メインコンテンツにスキップ

Casio F-91W Battery Replacement

必要な工具と部品

  1. Casio F-91W Battery Replacement, Battery: 手順 1、 1の画像 1
    • Place the watch with the digital display facing downward, revealing the back cover.

  2. Casio F-91W Battery Replacement: 手順 2、 3の画像 1 Casio F-91W Battery Replacement: 手順 2、 3の画像 2 Casio F-91W Battery Replacement: 手順 2、 3の画像 3
    • Using a small Phillips head screwdriver, remove the four screws connecting the case back to the watch case.

    • Place the screws in a small bag or container for safekeeping while you replace the battery.

    • Be especially careful while removing the screws to avoid dropping any.

    • Gently remove the case back and set aside.

  3. Casio F-91W Battery Replacement: 手順 3、 1の画像 1
    この手順で使用する道具:
    Tweezers
    $4.99
    購入する
    • Use a pair of tweezers to gently remove the gasket from the bevel surrounding the watch movement.

    • You may want to take a picture of the position of the gasket prior to removing it to help you remember the gasket orientation.

  4. Casio F-91W Battery Replacement: 手順 4、 2の画像 1 Casio F-91W Battery Replacement: 手順 4、 2の画像 2
    • Gently pry the watch movement out of the case from the upper right corner. Use as little force as possible.

    • Once you have pried the watch movement up slightly from the case, you can gently remove it with your fingers.

    • Now that you are touching the internals of the watch, you should use finger cots or gloves (if possible) to keep the movement clean and avoid rust.

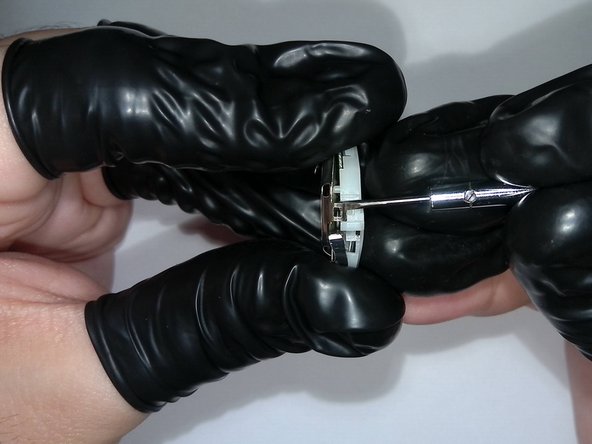
  5. Casio F-91W Battery Replacement: 手順 5、 2の画像 1 Casio F-91W Battery Replacement: 手順 5、 2の画像 2
    • Gently disengage the hinges holding the battery cover onto the rest of the watch movement.

    • There are four hinges to disengage—two on each side of the movement. Make sure you disengage all four before attempting to remove the battery cover to avoid damaging the movement.

  6. Casio F-91W Battery Replacement: 手順 6、 2の画像 1 Casio F-91W Battery Replacement: 手順 6、 2の画像 2
    • Remove the battery cover and set aside, exposing the drained battery.

    • Make sure to note the orientation of the battery. If you do not replace the battery in the correct orientation, the watch will not receive power.

  7. Casio F-91W Battery Replacement: 手順 7、 3の画像 1 Casio F-91W Battery Replacement: 手順 7、 3の画像 2 Casio F-91W Battery Replacement: 手順 7、 3の画像 3
    • Gently remove the old battery and replace it with the new battery.

    • If you have not replaced the battery in your Casio F-91W before, the battery may be secured with a small piece of black adhesive (visible on the left side of PCB in the second picture).

    • Make sure the replacement battery rests securely between the four white plastic posts circled in the third picture.

終わりに

To reassemble your device, follow these instructions in reverse order.

2 の人々がこのガイドを完成させました。

作成者

2人の作成者と共同で作成されました。

Ryan Hill

メンバー登録日: 03/05/23

199 ポイント

1ガイドが承認済み

チーム

University of North Texas, Team 2-1, Raign Spring 2023 University of North Texas, Team 2-1, Raign Spring 2023人のメンバー

UNT-RAIGN-S23S2G1

2 メンバー

3のガイドは作成済み

コメント 1 件

Fantastic guide, thank you! On reassembling I did find I had trouble getting the watch movement back in the case. This was because the buttons were catching on the button arms. To solve it I used a flat head to push the buttons out, from the inside, as far as they would go and with a bit of persuassion it all went back in. Thanks again :-)

Doug - 返信

コメントを追加

統計データ:

過去 24時間: 29

過去 7 日: 168

過去 30 日: 809

今までの合計 6,923