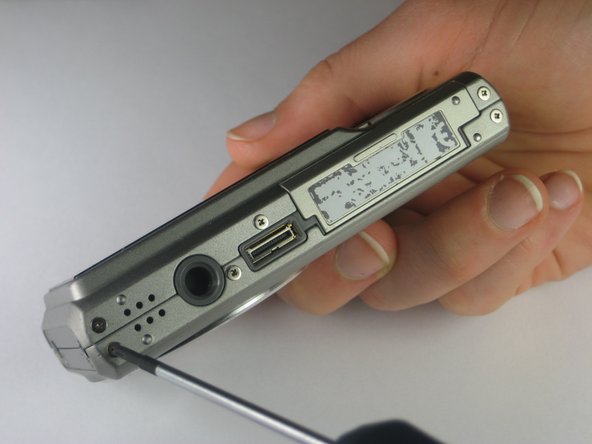
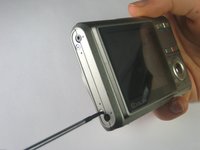
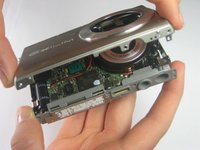
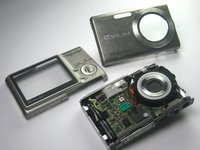
メインコンテンツにスキップ

Casio Exilim EX-Z70 Camera Casing Replacement

必要な工具と部品

  1. Casio Exilim EX-Z70 Camera Casing Replacement, Camera Casing: 手順 1、 3の画像 1 Casio Exilim EX-Z70 Camera Casing Replacement, Camera Casing: 手順 1、 3の画像 2 Casio Exilim EX-Z70 Camera Casing Replacement, Camera Casing: 手順 1、 3の画像 3
    • Remove the strap from the camera by pulling the thin cord out, creating a small loop, then pushing the thicker cord back through this loop.

  2. Casio Exilim EX-Z70 Camera Casing Replacement: 手順 2、 3の画像 1 Casio Exilim EX-Z70 Camera Casing Replacement: 手順 2、 3の画像 2 Casio Exilim EX-Z70 Camera Casing Replacement: 手順 2、 3の画像 3
    • Remove the two Phillips screws (2.83 mm) from the left side panel of the camera casing.

    • The left panel can now be removed. However, one piece of tape attaches it to the camera, so a spudger may be required to ease the panels off.

    • Repeat for the right side panel of the camera.

    • Keep track of which screws go where. There are a couple sets of screws to take out and they are all small and look the same.

  3. Casio Exilim EX-Z70 Camera Casing Replacement: 手順 3、 3の画像 1 Casio Exilim EX-Z70 Camera Casing Replacement: 手順 3、 3の画像 2 Casio Exilim EX-Z70 Camera Casing Replacement: 手順 3、 3の画像 3
    • Remove the six Phillips screws (3.69 mm) from the bottom of the camera casing.

  4. Casio Exilim EX-Z70 Camera Casing Replacement: 手順 4、 3の画像 1 Casio Exilim EX-Z70 Camera Casing Replacement: 手順 4、 3の画像 2 Casio Exilim EX-Z70 Camera Casing Replacement: 手順 4、 3の画像 3
    • Remove the two Phillips screws (2.79 mm) on the left side of the camera where the metal panel used to be.

    • Repeat for the two Phillips screws (2.79 mm) right side of the camera.

  5. Casio Exilim EX-Z70 Camera Casing Replacement: 手順 5、 2の画像 1 Casio Exilim EX-Z70 Camera Casing Replacement: 手順 5、 2の画像 2
    • With the LCD screen facing up towards you, start at the bottom of the camera and gently pull off the back of the casing.

  6. Casio Exilim EX-Z70 Camera Casing Replacement: 手順 6、 3の画像 1 Casio Exilim EX-Z70 Camera Casing Replacement: 手順 6、 3の画像 2 Casio Exilim EX-Z70 Camera Casing Replacement: 手順 6、 3の画像 3
    • With the front side (with the lens) facing up towards you, start at the bottom of the camera and gently pull off the front of the casing.

    • The nob that previously held the camera strap will no longer be attached to the camera once you remove the camera casing. When putting the camera back together, remember to put the nob back into position before replacing the casing.

  7. Casio Exilim EX-Z70 Camera Casing Replacement: 手順 7、 2の画像 1 Casio Exilim EX-Z70 Camera Casing Replacement: 手順 7、 2の画像 2
    • Slide the labeled piece toward the LCD screen and release.

    • The tab will spring open.

  8. Casio Exilim EX-Z70 Camera Casing Replacement: 手順 8、 2の画像 1 Casio Exilim EX-Z70 Camera Casing Replacement: 手順 8、 2の画像 2
    • Look at the bottom of the camera. Take out the Phillips screw (1.77 mm) holding on the bottom plastic piece.

    • The bottom plastic piece is held on to the main frame of the camera only by two thin wires.

終わりに

To reassemble your device, follow these instructions in reverse order.

2 の人々がこのガイドを完成させました。

作成者

5人の作成者と共同で作成されました。

Paul Fallon

メンバー登録日: 04/10/12

141 ポイント

6のガイドは作成済み

チーム

Cal Poly, Team 17-28, Amido Spring 2012 Cal Poly, Team 17-28, Amido Spring 2012人のメンバー

CPSU-AMIDO-S12S17G28

4 メンバー

14のガイドは作成済み

0 件のコメント

コメントを追加

統計データ:

過去 24時間: 1

過去 7 日: 3

過去 30 日: 6

今までの合計 961