はじめに
Part one of many for a complete repair for the Casio CFX- 200 and CFX 20 Scientific watch
必要な工具と部品
-
-
This the the Casio CFX 200 Scientific Calculator watch. Recognised as the Uber geek watch. Feel free to look it up anywhere on the web. Nobody has a guide or any repair parts that I can find- and I looked really hard for one.
-
This is the first guide for how to open the back and replace the battery.
-
-
-
These watches are old if you can find one Odds are it is a survivor and has been through a lot in the last 38 years since it was introduced in 1983. This is a common issue shown- partially not working lcd.
-
the CFX-200 are a base metal with a chrome plating. There is a cfx-20 made out of resin as well. They are NOT water resistant at all.
-
-
-
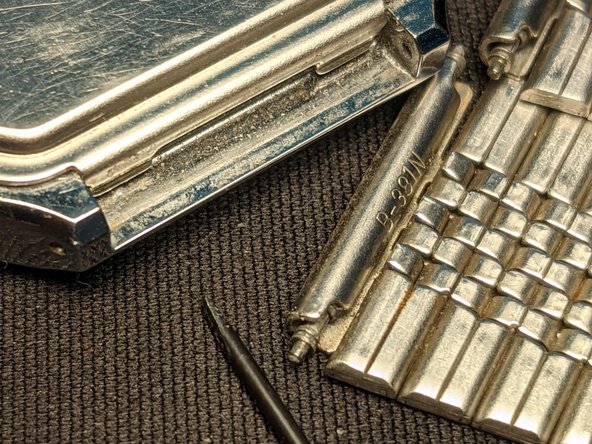
There are standard 20mm pins on the case. Using the Mini flatblade screwdriver (ifixit has a nice one for sale- shameless plug) Carefully pop the pins out by moving one towards the center of the pin and then ease the band out. Both sides of the band are removed to allow proper access to the case back.
-
The case also has holes on the ends if you want to use a paperclip to remove the pins.
-
Before you open the case be sure your hands are washed and your work area is clean. Grease and other stuff inside a watch is not good. Nitrile or cotton gloves are recommended as that is what professionals use and it looks cool too.
-
-
-
-
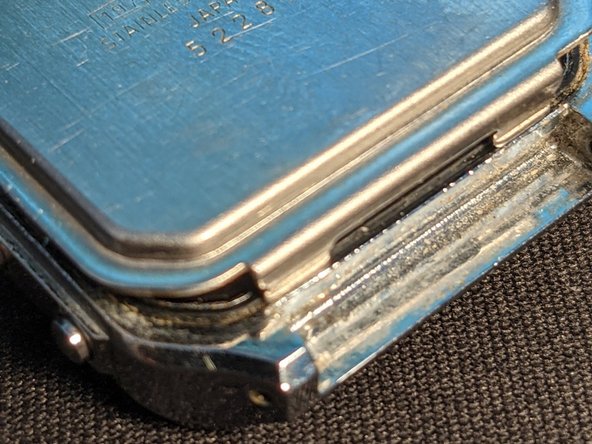
Next SLOWLY pry the case back up using the slot. DO NOT rest the ifixit pry tool on the case to pry upwards as it may break the case. The case back will fly off and the small speaker spring will disappear forever if you use too much force. Trust me. You do not want to use the thump method for trying to find this very tiny spring.
-
The spring is usually held in place with a small extension to the end of the spring and will not normally fall out. If this is not the original spring or it has been improperly inserted it may disappear- make note of this.
-
-
-
The first pic is of a good example with the CR2016 lithium battery installed. Notice the greasy fingerprints. Wash yer hands and wear gloves ya filthy animal! Extra grime from dirty hands and a dirty work area is not very professional and makes extra work. Delicate electronics and your mother agree.
-
If you are extremely lucky the watch is in good shape and does not have a lot of foreign garbage inside. If the module inside is corroded or has signs of corrosion a battery replacement is not recommended until the module has been thoroughly inspected. I will be doing more guides for this watch.
-
-
-
the Battery is held in place by a bracket. ONE side of the bracket has a tab. Carefully insert either a small screwdriver or a needle to release the tab.
-
The tabs are plastic and are easily damaged if you use too much force or insert the bracket incorrectly. Take your time- this is a delicate old piece of technology that has no replacement parts available.
-
-
-
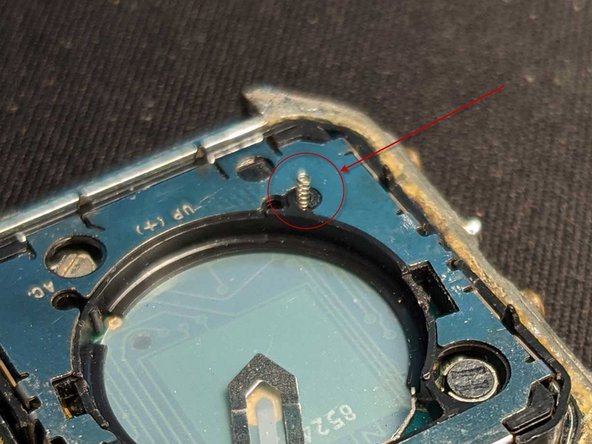
Once you have installed a new lithium battery and carefully clipped it into place with the bracket (make sure it is the right way around) use a pin or fixya micro tweezers to short the little contact in the hole marked AC with the case back that is metal.
-
This is one of those strange times when you NEED a conductive needle or tweezers to do it right. You will no it worked if the display resets to 12:00
-
The AC reset needs to be done or the module may doing a weird display. Even if it looks correct do the AC reset anyway just to be sure.
-
-
-
If the little speaker spring is not there you need to find and install it- it is a tricky little thing and will easily disappear. Trust me.
-
If you need to clean up the back of the case and cover and search fruitlessly for a replacement gasket you will have to go to the next guide for checking the module and fixing common issues.
-
Re assemble the back cover. You can just pop it back on and make sure it seats properly. If all you need to do was install a new battery to get it working congrats you are done!
-


ある他の人がこのガイドを完成しました。