メインコンテンツにスキップ

Canon Selphy CP1200 Cooling Fan Replacement

必要な工具と部品

  1. Canon Selphy CP1200 Cooling Fan Replacement, LCD/Buttons: 手順 1、 1の画像 1
    • Unscrew the four 6mm PH000 corner screws.

    • This will require a screwdriver with a long, narrow shaft.

  2. Canon Selphy CP1200 Cooling Fan Replacement: 手順 2、 1の画像 1
    • Unscrew the three 4mm PH1 screws on the bottom of the printer.

  3. Canon Selphy CP1200 Cooling Fan Replacement: 手順 3、 1の画像 1
    • Gently pry open the top of the case from either the front or back.

    • A plastic opening tool may help.

    • Be careful in lifting the top assembly as it is attached to the motherboard at this point.

  4. Canon Selphy CP1200 Cooling Fan Replacement: 手順 4、 1の画像 1
    • Keeping the top assembly elevated, detach the ribbon cables connecting the LCD and buttons to the motherboard from the motherboard.

    • Tweezers may be useful given the limited space between the top assembly and motherboard.

    • The top assembly, containing both the LCD and buttons, will now be completely free

    I have one but the lcd have Been broken can you give me the number of the lcd please

    Mrgames-kw - 返信

  5. Canon Selphy CP1200 Cooling Fan Replacement, Motherboard: 手順 5、 1の画像 1
    • Detach the fan cable from the motherboard.

  6. Canon Selphy CP1200 Cooling Fan Replacement: 手順 6、 1の画像 1
    • Detach the ribbon cable leading to the DC in port and battery leads.

    • Tweezers may be useful.

  7. Canon Selphy CP1200 Cooling Fan Replacement: 手順 7、 1の画像 1
    • Unscrew the three 3mm PH000 screws from the motherboard.

    As at this point the whole printmechanism-motherboard assembly is already loose in the case, you can also consider taking out the whole thing completely before removing these screws. It is much easier to remove the cables at the bottom when you have a bit more space. You have to bend the plastic case a bit so the USB ports are free, but other than that you should have not have a problem.

    (do step 10 first though, if possible)

    Joffrey Wallaart - 返信

  8. Canon Selphy CP1200 Cooling Fan Replacement: 手順 8、 1の画像 1
    • Disconnect the bundled cables leading to the printing mechanism.

  9. Canon Selphy CP1200 Cooling Fan Replacement: 手順 9、 1の画像 1
    • Gently lift the motherboard and detach the ribbon cables leading to the print mechanism.

    • Tweezers may be useful due to the limited amount of space.

  10. Canon Selphy CP1200 Cooling Fan Replacement, Print Mechanism: 手順 10、 2の画像 1 Canon Selphy CP1200 Cooling Fan Replacement, Print Mechanism: 手順 10、 2の画像 2
    • Open the side door and depress the ink cassette release.

    • Slide out and remove the ink cassette.

  11. Canon Selphy CP1200 Cooling Fan Replacement: 手順 11、 1の画像 1
    • Unscrew the three 3mm PH000 screws securing the metal plate to the printing mechanism.

  12. Canon Selphy CP1200 Cooling Fan Replacement: 手順 12、 1の画像 1
    • Lift out the print mechanism of the printer case.

    Where to buy print mathematical mechanism part…please help…sir

    sunil maurya - 返信

    When I re-assembled the printer, I found it easier to assemble the motherboard and printing unit outside of the case and then putting that assembly back in the case in one go. This gives a lot more room to reinsert the flat cables. (my unit was a CP1300 though, but I think they are identical)

    Other than that, great guide. Thanks for posting!

    Joffrey Wallaart - 返信

  13. Canon Selphy CP1200 Cooling Fan Replacement, Cooling Fan: 手順 13、 1の画像 1
    • Lift out the back case plate.

  14. Canon Selphy CP1200 Cooling Fan Replacement: 手順 14、 2の画像 1 Canon Selphy CP1200 Cooling Fan Replacement: 手順 14、 2の画像 2
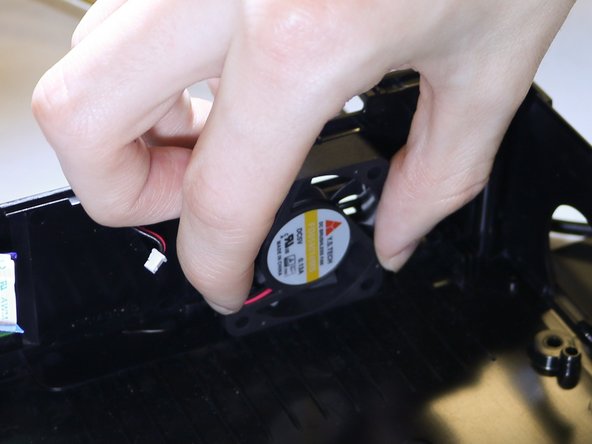
    • Remove the fan by tilting it forward slightly and then lifting upwards.

終わりに

To reassemble your device, follow these instructions in reverse order.

ある他の人がこのガイドを完成しました。

作成者

2人の作成者と共同で作成されました。

W Sherer

メンバー登録日: 01/16/19

635 ポイント

5のガイドは作成済み

チーム

コメント 1 件

Where can I get a new cooling fan for Selphy 1200

Roy johannessen - 返信

コメントを追加

統計データ:

過去 24時間: 0

過去 7 日: 0

過去 30 日: 1

今までの合計 284