メインコンテンツにスキップ

Canon Powershot Pro1 LCD Screen Replacement

必要な工具と部品

  1. Canon Powershot Pro1 LCD Screen Replacement, Battery: 手順 1、 1の画像 1
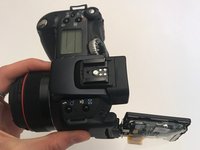
    • Locate the battery compartment cover on the right hand side of the camera. The cover features the text: “CF/BATT.OPEN”.

  2. Canon Powershot Pro1 LCD Screen Replacement: 手順 2、 1の画像 1
    • There is an arrow beside the text. Using your hands, slide the cover in the direction of this arrow.

  3. Canon Powershot Pro1 LCD Screen Replacement: 手順 3、 1の画像 1
    • Pull the cover toward you. After doing so you will see the battery sitting inside the compartment.

  4. Canon Powershot Pro1 LCD Screen Replacement: 手順 4、 1の画像 1
    • Press the orange battery lock inside the compartment.

    • Remove the battery.

    • This photo show the battery compartment after the battery has been removed.

  5. Canon Powershot Pro1 LCD Screen Replacement, LCD screen: 手順 5、 1の画像 1
    • Open up the LCD screen.

  6. Canon Powershot Pro1 LCD Screen Replacement: 手順 6、 2の画像 1 Canon Powershot Pro1 LCD Screen Replacement: 手順 6、 2の画像 2
    • Remove the 1.2 mm Phillips #0 screws on the left and right side of the LCD.

    • Using the Phillips #000 screwdriver, remove the screws on the right (you need to rotate the screen to access the screws on the right, and you will see one on each corner).

  7. Canon Powershot Pro1 LCD Screen Replacement: 手順 7、 1の画像 1
    • Remove the back cover of the LCD screen (has “Canon” written on it).

  8. Canon Powershot Pro1 LCD Screen Replacement: 手順 8、 3の画像 1 Canon Powershot Pro1 LCD Screen Replacement: 手順 8、 3の画像 2 Canon Powershot Pro1 LCD Screen Replacement: 手順 8、 3の画像 3
    • Now you will see an exposed circuit board and the backside of the LCD.

    • Fold back the plastic covering and remove the highlighted ribbon cables with tweezers.

  9. Canon Powershot Pro1 LCD Screen Replacement: 手順 9、 1の画像 1
    • Using the nylon spudger, pry the LCD off the screen cover.

    • You can now separate the LCD from the camera.

    • Don't use a metal spudger as this could cause damage to the device.

終わりに

To reassemble your device, follow these instructions in reverse order.

作成者

2人の作成者と共同で作成されました。

Seana Meegan

メンバー登録日: 09/06/19

662 ポイント

5のガイドは作成済み

チーム

University of Alabama, Team S1-G1, Bedsole Fall 2019 University of Alabama, Team S1-G1, Bedsole Fall 2019人のメンバー

UA-BEDSOLE-F19S1G1

3 メンバー

10のガイドは作成済み

0 件のコメント

コメントを追加

統計データ:

過去 24時間: 0

過去 7 日: 0

過去 30 日: 6

今までの合計 738