メインコンテンツにスキップ

Canon Powershot ELPH 100 HS Outer Case Replacement

必要な工具と部品

  1. Canon Powershot ELPH 100 HS Outer Case Replacement, Outer Case: 手順 1、 1の画像 1
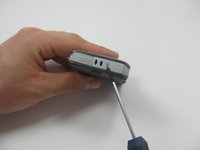
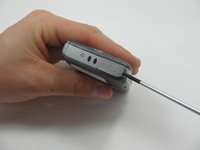
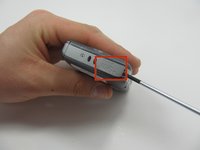
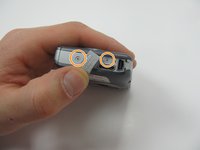
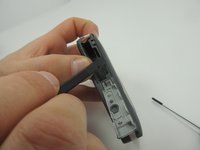
    • Using the Phillips #00 screwdriver, remove the two 3.1mm screws from the bottom of the camera.

    • Keep track of all the screws that are being taken out from the outer case.

    • The display screen of the camera should be facing towards you.

  2. Canon Powershot ELPH 100 HS Outer Case Replacement: 手順 2、 1の画像 1
    • Ensure that the screen is facing you, and then rotate it till you see the screws on the side of the camera.

    • Use the Phillips #00 screwdriver to remove the two 3.1 mm screws.

  3. Canon Powershot ELPH 100 HS Outer Case Replacement: 手順 3、 2の画像 1 Canon Powershot ELPH 100 HS Outer Case Replacement: 手順 3、 2の画像 2
    • With the screen still facing you, rotate the camera 180 degrees.

    • The side with the charging port should now be facing up.

  4. Canon Powershot ELPH 100 HS Outer Case Replacement: 手順 4、 2の画像 1 Canon Powershot ELPH 100 HS Outer Case Replacement: 手順 4、 2の画像 2
    • Use the Philips #00 screwdriver to pry open the charging port cover.

    • Once you pry open the charging port cover, rotate the cover so that you have access to the screw underneath. Which is seen in the next image.

    • Remove both 3.1 mm screws using the Phillips #00 screwdriver.

    • The image still shows the screw from step 3 in place.

  5. Canon Powershot ELPH 100 HS Outer Case Replacement: 手順 5、 2の画像 1 Canon Powershot ELPH 100 HS Outer Case Replacement: 手順 5、 2の画像 2
    • Turn the camera so the bottom is once again facing up.

    • With the battery door still open, use a spudger to remove the cover from the front of the camera.

    • Carefully go around all of the edges until the cover is released.

  6. Canon Powershot ELPH 100 HS Outer Case Replacement: 手順 6、 1の画像 1
    • Once the entire front cover has been released carefully pull it off.

    • Be careful not to break the tabs that hold it in place.

  7. Canon Powershot ELPH 100 HS Outer Case Replacement: 手順 7、 3の画像 1 Canon Powershot ELPH 100 HS Outer Case Replacement: 手順 7、 3の画像 2 Canon Powershot ELPH 100 HS Outer Case Replacement: 手順 7、 3の画像 3
    • Just like Step 4-6 , carefully use the Spudger to remove the back cover.

    • Go along all the borders of the back cover so that it releases from the camera safely.

    • Be careful not to break the tabs.

終わりに

To reassemble your device, follow these instructions in reverse order.

6 の人々がこのガイドを完成させました。

作成者

8人の作成者と共同で作成されました。

Jacob

メンバー登録日: 03/17/15

570 ポイント

3のガイドは作成済み

チーム

Michigan Tech, Team 1-10, Lauer Spring 2015 Michigan Tech, Team 1-10, Lauer Spring 2015人のメンバー

MTU-LAUER-S15S1G10

2 メンバー

5のガイドは作成済み

0 件のコメント

コメントを追加

統計データ:

過去 24時間: 0

過去 7 日: 5

過去 30 日: 20

今までの合計 1,620