メインコンテンツにスキップ

Canon Powershot A3300 IS Motherboard Replacement

必要な工具と部品

  1. Canon Powershot A3300 IS Motherboard Replacement, Back Cover: 手順 1、 3の画像 1 Canon Powershot A3300 IS Motherboard Replacement, Back Cover: 手順 1、 3の画像 2 Canon Powershot A3300 IS Motherboard Replacement, Back Cover: 手順 1、 3の画像 3
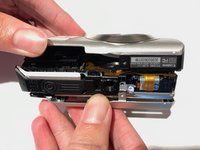
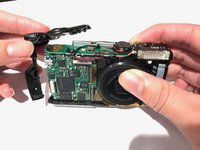
    • Remove four 2.7 mm screws, two on each side, from the camera with a JIS 000 screwdriver.

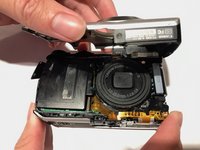
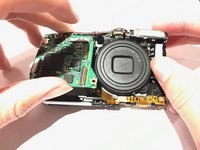
    • Remove one 3.5 mm screw on the bottom of the camera with a JIS 000 screwdriver.

    • When removing the front and back housings, be careful to not break the tabs that hook into the top section of the chassis.

  2. Canon Powershot A3300 IS Motherboard Replacement: 手順 2、 2の画像 1 Canon Powershot A3300 IS Motherboard Replacement: 手順 2、 2の画像 2
    • Pull off the back cover.

  3. Canon Powershot A3300 IS Motherboard Replacement, Front Cover: 手順 3、 2の画像 1 Canon Powershot A3300 IS Motherboard Replacement, Front Cover: 手順 3、 2の画像 2
    • Pull the front cover off.

  4. Canon Powershot A3300 IS Motherboard Replacement, Motherboard: 手順 4、 2の画像 1 Canon Powershot A3300 IS Motherboard Replacement, Motherboard: 手順 4、 2の画像 2
    • Remove the black cover to expose the motherboard.

  5. Canon Powershot A3300 IS Motherboard Replacement: 手順 5、 2の画像 1 Canon Powershot A3300 IS Motherboard Replacement: 手順 5、 2の画像 2
    • Remove the shutter button located at the top left of the camera.

    • This will expose the screws that need to be removed.

  6. Canon Powershot A3300 IS Motherboard Replacement: 手順 6、 1の画像 1
    • Using a JIS 000 screwdriver, remove the 1.2mm screw at the top left of the motherboard.

  7. Canon Powershot A3300 IS Motherboard Replacement: 手順 7、 1の画像 1
    • Remove the 1.6mm screw at the top of the camera.

  8. Canon Powershot A3300 IS Motherboard Replacement: 手順 8、 1の画像 1
    この手順で使用する道具:
    Tweezers
    $4.99
    購入する
    • Use tweezers to pull out brown flat flexible wires from their connection.

    • Remember to gently wiggle the wires from the connection since they are very fragile connectors.

  9. Canon Powershot A3300 IS Motherboard Replacement: 手順 9、 1の画像 1
    • Remove the last 1.2mm screw to pull out the motherboard.

    • The motherboard should freely separate from the housing.

  10. Canon Powershot A3300 IS Motherboard Replacement: 手順 10、 3の画像 1 Canon Powershot A3300 IS Motherboard Replacement: 手順 10、 3の画像 2 Canon Powershot A3300 IS Motherboard Replacement: 手順 10、 3の画像 3
    • Remove motherboard and replace with a new one.

終わりに

To reassemble your device, follow these instructions in reverse order.

作成者

4人の作成者と共同で作成されました。

Phillip Chen

メンバー登録日: 10/17/17

440 ポイント

4のガイドは作成済み

チーム

UC Santa Barbara, Team S2-G7, Weedon Fall 2017 UC Santa Barbara, Team S2-G7, Weedon Fall 2017人のメンバー

UCSB-WEEDON-F17S2G7

4 メンバー

10のガイドは作成済み

0 件のコメント

コメントを追加

統計データ:

過去 24時間: 6

過去 7 日: 11

過去 30 日: 30

今までの合計 470