メインコンテンツにスキップ

Canon PowerShot SX260 HS Motherboard Replacement

必要な工具と部品

  1. Canon PowerShot SX260 HS Motherboard Replacement, Motherboard: 手順 1、 3の画像 1 Canon PowerShot SX260 HS Motherboard Replacement, Motherboard: 手順 1、 3の画像 2 Canon PowerShot SX260 HS Motherboard Replacement, Motherboard: 手順 1、 3の画像 3
    • *Be sure to always remove the battery from the camera before disassembling to avoid permanent damage.

    • There are a total of 6 (3mm) external screws that will need to be removed; 2 on the left side, 2 on the bottom, and 2 on the right side.

    • 1.) Remove the 2 screws on the left side

    • 2.) Remove the 2 screws on the bottom of the camera.

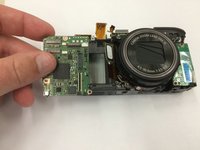
    • 3.) Remove the 2 screws on the right side of the camera.

  2. Canon PowerShot SX260 HS Motherboard Replacement: 手順 2、 1の画像 1
    • Use spludger tool or small flathead screw driver to gently lift and remove back face plate.

  3. Canon PowerShot SX260 HS Motherboard Replacement: 手順 3、 1の画像 1
    • After removing exterior screws, gently lift off the front face plate.

  4. Canon PowerShot SX260 HS Motherboard Replacement: 手順 4、 1の画像 1
    • After removing the front faceplate you will find 4 (3mm) screws on the interior.

    • Remove all 4 interior screws.

  5. Canon PowerShot SX260 HS Motherboard Replacement: 手順 5、 1の画像 1
    • Remove 1 (6 mm) Screw from the bottom of the silver metal plate. The screw is also silver

  6. Canon PowerShot SX260 HS Motherboard Replacement: 手順 6、 1の画像 1
    • With blue spludger tool gently lift the metal plate from the face of the camera.

    • The plate is held by a piece of double sided tape so there will be a bit of resistance.

  7. Canon PowerShot SX260 HS Motherboard Replacement: 手順 7、 1の画像 1
    • Remove 3 (3 mm) screws from the top surface of the motherboard.

    • You will notice that there is one on the top, and 2 on the bottom in a triangular shape.

  8. Canon PowerShot SX260 HS Motherboard Replacement: 手順 8、 1の画像 1
    • Gently remove the ribbon cable from the top of the motherboard with a pair of tweezers.

    • Be careful during this step not to rip or tear the cable.

  9. Canon PowerShot SX260 HS Motherboard Replacement: 手順 9、 1の画像 1
    • Use the blue spludger tool to gently unplug the last ribbon cable that is attached to the motherboard.

  10. Canon PowerShot SX260 HS Motherboard Replacement: 手順 10、 2の画像 1 Canon PowerShot SX260 HS Motherboard Replacement: 手順 10、 2の画像 2
    • Remove the motherboard with your fingers.

終わりに

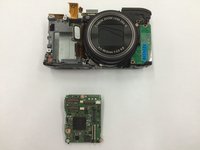
To reassemble your device, follow these instructions in reverse order.

3 の人々がこのガイドを完成させました。

作成者

3人の作成者と共同で作成されました。

Tyler Kelch

メンバー登録日: 03/05/15

622 ポイント

4のガイドは作成済み

チーム

Sam Houston State, Team 11-8, Blackburne Winter 2015 Sam Houston State, Team 11-8, Blackburne Winter 2015人のメンバー

SHSU-BLACKBURNE-W15S11G8

2 メンバー

4のガイドは作成済み

2 件のコメント

Where is the internal clock/calendar battery located?

GPa Rocks - 返信

Internal clock battery is under circuit board on right side of lens as seen in photo for Step 9. See 2:48 - 3:19 in this video: https://www.youtube.com/watch?v=Awmm6hDm....

Paul Unger - 返信

コメントを追加

統計データ:

過去 24時間: 0

過去 7 日: 6

過去 30 日: 17

今までの合計 2,092