メインコンテンツにスキップ

Canon PowerShot SX160 IS LCD Replacement

必要な工具と部品

  1. Canon PowerShot SX160 IS LCD Replacement, LCD: 手順 1、 3の画像 1 Canon PowerShot SX160 IS LCD Replacement, LCD: 手順 1、 3の画像 2 Canon PowerShot SX160 IS LCD Replacement, LCD: 手順 1、 3の画像 3
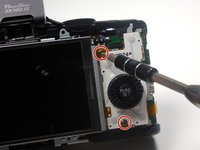
    • Unscrew the 2-4.8mm black screws from the front of the camera using a #0 Phillips head screw driver.

    • Unscrew the 2-4.8mm black screws from the side of the camera using a #0 Phillips head screw driver.

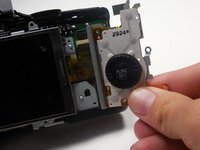
    • Unscrew the 3-4.8mm black screws from the bottom of the camera using a #0 Phillips head screw driver.

  2. Canon PowerShot SX160 IS LCD Replacement: 手順 2、 2の画像 1 Canon PowerShot SX160 IS LCD Replacement: 手順 2、 2の画像 2
    • Use your hand to gently separate the back panel from the camera.

    • Continue to pull the panel until it becomes completely detached from the camera.

  3. Canon PowerShot SX160 IS LCD Replacement: 手順 3、 2の画像 1 Canon PowerShot SX160 IS LCD Replacement: 手順 3、 2の画像 2
    • Unscrew the 3-3.75mm silver screws from the function wheel panel of the camera using a #0 Phillips head screw driver.

    • Remove the function wheel panel from the camera and set aside.

  4. Canon PowerShot SX160 IS LCD Replacement: 手順 4、 1の画像 1
    • Unlatch the LCD ribbon connector from the camera by gently lifting up on the ribbon while pulling away from the camera.

    • Be extra cautious not to tear the ribbon.

  5. Canon PowerShot SX160 IS LCD Replacement: 手順 5、 1の画像 1
    • Using your hand, pull the LCD screen away from the camera and replace.

終わりに

Congratulations, you have successfully replaced your LCD screen. To reassemble your device, follow these instructions in reverse order.

2 の人々がこのガイドを完成させました。

作成者

1人の作成者と共同作成されました。

Jamie Secretan

メンバー登録日: 03/11/15

1,962 ポイント

6のガイドは作成済み

チーム

Colorado Springs, Team 2-3, Panko Spring 2015 Colorado Springs, Team 2-3, Panko Spring 2015人のメンバー

UCCS-PANKO-S15S2G3

3 メンバー

6のガイドは作成済み

0 件のコメント

コメントを追加

統計データ:

過去 24時間: 0

過去 7 日: 1

過去 30 日: 6

今までの合計 1,384