メインコンテンツにスキップ

Canon PowerShot SD850 IS Function Set Button Replacement

必要な工具と部品

  1. Canon PowerShot SD850 IS Function Set Button Replacement, Battery: 手順 1、 3の画像 1 Canon PowerShot SD850 IS Function Set Button Replacement, Battery: 手順 1、 3の画像 2 Canon PowerShot SD850 IS Function Set Button Replacement, Battery: 手順 1、 3の画像 3
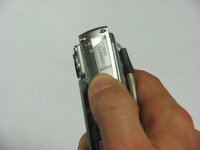
    • Slide the light grey tab toward the edge of the camera using your fingernail.

    • Pull the light grey tab up to open the door.

    • These photos do not show the camera’s memory card or battery, which should be visible inside.

  2. Canon PowerShot SD850 IS Function Set Button Replacement: 手順 2、 2の画像 1 Canon PowerShot SD850 IS Function Set Button Replacement: 手順 2、 2の画像 2
    • Slide the small brown tab toward the edge of the camera using your fingernail.

    • Let go of the brown tab when the battery pops up.

    • Grab battery and pull straight up to remove from holder.

    • When inserting the battery, orient it so that the terminals connect.

  3. Canon PowerShot SD850 IS Function Set Button Replacement, Case: 手順 3、 2の画像 1 Canon PowerShot SD850 IS Function Set Button Replacement, Case: 手順 3、 2の画像 2
    • Remove the following 4 screws:

    • Two 2.8 mm Phillips #00 at the bottom of the camera.

    • Two 2.75 mm Phillips #00 on the opposite side of the wrist strap.

  4. Canon PowerShot SD850 IS Function Set Button Replacement: 手順 4、 3の画像 1 Canon PowerShot SD850 IS Function Set Button Replacement: 手順 4、 3の画像 2 Canon PowerShot SD850 IS Function Set Button Replacement: 手順 4、 3の画像 3
    • Open the A/V OUT DIGITAL flap on the side of the wrist strap.

    • Remove the 2.75 mm Phillips #00 under the A/V OUT DIGITAL flap on the side of the wrist strap.

  5. Canon PowerShot SD850 IS Function Set Button Replacement: 手順 5、 2の画像 1 Canon PowerShot SD850 IS Function Set Button Replacement: 手順 5、 2の画像 2
    • On the bottom of the camera, use your fingernail to slide the light gray tab towards the edge of the camera.

    • Slide light gray door and pull up to open the door.

    • Remove the 8.35 mm Phillips #00 next to the brown tab that holds the battery.

  6. Canon PowerShot SD850 IS Function Set Button Replacement: 手順 6、 2の画像 1 Canon PowerShot SD850 IS Function Set Button Replacement: 手順 6、 2の画像 2
    • Gently pull the front cover straight out from the camera. This will expose the wiring on the front of the camera.

  7. Canon PowerShot SD850 IS Function Set Button Replacement: 手順 7、 1の画像 1
    • Remove the 2.75 mm Phillips #00 next to A/V OUT DIGITAL.

  8. Canon PowerShot SD850 IS Function Set Button Replacement: 手順 8、 1の画像 1
    • Slide the back casing (with the screen protector) off to reveal the LCD and back wiring.

  9. Canon PowerShot SD850 IS Function Set Button Replacement, Function Set Button: 手順 9、 2の画像 1 Canon PowerShot SD850 IS Function Set Button Replacement, Function Set Button: 手順 9、 2の画像 2
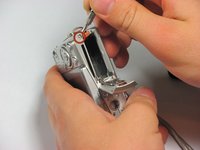
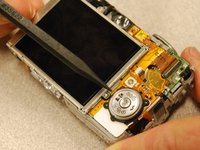
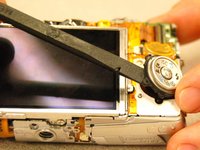
    • Identify and remove the plastic function set button. Do this by gently prying up as indicated in the photo.

  10. Canon PowerShot SD850 IS Function Set Button Replacement: 手順 10、 1の画像 1
    • Lift the function set button ribbon cable from the two guide pins.

  11. Canon PowerShot SD850 IS Function Set Button Replacement: 手順 11、 1の画像 1
    • Remove the ribbon cable by lifting on the flat tab and pulling the ribbon cable from the connection.

終わりに

To reassemble your device, follow these instructions in reverse order.

作成者

6人の作成者と共同で作成されました。

iDeleted

メンバー登録日: 07/07/10

2,101 ポイント

39のガイドは作成済み

0 件のコメント

コメントを追加

統計データ:

過去 24時間: 0

過去 7 日: 0

過去 30 日: 0

今までの合計 1,148