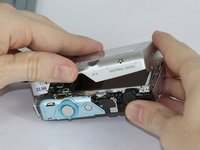
メインコンテンツにスキップ

Canon PowerShot SD1200 IS LCD Replacement

必要な工具と部品

  1. Canon PowerShot SD1200 IS LCD Replacement, Front and Rear Covers: 手順 1、 1の画像 1
    • Remove the battery.

  2. Canon PowerShot SD1200 IS LCD Replacement: 手順 2、 3の画像 1 Canon PowerShot SD1200 IS LCD Replacement: 手順 2、 3の画像 2 Canon PowerShot SD1200 IS LCD Replacement: 手順 2、 3の画像 3
    • Remove the two screws from the side of the camera casing with the strap. (4mm Phillips 00)

    • Remove the two screws from the bottom of the camera. (4mm Phillips 00)

    • Remove the two screws from the right side of the camera opposite the strap. (2mm Phillips 00)

  3. Canon PowerShot SD1200 IS LCD Replacement: 手順 3、 2の画像 1 Canon PowerShot SD1200 IS LCD Replacement: 手順 3、 2の画像 2
    • Pull off the front cover.

    • If the top of the cover sticks, use gentle downward pressure on the retention clips above the lens to release.

    • Remove the back cover.

  4. Canon PowerShot SD1200 IS LCD Replacement, LCD: 手順 4、 3の画像 1 Canon PowerShot SD1200 IS LCD Replacement, LCD: 手順 4、 3の画像 2 Canon PowerShot SD1200 IS LCD Replacement, LCD: 手順 4、 3の画像 3
    この手順で使用する道具:
    Tweezers
    $4.99
    購入する
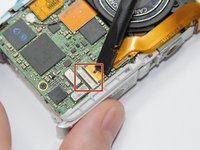
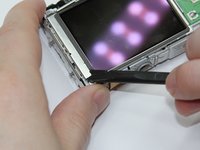
    • Use the spudger to lift the retaining flap on the Zero Insertion Force (ZIF) tab securing the thick ribbon cable.

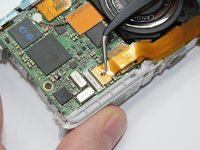
    • Slide out the ribbon cable using fingers or tweezers.

    • Be sure you are prying up on the hinged retaining flap, not the connector.

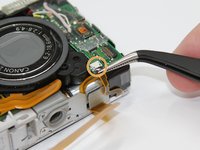
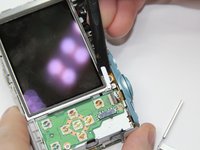
    • Using tweezers, disconnect the small ribbon cable below the flash assembly from the No Fuss Connector by simply pulling the ribbon cable straight out.

  5. Canon PowerShot SD1200 IS LCD Replacement: 手順 5、 3の画像 1 Canon PowerShot SD1200 IS LCD Replacement: 手順 5、 3の画像 2 Canon PowerShot SD1200 IS LCD Replacement: 手順 5、 3の画像 3
    • Remove the L shaped brackets from the left and right side of the LCD screen with the spudger tool.

    • The Brackets have tabs that need to be pried up.

    • Remove the screw below the shutter button. (2.5mm Phillips 00)

    • Holding the sides of the LCD screen, lift the screen up and away to remove.

終わりに

To reassemble your device, follow these instructions in reverse order.

ある他の人がこのガイドを完成しました。

作成者

5人の作成者と共同で作成されました。

Jeff Casper

メンバー登録日: 09/15/16

848 ポイント

7のガイドは作成済み

チーム

USF Tampa, Team 17-5, Blackwell Fall 2016 USF Tampa, Team 17-5, Blackwell Fall 2016人のメンバー

USFT-BLACKWELL-F16S17G5

3 メンバー

7のガイドは作成済み

コメント 1 件

Hello do you guys sello the LCD screen and do you ship to México.

Killer King - 返信

コメントを追加

統計データ:

過去 24時間: 0

過去 7 日: 3

過去 30 日: 6

今までの合計 553