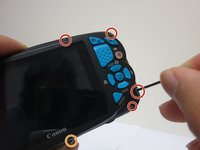
メインコンテンツにスキップ

Canon PowerShot D20 LCD Screen Replacement

必要な工具と部品

  1. Canon PowerShot D20 LCD Screen Replacement, LCD Screen: 手順 1、 2の画像 1 Canon PowerShot D20 LCD Screen Replacement, LCD Screen: 手順 1、 2の画像 2
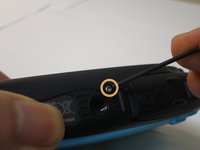
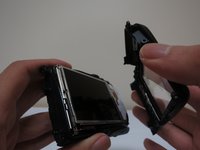
    • Open the cover on the bottom of the camera.

    • Remove the battery.

    • Remove the memory card.

  2. Canon PowerShot D20 LCD Screen Replacement: 手順 2、 3の画像 1 Canon PowerShot D20 LCD Screen Replacement: 手順 2、 3の画像 2 Canon PowerShot D20 LCD Screen Replacement: 手順 2、 3の画像 3
    • Using the 1.5mm hex screwdriver, remove the screws from the end cap.

    • Note the location of each screw. The top screw is about .4" long, while the bottom three are about .15".

    • Remove the end cap.

  3. Canon PowerShot D20 LCD Screen Replacement: 手順 3、 2の画像 1 Canon PowerShot D20 LCD Screen Replacement: 手順 3、 2の画像 2
    • Using the 1.5mm hex screwdriver, remove the four screws from the rear of the case.

    • Remove the screw from the bottom of the case.

    • The bottom screw and the top-right screw are both .15". The two bottom-right screws are both .4".

    • The top-middle screw is also .15" but has a different size thread and a blue mark.

  4. Canon PowerShot D20 LCD Screen Replacement: 手順 4、 3の画像 1 Canon PowerShot D20 LCD Screen Replacement: 手順 4、 3の画像 2 Canon PowerShot D20 LCD Screen Replacement: 手順 4、 3の画像 3
    • Using the Philips #00 screwdriver, remove the two screws on the left side of the case.

    • These two screws are .2"

    • Remove the rear of the case.

  5. Canon PowerShot D20 LCD Screen Replacement: 手順 5、 2の画像 1 Canon PowerShot D20 LCD Screen Replacement: 手順 5、 2の画像 2
    • Using the Phillips #00 screwdriver, remove the two screws holding the LCD screen in place.

    • These two screws are the smallest; they are less than .1" and have a small blue mark on the thread.

    • Remove the small metal bar holding in the LCD screen.

  6. Canon PowerShot D20 LCD Screen Replacement: 手順 6、 3の画像 1 Canon PowerShot D20 LCD Screen Replacement: 手順 6、 3の画像 2 Canon PowerShot D20 LCD Screen Replacement: 手順 6、 3の画像 3
    • Slide the spudger under the LCD screen and pry it off. Since the screen is glued down with adhesive, some effort may be required.

  7. Canon PowerShot D20 LCD Screen Replacement: 手順 7、 3の画像 1 Canon PowerShot D20 LCD Screen Replacement: 手順 7、 3の画像 2 Canon PowerShot D20 LCD Screen Replacement: 手順 7、 3の画像 3
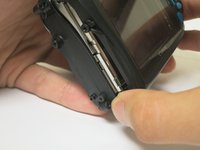
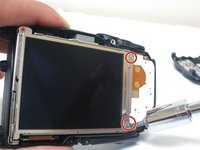
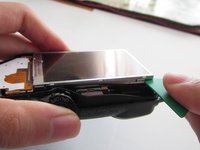
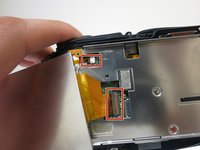
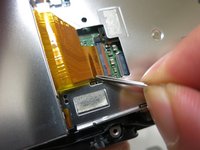
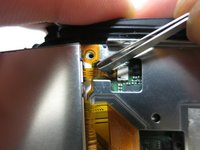
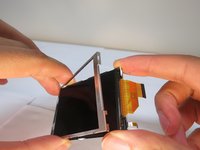
    • Gently disconnect the two ribbon wires from the camera. Use tweezers or a spudger to remove them.

    • To remove these cables, pull them straight out of their sockets.

    • When reassembling, be sure you plug these cables into the sockets fully. You will hear a faint click when they are fully in.

  8. Canon PowerShot D20 LCD Screen Replacement: 手順 8、 3の画像 1 Canon PowerShot D20 LCD Screen Replacement: 手順 8、 3の画像 2 Canon PowerShot D20 LCD Screen Replacement: 手順 8、 3の画像 3
    • If your replacement LCD screen comes in a metal case, skip this step.

    • Use a guitar pick or spudger to pry the front and back of the metal case off the LCD screen.

終わりに

To reassemble your device, follow these instructions in reverse order.

ある他の人がこのガイドを完成しました。

作成者

2人の作成者と共同で作成されました。

Alex Giannousis

メンバー登録日: 09/29/15

131 ポイント

1ガイドが承認済み

チーム

Cal Poly, Team 10-2, Green Fall 2015 Cal Poly, Team 10-2, Green Fall 2015人のメンバー

CPSU-GREEN-F15S10G2

3 メンバー

3のガイドは作成済み

2 件のコメント

I have the exact same camera with a busted optical part but has a good screen if anyone wants it. contact me on leporidae@outlook.com

plsambas - 返信

How do you take the shutter button part off ?

kasi walker - 返信

コメントを追加

統計データ:

過去 24時間: 3

過去 7 日: 5

過去 30 日: 14

今までの合計 2,143