メインコンテンツにスキップ

Canon PowerShot A620 Camera Housing Replacement

必要な工具と部品

  1. Canon PowerShot A620 Camera Housing Replacement, Open Battery Door: 手順 1、 3の画像 1 Canon PowerShot A620 Camera Housing Replacement, Open Battery Door: 手順 1、 3の画像 2 Canon PowerShot A620 Camera Housing Replacement, Open Battery Door: 手順 1、 3の画像 3
    • Slide the tab on the battery door while pushing the battery door away from you. The battery door should pop open.

  2. Canon PowerShot A620 Camera Housing Replacement, Insert Batteries: 手順 2、 2の画像 1 Canon PowerShot A620 Camera Housing Replacement, Insert Batteries: 手順 2、 2の画像 2
    • Insert AA batteries according to the diagram printed on the camera.

    • Close the battery door.

  3. Canon PowerShot A620 Camera Housing Replacement, Side Panel: 手順 3、 3の画像 1 Canon PowerShot A620 Camera Housing Replacement, Side Panel: 手順 3、 3の画像 2 Canon PowerShot A620 Camera Housing Replacement, Side Panel: 手順 3、 3の画像 3
    • Unscrew the three Phillips #00 1.6x3mm screws on the side.

    • Lift loose panel from the case.

    • Unscrew the two Phillips #00 1.6x3mm screws that were previously hidden beneath the panel.

  4. Canon PowerShot A620 Camera Housing Replacement, Bottom Panel: 手順 4、 1の画像 1
    • Unscrew the two Phillips #00 1.6x3mm screws on the bottom panel.

  5. Canon PowerShot A620 Camera Housing Replacement, Battery Compartment: 手順 5、 1の画像 1
    • Open the battery door.

    • Unscrew the four Phillips #00 1.6x3mm screws in the battery compartment.

  6. Canon PowerShot A620 Camera Housing Replacement, Terminal Cover: 手順 6、 2の画像 1 Canon PowerShot A620 Camera Housing Replacement, Terminal Cover: 手順 6、 2の画像 2
    • Lift the terminal cover on the side of the camera.

    • Unscrew the three Phillips #00 1.6x3mm screws beneath the terminal cover.

  7. Canon PowerShot A620 Camera Housing Replacement, Top Panel: 手順 7、 1の画像 1
    • Gently pull the top panel to separate it from the case.

    • Although the top panel will now be free from the rest of the case, it will still be attached to the camera by a ribbon cable.

  8. Canon PowerShot A620 Camera Housing Replacement, Front Panel: 手順 8、 2の画像 1 Canon PowerShot A620 Camera Housing Replacement, Front Panel: 手順 8、 2の画像 2
    • Gently pull the front panel to separate it from the camera.

    • The battery terminals are easy to access from this step.

  9. Canon PowerShot A620 Camera Housing Replacement, Terminal Cover: 手順 9、 2の画像 1 Canon PowerShot A620 Camera Housing Replacement, Terminal Cover: 手順 9、 2の画像 2
    • Gently pull the terminal cover to separate it from the camera.

  10. Canon PowerShot A620 Camera Housing Replacement, Memory Card Cover: 手順 10、 2の画像 1 Canon PowerShot A620 Camera Housing Replacement, Memory Card Cover: 手順 10、 2の画像 2
    • Slide the memory card cover down.

    • Unscrew the Phillips #00 1.6x3mm screw beneath the memory card cover.

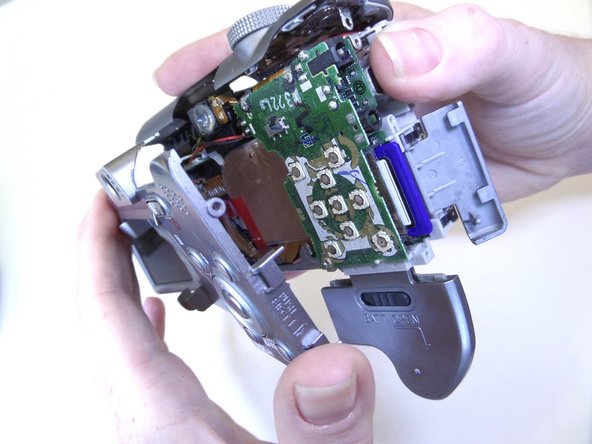
  11. Canon PowerShot A620 Camera Housing Replacement, Back Panel: 手順 11、 2の画像 1 Canon PowerShot A620 Camera Housing Replacement, Back Panel: 手順 11、 2の画像 2
    • Gently pull the back panel to separate it from the camera.

終わりに

To reassemble your device, follow these instructions in reverse order.

2 の人々がこのガイドを完成させました。

作成者

4人の作成者と共同で作成されました。

Jaime Abraham

メンバー登録日: 09/08/14

350 ポイント

3のガイドは作成済み

チーム

CSU Fullerton, Team 1-1, Bruce Fall 2014 CSU Fullerton, Team 1-1, Bruce Fall 2014人のメンバー

CSUF-BRUCE-F14S1G1

3 メンバー

6のガイドは作成済み

コメント 1 件

Ottima spiegazione: é tutto facile quando la spiegazione é semplice ed univoca. Ma redigere istruzioni semplici é un'arte che non tutti possiedono.

Paolo Ravera - 返信

コメントを追加

統計データ:

過去 24時間: 1

過去 7 日: 3

過去 30 日: 20

今までの合計 1,516