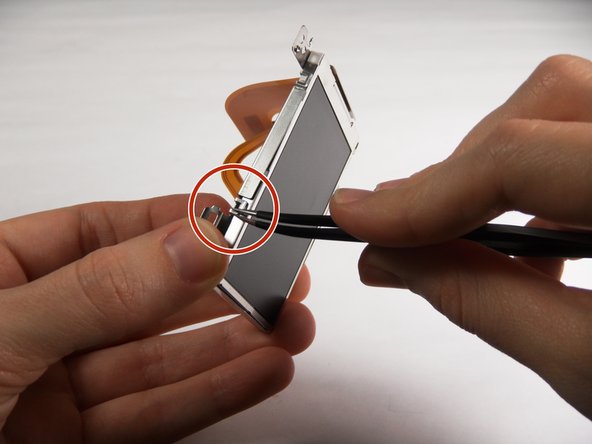
メインコンテンツにスキップ

Canon PowerShot A540 LCD Screen Replacement

必要な工具と部品

  1. Canon PowerShot A540 LCD Screen Replacement, Back Cover: 手順 1、 2の画像 1 Canon PowerShot A540 LCD Screen Replacement, Back Cover: 手順 1、 2の画像 2
    • Turn off the camera.

    • Turn the camera upside-down and press the tab to release the battery cover. Remove the batteries.

  2. Canon PowerShot A540 LCD Screen Replacement: 手順 2、 1の画像 1
    • Turn the camera upside down to view the "Card/Batt. Open" Cover.

    • Use a Phillips head #000 screwdriver to remove the three (3) 4.0 mm screws.

  3. Canon PowerShot A540 LCD Screen Replacement: 手順 3、 1の画像 1
    • Open "Card/Batt. Open" Cover.

    • Remove the one (1) 5.0 mm screw with the Phillips head #000 screwdriver.

  4. Canon PowerShot A540 LCD Screen Replacement: 手順 4、 1の画像 1
    • Turn the camera to the right side of the LCD screen.

    • Remove the three (3) 4.0 mm screws with the Phillips head #000 screwdriver.

  5. Canon PowerShot A540 LCD Screen Replacement: 手順 5、 3の画像 1 Canon PowerShot A540 LCD Screen Replacement: 手順 5、 3の画像 2 Canon PowerShot A540 LCD Screen Replacement: 手順 5、 3の画像 3
    • Gently remove the back cover.

    • Start at the bottom at the corner of the "Card/Batt. Open" Cover.

    • Then move onto the other edges and the top.

    • It may be tight at the top!

  6. Canon PowerShot A540 LCD Screen Replacement, LCD Screen: 手順 6、 2の画像 1 Canon PowerShot A540 LCD Screen Replacement, LCD Screen: 手順 6、 2の画像 2
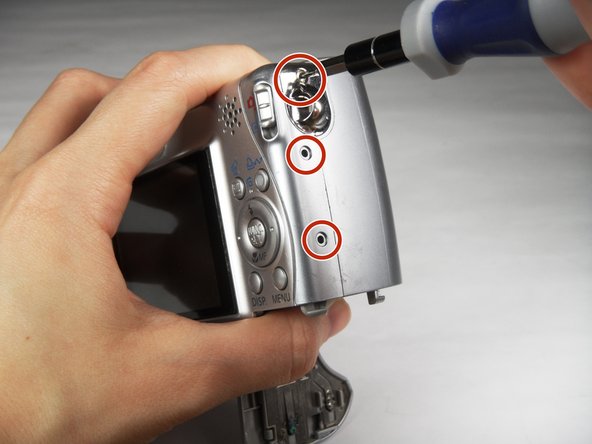
    • Turn the camera to view the back.

    • Remove the one (1) 3.0 mm screw on the top right corner of the screen.

    • There is a small metal bar that rests on this frame. Keep it with the screws that have been removed from the camera.

  7. Canon PowerShot A540 LCD Screen Replacement: 手順 7、 2の画像 1 Canon PowerShot A540 LCD Screen Replacement: 手順 7、 2の画像 2
    • Lift the LCD Screen off of the back to view the attached ribbon cables.

    • Use tweezers to flip the black bar up.

  8. Canon PowerShot A540 LCD Screen Replacement: 手順 8、 3の画像 1 Canon PowerShot A540 LCD Screen Replacement: 手順 8、 3の画像 2 Canon PowerShot A540 LCD Screen Replacement: 手順 8、 3の画像 3
    • Gently pull the big ribbon out.

    • Gently pull the small ribbon out.

    • The small ribbon does not have a bar like the big ribbon.

  9. Canon PowerShot A540 LCD Screen Replacement: 手順 9、 2の画像 1 Canon PowerShot A540 LCD Screen Replacement: 手順 9、 2の画像 2
    • Use tweezers at the top left of the LCD Screen to wedge the top left of the Outer Frame loose.

    • Use your thumb to hold the Outer Frame open.

    • Use the tweezers at the top right of the LCD Screen to wedge the top right of the Outer Frame loose.

  10. Canon PowerShot A540 LCD Screen Replacement: 手順 10、 2の画像 1 Canon PowerShot A540 LCD Screen Replacement: 手順 10、 2の画像 2
    • Slide the LCD Screen out from the Outer Frame.

終わりに

To reassemble your device, follow these instructions in reverse order.

2 の人々がこのガイドを完成させました。

作成者

3人の作成者と共同で作成されました。

Carley Fuller

メンバー登録日: 03/23/15

434 ポイント

3のガイドは作成済み

チーム

Baylor, Team 7-12, Williams Spring 2015 Baylor, Team 7-12, Williams Spring 2015人のメンバー

BU-WILLIAMS-S15S7G12

3 メンバー

20のガイドは作成済み

コメント 1 件

I wish to purchase a new screen. Where? I feel capable of repair per these instructions and a u tube video.

Geo Schou - 返信

コメントを追加

統計データ:

過去 24時間: 0

過去 7 日: 0

過去 30 日: 12

今までの合計 809