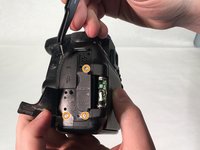
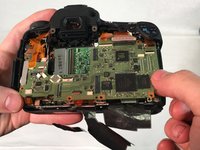
メインコンテンツにスキップ

Canon EOS 70D Camera Motherboard Replacement

必要な工具と部品

  1. Canon EOS 70D Camera Motherboard Replacement, Battery: 手順 1、 1の画像 1
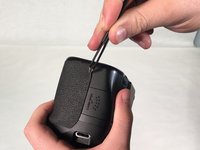
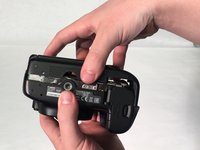
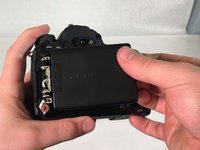
    • Hold the camera with the lens pointing down. Press the highlighted button with your finger to release the cover.

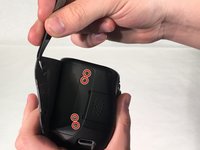
    • Pull cover over to expose the battery.

  2. Canon EOS 70D Camera Motherboard Replacement: 手順 2、 2の画像 1 Canon EOS 70D Camera Motherboard Replacement: 手順 2、 2の画像 2
    • Press the white button with your finger to release the battery.

    • Once released, the battery will eject out about two inches

  3. Canon EOS 70D Camera Motherboard Replacement: 手順 3、 1の画像 1
    • Pull battery out of the camera.

  4. Canon EOS 70D Camera Motherboard Replacement, LCD Touchscreen: 手順 4、 2の画像 1 Canon EOS 70D Camera Motherboard Replacement, LCD Touchscreen: 手順 4、 2の画像 2
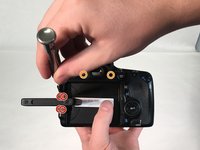
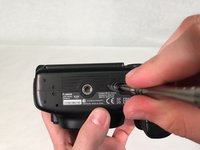
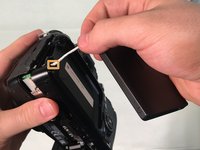
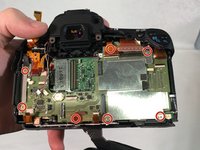
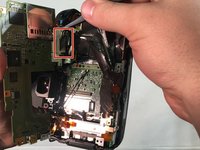
    • Pull Touchscreen out and rotate 90 degrees. Remove the four 3 mm Phillips #000 head screws that are now exposed at the hinge.

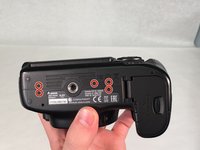
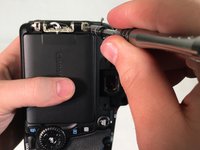
    • Remove the two 5 mm Phillips #000 head screws that near the viewfinder.

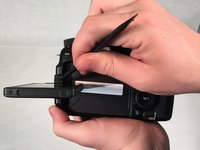
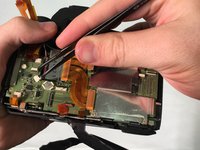
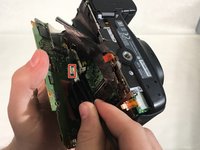
    • Use a spudger and pry apart the two plastic columns surrounding the screen hinge.

    • The screen will not be removed at this step.

    • Rotate the screen forward 90 degrees and push it back into its housing against the camera.

  5. Canon EOS 70D Camera Motherboard Replacement: 手順 5、 2の画像 1 Canon EOS 70D Camera Motherboard Replacement: 手順 5、 2の画像 2
    • Use a spudger to peel rubber matting on left hand side to expose camera backplate mounting screws.

    • Remove three 4 mm Phillip #000 head screws that mount the backplate to the left side of camera.

  6. Canon EOS 70D Camera Motherboard Replacement: 手順 6、 2の画像 1 Canon EOS 70D Camera Motherboard Replacement: 手順 6、 2の画像 2
    • Use tweezers to pry rubber matting on right hand side to expose backplate mounting screws.

    • Remove four 4 mm Phillips #000 head screws that mount the backplate to the right side of camera.

  7. Canon EOS 70D Camera Motherboard Replacement: 手順 7、 3の画像 1 Canon EOS 70D Camera Motherboard Replacement: 手順 7、 3の画像 2 Canon EOS 70D Camera Motherboard Replacement: 手順 7、 3の画像 3
    • Turn camera upside down. Remove five 5 mm Phillips #000 head screws securing the backplate to the bottom of the camera.

    • Grab the backplate and gently pull away from camera.

    • The backplate will still be attached by the wires running to the LCD touchscreen.

    • The screen will still be attached to the camera and won't be removed until step 10.

  8. Canon EOS 70D Camera Motherboard Replacement: 手順 8、 2の画像 1 Canon EOS 70D Camera Motherboard Replacement: 手順 8、 2の画像 2
    • Carefully pry open backplate from camera to expose LCD connector (white wire). LCD connector is attached with a metal bar to the motherboard.

    • Use tweezers to gently pry metal bar connector from camera motherboard.

  9. Canon EOS 70D Camera Motherboard Replacement: 手順 9、 2の画像 1 Canon EOS 70D Camera Motherboard Replacement: 手順 9、 2の画像 2
    • Remove two 4 mm Phillips #000 head screws that mount the LCD touchscreen to the hinge on the camera.

  10. Canon EOS 70D Camera Motherboard Replacement: 手順 10、 3の画像 1 Canon EOS 70D Camera Motherboard Replacement: 手順 10、 3の画像 2 Canon EOS 70D Camera Motherboard Replacement: 手順 10、 3の画像 3
    • Grip the screen with your hand and gently pull white connecting wire through hole in backplate.

    • Once the connector reaches the hole, twist the connector and pull completely through hole.

    • You must twist the connector in order to fit through hole.

  11. Canon EOS 70D Camera Motherboard Replacement, Camera Motherboard: 手順 11、 3の画像 1 Canon EOS 70D Camera Motherboard Replacement, Camera Motherboard: 手順 11、 3の画像 2 Canon EOS 70D Camera Motherboard Replacement, Camera Motherboard: 手順 11、 3の画像 3
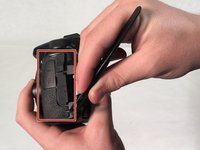
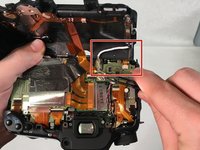
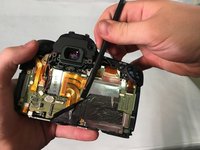
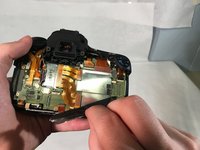
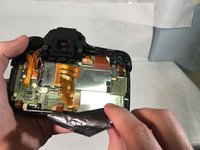
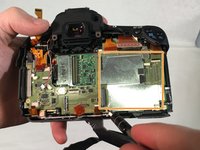
    • Use spudger to lift edge of black heat tape.

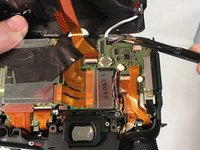
    • Slowly peel back black heat tape.

  12. Canon EOS 70D Camera Motherboard Replacement: 手順 12、 3の画像 1 Canon EOS 70D Camera Motherboard Replacement: 手順 12、 3の画像 2 Canon EOS 70D Camera Motherboard Replacement: 手順 12、 3の画像 3
    • Very carefully, use spudger to remove nine orangish ribbon cables.

    • Using tweezers remove the two wire cables shown.

    • Slowly remove ribbon cables because they can tear very easily.

  13. Canon EOS 70D Camera Motherboard Replacement: 手順 13、 3の画像 1 Canon EOS 70D Camera Motherboard Replacement: 手順 13、 3の画像 2 Canon EOS 70D Camera Motherboard Replacement: 手順 13、 3の画像 3
    • Remove seven 5 mm Phillips #000 head screws around motherboard.

    • Once the five screws are removed, remove the metal chip covered by hand.

    • This will leave the mother board exposed, attached by two cable wires underneath.

  14. Canon EOS 70D Camera Motherboard Replacement: 手順 14、 3の画像 1 Canon EOS 70D Camera Motherboard Replacement: 手順 14、 3の画像 2 Canon EOS 70D Camera Motherboard Replacement: 手順 14、 3の画像 3
    • Slowly lift motherboard to expose the two cable wires underneath.

    • Using tweezers, unattach the two wire cables holding the motherboard in.

  15. Canon EOS 70D Camera Motherboard Replacement: 手順 15、 1の画像 1
    • Carefully remove motherboard.

終わりに

To reassemble your device, follow these instructions in reverse order.

12 の人々がこのガイドを完成させました。

作成者

3人の作成者と共同で作成されました。

Tyler Baker

メンバー登録日: 03/21/18

349 ポイント

1ガイドが承認済み

チーム

University of Memphis, Team S2-G5, Kim Spring 2018 University of Memphis, Team S2-G5, Kim Spring 2018人のメンバー

UM-KIM-S18S2G5

3 メンバー

12のガイドは作成済み

3 件のコメント

Great write up and illustrations. I'm in the process of repairing a 70D and this will be a great help.

Thank you and keep up the good work!

marcuscleveland85 - 返信

Hi, do you know if after replacing the main board it is necessary to configure the camera with some software ? (I heard of spt software)

Stephen Lay -

Hi Tyler my Canon Camera eos 70D isn’t working anymore is it possible to replace the motherboard?

Charlie Laguna - 返信

コメントを追加

統計データ:

過去 24時間: 2

過去 7 日: 38

過去 30 日: 172

今までの合計 15,780