メインコンテンツにスキップ

このバージョンは誤った内容を含んでいる可能性があります。最新の承認済みスナップショットに切り替えてください。

必要な工具と部品

  1. この手順は未翻訳です。 翻訳を手伝う。

    : 手順 1、 1の画像 1
    • Peel back the rubber cover above the in/out ports to reveal two screw heads.

  2. この手順は未翻訳です。 翻訳を手伝う。

    : 手順 2、 1の画像 1
    • Remove both 5.4 mm screws using a Phillips #0.

  3. この手順は未翻訳です。 翻訳を手伝う。

    : 手順 3、 1の画像 1
    • Lift the in/out port plastic covering from the bottom where the backup battery used to be.

  4. この手順は未翻訳です。 翻訳を手伝う。

    : 手順 4、 1の画像 1
    • Remove each 6.3 mm screw on either side of the viewfinder using a Phillips #0 screwdriver.

  5. この手順は未翻訳です。 翻訳を手伝う。

    : 手順 5、 1の画像 1
    • Remove the three 4.8 mm screws on the bottom of the back plate using a Phillips #0.

  6. この手順は未翻訳です。 翻訳を手伝う。

    : 手順 6、 1の画像 1
    • Peel back the rubber covering next to the menu dial to access the screw.

    • Remove the single 3.4 mm screw using a Phillips #0.

  7. この手順は未翻訳です。 翻訳を手伝う。

    : 手順 7、 1の画像 1
    • The back panel can now fall off easily by turning the device upside down. Be sure to catch it so the data ribbons do not tear or tug.

  8. この手順は未翻訳です。 翻訳を手伝う。

    : 手順 8、 1の画像 1
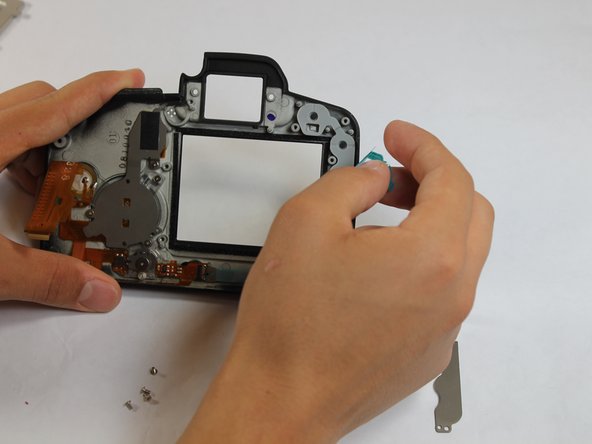
    • Remove each data ribbon cable from the motherboard by applying pressure down towards the motherboard and gently sliding your thumb upwards on the slot where the cable meets the motherboard. This will raise a very small clip that locks the cable in place.

    • The back panel is now free from the rest of the device.

  9. この手順は未翻訳です。 翻訳を手伝う。

    : 手順 9、 2の画像 1 : 手順 9、 2の画像 2
    • Remove each of the four 4.8 mm screws holding the protective plate over the button contact ribbon cable.

  10. この手順は未翻訳です。 翻訳を手伝う。

    : 手順 10、 2の画像 1 : 手順 10、 2の画像 2
    • Free the blue data ribbon cable by firmly pressing your thumb over the black clasp at the end of the cable and sliding your thumb to the left. This will raise the clasp and free the cable.

  11. この手順は未翻訳です。 翻訳を手伝う。

    : 手順 11、 1の画像 1
    • Pull back the rubber backing found underneath the blue ribbon cable.

  12. この手順は未翻訳です。 翻訳を手伝う。

    : 手順 12、 1の画像 1
    • You can now use a brush to clean any built up residue beneath the buttons.

ゴール

4 の人々がこのガイドを完成させました。

作成者

1人の作成者と共同作成されました。

Mike Seed

メンバー登録日: 09/22/14

2,956 ポイント

8のガイドは作成済み

チーム

USF Tampa, Team 1-6, Hickman Fall 2014 USF Tampa, Team 1-6, Hickman Fall 2014人のメンバー

USFT-HICKMAN-F14S1G6

3 メンバー

16のガイドは作成済み

2 件のコメント

Thank you for the great guide. Can you include one more step on the circular button as well? It will complete the guide by covering all the buttons in the back.

Also, do you have a recommendation on where to get a replacement button? My button is sticky.

Dat Chu - 返信

My 5D Mark II buttons work fine in auto mode, but don’t function in other modes. IE Manual, AV, TV ETC. Do you think this is a button residue issue? My camera may have taken on some water during my last shoot. What fix would you suggest?

Brian Kingsberry - 返信

コメントを追加

統計データ:

過去 24時間: 2

過去 7 日: 6

過去 30 日: 30

今までの合計 6,028