メインコンテンツにスキップ

CR-10S/DDX Linear Rail Kit Hotend Installation

必要な工具と部品

  1. CR-10S/DDX Linear Rail Kit Hotend Installation, Hotend Removal down: 手順 1、 3の画像 1 CR-10S/DDX Linear Rail Kit Hotend Installation, Hotend Removal down: 手順 1、 3の画像 2 CR-10S/DDX Linear Rail Kit Hotend Installation, Hotend Removal down: 手順 1、 3の画像 3
    • Remove the Hotend cover screw

    • Remove the Hotend mounting screws

  2. CR-10S/DDX Linear Rail Kit Hotend Installation, Belt removal and Stock X Carriage: 手順 2、 3の画像 1 CR-10S/DDX Linear Rail Kit Hotend Installation, Belt removal and Stock X Carriage: 手順 2、 3の画像 2 CR-10S/DDX Linear Rail Kit Hotend Installation, Belt removal and Stock X Carriage: 手順 2、 3の画像 3
    • Loosen Idler pulley bracket screws and remove the idler pulley bracket

    • Remove the belt

    • Remove the lower V-slot wheel bolt from X-carriage

  3. CR-10S/DDX Linear Rail Kit Hotend Installation, Mounting screw Pattern & Sliding on the Rail: 手順 3、 3の画像 1 CR-10S/DDX Linear Rail Kit Hotend Installation, Mounting screw Pattern & Sliding on the Rail: 手順 3、 3の画像 2 CR-10S/DDX Linear Rail Kit Hotend Installation, Mounting screw Pattern & Sliding on the Rail: 手順 3、 3の画像 3
    • Follow the table for the recommended mounting locations

    • Take note to skip 2 holes between fasteners, and make sure to mirror this process from each of the end of the rail until you meet in the middle.

    • For rails with an odd number of mounting holes, the pattern will overlap in the middle

    • For rails with an even number of mounting holes, the pattern will be continued across the rail

    • Pre-install all the M3x8 SHCS screw and Sliding T-nuts

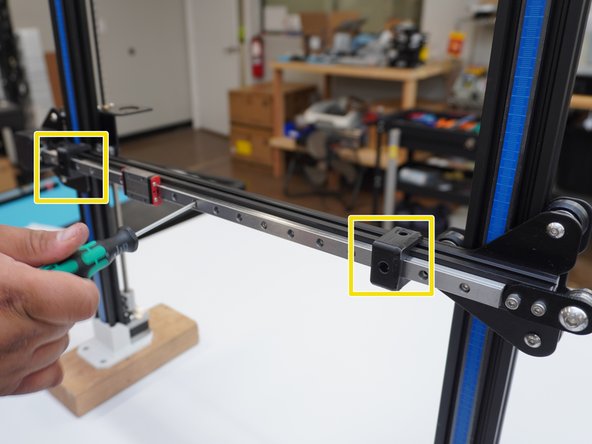
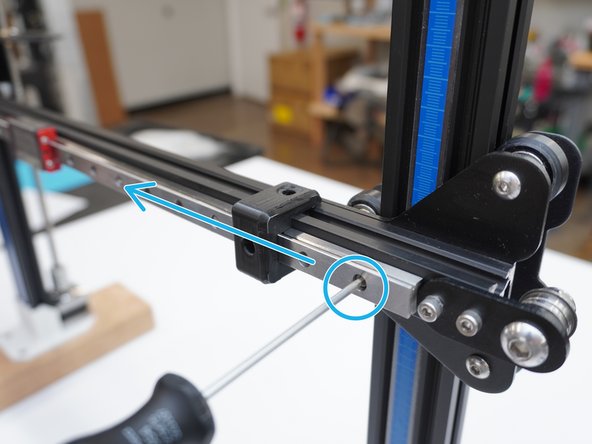
    • Install the Printed T-nut guide on the end of the X axis extrusion, and slide the rail on to the X-axis from Right to left

    • The guide helps to slide the T-nuts into the extrusion

  4. CR-10S/DDX Linear Rail Kit Hotend Installation, Mounting the Rail: 手順 4、 3の画像 1 CR-10S/DDX Linear Rail Kit Hotend Installation, Mounting the Rail: 手順 4、 3の画像 2 CR-10S/DDX Linear Rail Kit Hotend Installation, Mounting the Rail: 手順 4、 3の画像 3
    • Slide the rail until you have about 2-3 mm between the rail and the end of the X axis extrusion.

    • Use both Linear rail Guide to center the rail to the Aluminum extrusion

    • Tighten the mounting screws as you go down. Making sure to slide down, slide the linear rail guide down as each screw is tightened.

  5. CR-10S/DDX Linear Rail Kit Hotend Installation, X Carriage install: 手順 5、 3の画像 1 CR-10S/DDX Linear Rail Kit Hotend Installation, X Carriage install: 手順 5、 3の画像 2 CR-10S/DDX Linear Rail Kit Hotend Installation, X Carriage install: 手順 5、 3の画像 3
    • Belt adaptor

    • 4x M3x8 SHCS

    • 3x M3 split washers

    • M3 Hex nuts

    • Install the M3x8 SHCS screw with M3 Split washer in to the X carriage adaptor plate and mount to the Rail block.

    • Push up on the belt bracket, it is square against the bottom of the carriage block.

    • Note: If screws will not start, threading in. Spin the screws counterclockwise until you hear a click, and then tighten the screws evenly in an X pattern until they are fully tightened. This is to ensure that the threads do not get damaged.

    • Note, reference Hotend Mounting Instructions section before mounting the MGN 12 Adaptor Plates to the linear rail block. For installing Hex Nuts to the back of the Adaptors.

  6. CR-10S/DDX Linear Rail Kit Hotend Installation, Stock Hotend Install: 手順 6、 1の画像 1
    • BL Touch and Fan Cover

    • M3x8 SHCS (2 mm longer than stock)

    • BL Touch and Fan Cover

    • This screw replaces the M3x8 SHCS mount screw

    • M3x14 SHCS (8-10 mm longer than stock)

    • Hotend mounting screws

    • M3x22 SHCS (6 mm longer than stock) (Stock hotend)

    • M3x22 FHCS (6 mm longer than stock) (Stock hotend)

  7. CR-10S/DDX Linear Rail Kit Hotend Installation, DDX Install: 手順 7、 1の画像 1
    • M3x28 SHCS & 2 Split lock washer(6 mm longer than stock) (Stock hotend)

ゴール

ある他の人がこのガイドを完成しました。

作成者

1人の作成者と共同作成されました。

AJ Pereira

メンバー登録日: 05/29/20

2,652 ポイント

16のガイドは作成済み

チーム

Tiny Machines 3D Tiny Machines 3D人のメンバー

Community

5 メンバー

40のガイドは作成済み

0 件のコメント

コメントを追加

統計データ:

過去 24時間: 0

過去 7 日: 11

過去 30 日: 30

今までの合計 1,586