メインコンテンツにスキップ

Bugaboo Cameleon 1 and 3 Swivel Wheel Lock Replacement

必要な工具と部品

  1. Bugaboo Cameleon 1 and 3 Swivel Wheel Lock Replacement, Detach the seat from the frame: 手順 1、 1の画像 1
    • Push both the white square buttons under the seat at the same time, to remove the seat from the frame.

  2. Bugaboo Cameleon 1 and 3 Swivel Wheel Lock Replacement: 手順 2、 1の画像 1
    • Put the frame with the handle on the ground like shown in the picture, to have better access to the swivel wheels.

  3. Bugaboo Cameleon 1 and 3 Swivel Wheel Lock Replacement, Detach swivel wheel: 手順 3、 1の画像 1
    • Press the button above the swivel wheel, and pull out the swivel wheel

  4. Bugaboo Cameleon 1 and 3 Swivel Wheel Lock Replacement, Remove screws: 手順 4、 3の画像 1 Bugaboo Cameleon 1 and 3 Swivel Wheel Lock Replacement, Remove screws: 手順 4、 3の画像 2 Bugaboo Cameleon 1 and 3 Swivel Wheel Lock Replacement, Remove screws: 手順 4、 3の画像 3
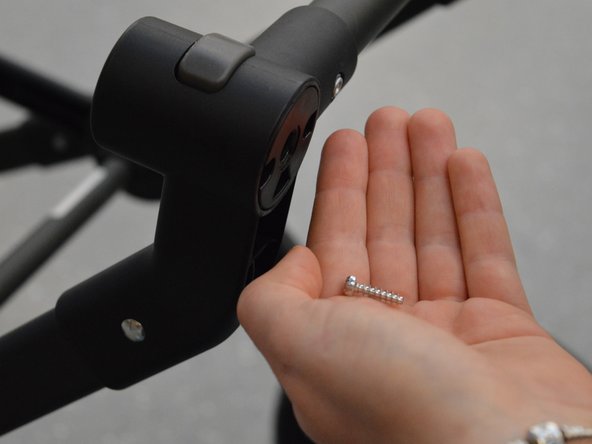
    • Remove the two screws on the black cylinder on the bottom with the Torx screwdriver.

    • Make sure not to lose the screws, since you need them for the reassembly later.

  5. Bugaboo Cameleon 1 and 3 Swivel Wheel Lock Replacement: 手順 5、 1の画像 1
    • Remove the bottom part of the cylinder. You can use your screwdriver to pull it out.

  6. Bugaboo Cameleon 1 and 3 Swivel Wheel Lock Replacement, Remove old part: 手順 6、 3の画像 1 Bugaboo Cameleon 1 and 3 Swivel Wheel Lock Replacement, Remove old part: 手順 6、 3の画像 2 Bugaboo Cameleon 1 and 3 Swivel Wheel Lock Replacement, Remove old part: 手順 6、 3の画像 3
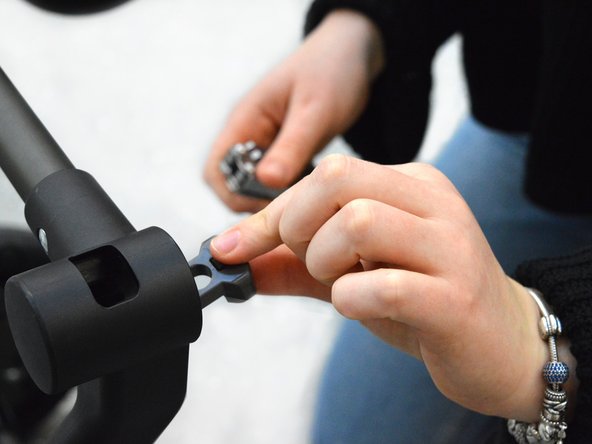
    • Push the old button, and place the flathead screwdriver behind the button

    • Push the button down and towards the opening of the cylinder.

    • Take out the wheel lock button and the spring, and make sure not to lose the spring.

  7. Bugaboo Cameleon 1 and 3 Swivel Wheel Lock Replacement, Attaching the new part: 手順 7、 2の画像 1 Bugaboo Cameleon 1 and 3 Swivel Wheel Lock Replacement, Attaching the new part: 手順 7、 2の画像 2
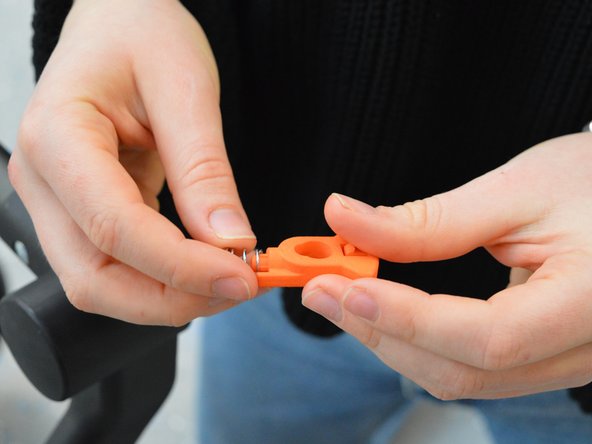
    • Pull the spring from the old part.

    • Attach it to pin on the new swivel wheel lock.

  8. Bugaboo Cameleon 1 and 3 Swivel Wheel Lock Replacement, Placing the new part in the stroller: 手順 8、 1の画像 1
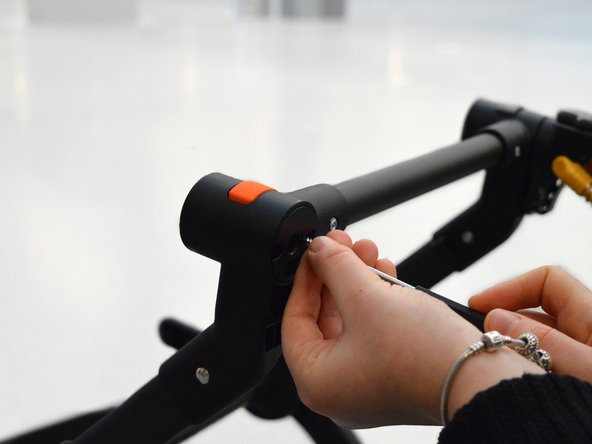
    • Put the new part with the spring back inside the cylinder, in the orientation shown in the picture.

  9. Bugaboo Cameleon 1 and 3 Swivel Wheel Lock Replacement, Reassembling: 手順 9、 1の画像 1
    • Place the inner black cylinder back into the outer cylinder.

  10. Bugaboo Cameleon 1 and 3 Swivel Wheel Lock Replacement, Securing the part: 手順 10、 2の画像 1 Bugaboo Cameleon 1 and 3 Swivel Wheel Lock Replacement, Securing the part: 手順 10、 2の画像 2
    • Use the two screws and the Torx screwdriver to secure the parts.

  11. Bugaboo Cameleon 1 and 3 Swivel Wheel Lock Replacement, Attach the wheel: 手順 11、 1の画像 1
    • Click the wheel back onto the frame.

  12. Bugaboo Cameleon 1 and 3 Swivel Wheel Lock Replacement, Put the stroller the right side up.: 手順 12、 2の画像 1 Bugaboo Cameleon 1 and 3 Swivel Wheel Lock Replacement, Put the stroller the right side up.: 手順 12、 2の画像 2
    • The repair is now finished. Flip the frame back onto four wheels.

    • Place the seat back onto the frame.

ゴール

ある他の人がこのガイドを完成しました。

添付文書

作成者

1人の作成者と共同作成されました。

Rebecca Dowling

メンバー登録日: 04/24/18

647 ポイント

3のガイドは作成済み

0 件のコメント

コメントを追加

統計データ:

過去 24時間: 2

過去 7 日: 8

過去 30 日: 14

今までの合計 2,227