メインコンテンツにスキップ

Braven BRV-X Battery Replacement

必要な工具と部品

  1. Braven BRV-X Battery Replacement, Bottom Outer Casing: 手順 1、 3の画像 1 Braven BRV-X Battery Replacement, Bottom Outer Casing: 手順 1、 3の画像 2 Braven BRV-X Battery Replacement, Bottom Outer Casing: 手順 1、 3の画像 3
    • Flip the Braven BRV-X upside down so you are facing the bottom side.

    • With the H1.5 Head Screwdriver, unscrew the four screws.

    • All screws on this device can be stripped easily. Hold your screwdriver with the thumb on top and swivel with the opposite hand's thumb and index finger.

    • Using the #0 Phillips screwdriver, unscrew the four screws on the four corners of the bottom side.

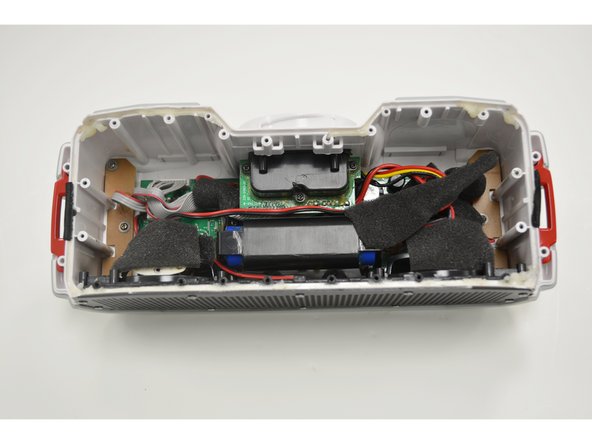
    • Gently remove the outer casing, which should reveal the inner shell.

  2. Braven BRV-X Battery Replacement: 手順 2、 2の画像 1 Braven BRV-X Battery Replacement: 手順 2、 2の画像 2
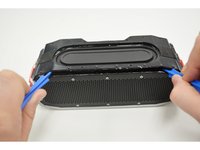
    • With a Jimmy, cut the two warranty seals on either side.

    • You may also use a tech knife instead of a Jimmy.

    • WARNING: Once warranty seals are broken, you may no longer return the product.

    • Next, remove the 18 screws with a #00 Phillips screwdriver.

  3. Braven BRV-X Battery Replacement: 手順 3、 2の画像 1 Braven BRV-X Battery Replacement: 手順 3、 2の画像 2
    • Using two plastic opening tools, slide under the cover and slowly lift.

    • There is glue nearly all around the inner shell, so strength will be necessary. When both tools are inserted, you can slide out along the edges.

  4. Braven BRV-X Battery Replacement, Battery: 手順 4、 1の画像 1
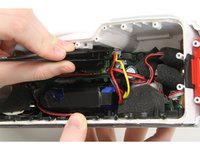
    • Remove the black foam squares from the red, yellow, and black wire on the top right side of the device.

  5. Braven BRV-X Battery Replacement: 手順 5、 3の画像 1 Braven BRV-X Battery Replacement: 手順 5、 3の画像 2 Braven BRV-X Battery Replacement: 手順 5、 3の画像 3
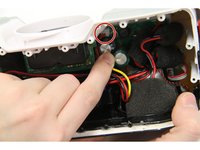
    • Now that the three wires are exposed, follow the wires to the white base that is plugged into the motherboard.

    • Using the tech knife, carefully remove the glue that keeps the plug in place.

    • Using the tweezers, carefully disconnect the plug from the motherboard.

    • WARNING: Make sure the battery is drained of all power for safety reasons.

    • There should still be a small white base attached to the motherboard, where the plug will eventually be plugged back in.

  6. Braven BRV-X Battery Replacement: 手順 6、 1の画像 1
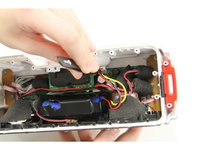
    • The battery's black shell is connected to the motherboard with four screws. Use the #00 Phillips screwdriver to remove the four screws.

    • The screws near the speaker side of the device will be a tight squeeze to get to.

  7. Braven BRV-X Battery Replacement: 手順 7、 1の画像 1
    • Now, you should be able to lift the battery along with the black container up.

    • Pull the battery pack straight out so you do not damage other wires or the motherboard.

  8. Braven BRV-X Battery Replacement: 手順 8、 1の画像 1
    • Slide the blue battery out from the black container. Your battery is now removed from the device and is ready for replacement.

終わりに

To reassemble your device, follow these instructions in reverse order.

5 の人々がこのガイドを完成させました。

作成者

5人の作成者と共同で作成されました。

Courtney Crockett

メンバー登録日: 09/29/15

324 ポイント

2のガイドは作成済み

チーム

Texas Tech, Team 19-4, Rauch Fall 2015 Texas Tech, Team 19-4, Rauch Fall 2015人のメンバー

TTU-RAUCH-F15S19G4

4 メンバー

2のガイドは作成済み

10 件のコメント

Thank you for the replacement steps - do you know where I could buy a replacement battery?

jmckeag7 - 返信

Anyone ever figure out what battery they needed?

Aaron Eisenbarth -

I also would love to know what battery is actually needed for this.

grenchpickle - 返信

The batteries are two 18650's in tandem. You can get these from batteries plus

nick - 返信

Parallel or series connection?

Vladimir Skrbic -

コメントを追加

統計データ:

過去 24時間: 0

過去 7 日: 6

過去 30 日: 29

今までの合計 10,258