メインコンテンツにスキップ

Boosted Mini Belt Replacement

必要な工具と部品

  1. Boosted Mini Belt Replacement, Belt: 手順 1、 2の画像 1 Boosted Mini Belt Replacement, Belt: 手順 1、 2の画像 2
    • Unscrew the axle nut holding the wheel in place with your wrench on the side of the board where the belt has snapped/became worn.

  2. Boosted Mini Belt Replacement: 手順 2、 2の画像 1 Boosted Mini Belt Replacement: 手順 2、 2の画像 2
    • Take off the nut and the washer.

  3. Boosted Mini Belt Replacement: 手順 3、 3の画像 1 Boosted Mini Belt Replacement: 手順 3、 3の画像 2 Boosted Mini Belt Replacement: 手順 3、 3の画像 3
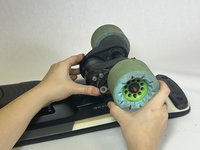
    • Use your allen wrench to remove the two black motor cap screws on the motor counter clockwise.

  4. Boosted Mini Belt Replacement: 手順 4、 1の画像 1
    • Remove the plastic motor cap.

  5. Boosted Mini Belt Replacement: 手順 5、 3の画像 1 Boosted Mini Belt Replacement: 手順 5、 3の画像 2 Boosted Mini Belt Replacement: 手順 5、 3の画像 3
    • Use your allen wrench to loosen the four motor screws on the motor by turning your tool ¼ turn left. The motor should be loose.

  6. Boosted Mini Belt Replacement: 手順 6、 3の画像 1 Boosted Mini Belt Replacement: 手順 6、 3の画像 2 Boosted Mini Belt Replacement: 手順 6、 3の画像 3
    • Remove the wheel and belt (if not snapped off already).

  7. Boosted Mini Belt Replacement: 手順 7、 2の画像 1 Boosted Mini Belt Replacement: 手順 7、 2の画像 2
    • Make sure the axle spacer and drive pulley washer are still in place on the axel.

  8. Boosted Mini Belt Replacement: 手順 8、 3の画像 1 Boosted Mini Belt Replacement: 手順 8、 3の画像 2 Boosted Mini Belt Replacement: 手順 8、 3の画像 3
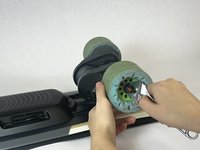
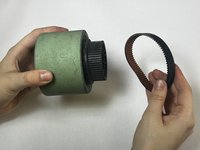
    • Get your new Boosted belt and place it on the inner side drive pulley of the wheel.

  9. Boosted Mini Belt Replacement: 手順 9、 2の画像 1 Boosted Mini Belt Replacement: 手順 9、 2の画像 2
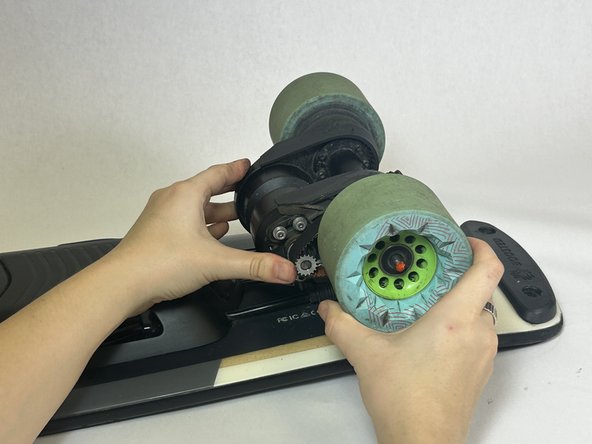
    • Place the wheel with its new belt inner side first on the axle, making sure the belt is securely back over the motor pulley.

  10. Boosted Mini Belt Replacement: 手順 10、 1の画像 1
    • To tighten the belt, create tension by putting your thumb on the wheel of the board and your fingers on the motor and pull the motor towards the motor driver until the belt is taught.

  11. Boosted Mini Belt Replacement: 手順 11、 2の画像 1 Boosted Mini Belt Replacement: 手順 11、 2の画像 2
    • Using the allen wrench place the two screws furthest from the wheel first back in place and tighten, then tighten the closer two screws.

  12. Boosted Mini Belt Replacement: 手順 12、 3の画像 1 Boosted Mini Belt Replacement: 手順 12、 3の画像 2 Boosted Mini Belt Replacement: 手順 12、 3の画像 3
    • Place the axle washer and nut back on the axle.

    • Make sure that the axle washer is first, closest to the wheel, then the nut.

  13. Boosted Mini Belt Replacement: 手順 13、 1の画像 1
    • Use your wrench to turn the nut clockwise to tighten it.

  14. Boosted Mini Belt Replacement: 手順 14、 1の画像 1
    • Place the plastic motor cap on the motor.

  15. Boosted Mini Belt Replacement: 手順 15、 3の画像 1 Boosted Mini Belt Replacement: 手順 15、 3の画像 2 Boosted Mini Belt Replacement: 手順 15、 3の画像 3
    • Lastly, use the allen wrench to reinstall the two motor cap screws.

終わりに

If the belt on the other side of the skateboard also needs to be replaced, repeat steps 1-16.

ある他の人がこのガイドを完成しました。

作成者

3人の作成者と共同で作成されました。

Juliana Renert

メンバー登録日: 02/02/24

241 ポイント

1ガイドが承認済み

チーム

UC Davis, Team 4-1, Andersen Winter 2024 UC Davis, Team 4-1, Andersen Winter 2024人のメンバー

UCD-ANDERSEN-W24S4G1

3 メンバー

1のガイドは作成済み

0 件のコメント

コメントを追加

統計データ:

過去 24時間: 0

過去 7 日: 0

過去 30 日: 3

今までの合計 84