メインコンテンツにスキップ

Blackberry Pearl 8100 Trackball Replacement

必要な工具と部品

  1. Blackberry Pearl 8100 Trackball Replacement, Battery: 手順 1、 1の画像 1
    • Before working on the phone, be sure that the device is turned off.

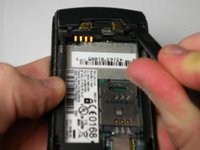
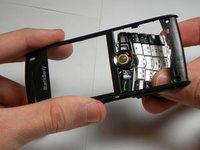
    • Begin by removing the back panel; this can be done by pressing the silver button on the backside of the Blackberry 8100, while simultaneously sliding the back panel off.

    • Remove the battery located directly below back panel.

  2. Blackberry Pearl 8100 Trackball Replacement, Keyboard: 手順 3、 1の画像 1
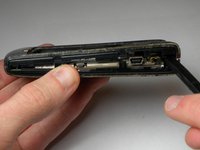
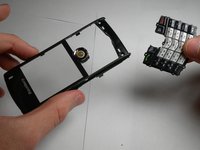
    • Using a 1.5 mm Hex screwdriver, remove the two screws that hold the two panels together.

  3. Blackberry Pearl 8100 Trackball Replacement: 手順 4、 2の画像 1 Blackberry Pearl 8100 Trackball Replacement: 手順 4、 2の画像 2
    • Using the spudger, pry off the small portion of the casing located at the bottom of the phone.

  4. Blackberry Pearl 8100 Trackball Replacement: 手順 5、 1の画像 1
    • Using the spudger, pry off the side casings one at a time by wedging it between the inner casing and the sides.

  5. Blackberry Pearl 8100 Trackball Replacement: 手順 6、 1の画像 1
    • Using a 1.5mm Hex screwdriver, unscrew the two screws, located on the front of the phone, that connect the back and front panels.

  6. Blackberry Pearl 8100 Trackball Replacement: 手順 7、 2の画像 1 Blackberry Pearl 8100 Trackball Replacement: 手順 7、 2の画像 2
    • Using the spudger, pry off the back body panel by wedging the spudger in between the front and back panels on the side face. Remove the back body panel.

  7. Blackberry Pearl 8100 Trackball Replacement: 手順 8、 1の画像 1
    • Separate the logic board from the front panel.

  8. Blackberry Pearl 8100 Trackball Replacement: 手順 9、 2の画像 1 Blackberry Pearl 8100 Trackball Replacement: 手順 9、 2の画像 2
    • Gently remove the keyboard from front casing. It should snap out of place.

  9. Blackberry Pearl 8100 Trackball Replacement, Trackball: 手順 10、 1の画像 1
    • Some of these parts are fairly small and fragile; be sure to keep them in a safe place where they won't be damaged if you intend to reuse them.

    • Before repairing device, make sure to power off the device.

    • Once powered off, begin repair by removing the larger chrome ring holding the track ball in place by using the spudger to gently wedge the top ring away, approaching from the front face.

  10. Blackberry Pearl 8100 Trackball Replacement: 手順 11、 1の画像 1
    • Be sure to keep all pieces in a safe place where they won't be lost or damaged if you intend to reuse them.

    • Remove the smaller chrome inner ring surrounding the trackball; you should be able to be simply lift it by hand.

    • If ring seems to be stuck, gently pry it off using your spudger tool.

  11. Blackberry Pearl 8100 Trackball Replacement: 手順 12、 1の画像 1
    • Once the ring has been remove, proceed to removing the trackball housing; it should be able to be removed by hand.

    • After removing old trackball, replace it with a new one and proceed to following these instructions in reversed order to reassemble your device.

終わりに

To reassemble your device, follow these instructions in reverse order.

5 の人々がこのガイドを完成させました。

作成者

8人の作成者と共同で作成されました。

Robert Cronin

メンバー登録日: 04/08/10

544 ポイント

6のガイドは作成済み

チーム

Cal Poly, Team 34-57, Forte Spring 2010 Cal Poly, Team 34-57, Forte Spring 2010人のメンバー

CPSU-FORTE-S10S34G57

5 メンバー

6のガイドは作成済み

コメント 1 件

why dissasemble the entire device, just remove the chrome ring....

Latios Eon - 返信

コメントを追加

統計データ:

過去 24時間: 0

過去 7 日: 0

過去 30 日: 8

今までの合計 7,859