メインコンテンツにスキップ

BlackBerry Z10 Rear Facing Camera Replacement

必要な工具と部品

  1. BlackBerry Z10 Rear Facing Camera Replacement, Battery: 手順 1、 1の画像 1
    • Turn the phone over so that the back cover faces up.

    • Locate the groove at the bottom center of the phone.

    • Press the groove with your thumb to release the edge of the case from the phone.

  2. BlackBerry Z10 Rear Facing Camera Replacement: 手順 2、 2の画像 1 BlackBerry Z10 Rear Facing Camera Replacement: 手順 2、 2の画像 2
    • Use your thumb and index finger to carefully open the sides of the phone.

    • Start from the bottom and work your fingers up along the sides of the phone until the back cover is completely separated from the body of the phone.

  3. BlackBerry Z10 Rear Facing Camera Replacement: 手順 3、 3の画像 1 BlackBerry Z10 Rear Facing Camera Replacement: 手順 3、 3の画像 2 BlackBerry Z10 Rear Facing Camera Replacement: 手順 3、 3の画像 3
    • Lift the bottom corner of the battery with your fingers.

    • Remove the battery from the body of the phone.

  4. BlackBerry Z10 Rear Facing Camera Replacement, Rear Facing Camera: 手順 4、 1の画像 1
    • Use a Torx 4 screwdriver to remove the nine screws around the battery.

    • For this step, be sure that the screen is face down.

  5. BlackBerry Z10 Rear Facing Camera Replacement: 手順 5、 3の画像 1 BlackBerry Z10 Rear Facing Camera Replacement: 手順 5、 3の画像 2 BlackBerry Z10 Rear Facing Camera Replacement: 手順 5、 3の画像 3
    • Then, use one hand to carefully open the case. Place four fingers at the top edge and thumb on the side. Slowly lift the case of the phone from the top to the bottom.

    • Place your other hand on the bottom corner to hold down the rest of the phone.

  6. BlackBerry Z10 Rear Facing Camera Replacement: 手順 6、 3の画像 1 BlackBerry Z10 Rear Facing Camera Replacement: 手順 6、 3の画像 2 BlackBerry Z10 Rear Facing Camera Replacement: 手順 6、 3の画像 3
    • Use the nylon spudger, which is a black plastic tool, to avoid any damages on the internal parts of the motherboard.

    • Now that the motherboard is exposed, keep the tool handy for future detachments.

    • With the nylon spudger, slowly lift up and disconnect the green ribbon cable located just below the rear camera.

  7. BlackBerry Z10 Rear Facing Camera Replacement: 手順 7、 3の画像 1 BlackBerry Z10 Rear Facing Camera Replacement: 手順 7、 3の画像 2 BlackBerry Z10 Rear Facing Camera Replacement: 手順 7、 3の画像 3
    • Using the nylon spudger, gently detach the ribbon cables on the motherboard. Carefully push up each ribbon cable until it opens up and folds backwards.

    • Open the gold-plated cable on the upper right-hand corner of the motherboard.

  8. BlackBerry Z10 Rear Facing Camera Replacement: 手順 8、 3の画像 1 BlackBerry Z10 Rear Facing Camera Replacement: 手順 8、 3の画像 2 BlackBerry Z10 Rear Facing Camera Replacement: 手順 8、 3の画像 3
    • Next, use the nylon spudger to open gold ribbon cable adjacent to the battery housing.

  9. BlackBerry Z10 Rear Facing Camera Replacement: 手順 9、 3の画像 1 BlackBerry Z10 Rear Facing Camera Replacement: 手順 9、 3の画像 2 BlackBerry Z10 Rear Facing Camera Replacement: 手順 9、 3の画像 3
    • Then, use the nylon spudger to lift up and open the other gold ribbon cable located behind the previous one.

  10. BlackBerry Z10 Rear Facing Camera Replacement: 手順 10、 3の画像 1 BlackBerry Z10 Rear Facing Camera Replacement: 手順 10、 3の画像 2 BlackBerry Z10 Rear Facing Camera Replacement: 手順 10、 3の画像 3
    • Repeat the same step for the final ribbon cable located under the larger one.

  11. BlackBerry Z10 Rear Facing Camera Replacement: 手順 11、 3の画像 1 BlackBerry Z10 Rear Facing Camera Replacement: 手順 11、 3の画像 2 BlackBerry Z10 Rear Facing Camera Replacement: 手順 11、 3の画像 3
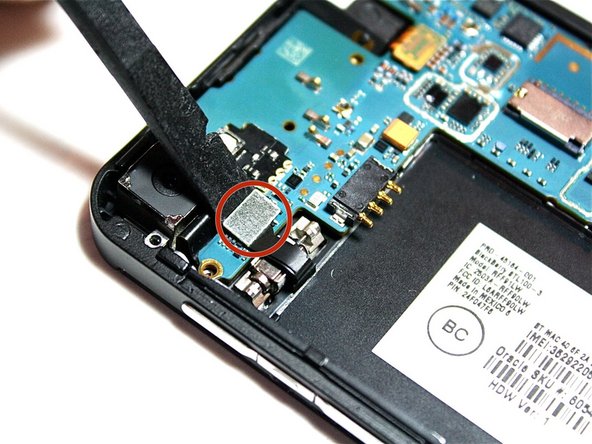
    • Now that all of the ribbon cables have been disconnected, carefully lift the motherboard from its housing with your thumb and index finger. Start lifting the motherboard from the bottom and work your way to the top. Hold down the phone with your other hand so you have a better grip on the device. Once removed, turn the motherboard over.

  12. BlackBerry Z10 Rear Facing Camera Replacement: 手順 12、 2の画像 1 BlackBerry Z10 Rear Facing Camera Replacement: 手順 12、 2の画像 2
    • Now that the motherboard is flipped over, the rear camera is visible.

  13. BlackBerry Z10 Rear Facing Camera Replacement: 手順 13、 3の画像 1 BlackBerry Z10 Rear Facing Camera Replacement: 手順 13、 3の画像 2 BlackBerry Z10 Rear Facing Camera Replacement: 手順 13、 3の画像 3
    • Remember to use the nylon spudger.

    • To disconnect the rear camera from the motherboard, carefully lift up the gold-plated connector. It is located just below the rear camera.

    • Then, hold and remove the rear camera using your thumb and index finger. It should detach along with the connector. Finally, set the rear camera aside.

終わりに

To reassemble your device, follow these instructions in reverse order.

6 の人々がこのガイドを完成させました。

作成者

7人の作成者と共同で作成されました。

Emie Lou Cruz

メンバー登録日: 09/08/14

1,069 ポイント

3のガイドは作成済み

チーム

CSU Fullerton, Team 1-2, Bruce Fall 2014 CSU Fullerton, Team 1-2, Bruce Fall 2014人のメンバー

CSUF-BRUCE-F14S1G2

3 メンバー

4のガイドは作成済み

0 件のコメント

コメントを追加

統計データ:

過去 24時間: 0

過去 7 日: 0

過去 30 日: 2

今までの合計 4,599