メインコンテンツにスキップ

BlackBerry 7510 Keypad Replacement

必要な工具と部品

  1. BlackBerry 7510 Keypad Replacement, Back Face of Phone: 手順 1、 1の画像 1
    • Remove the battery cover and battery before continuing.

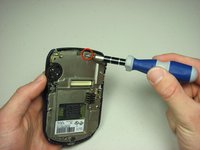
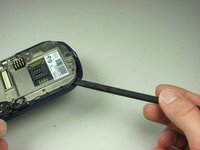
    • Remove the six T6 Torx screws on the back of the phone.

    • Make sure to keep the screws somewhere that they will not get lost.

  2. BlackBerry 7510 Keypad Replacement: 手順 2、 1の画像 1
    • Using your finger nail or a spudger, carefully pry up the back cover.

    • Begin in one spot and slowly circle around the device as you pry up all of the back cover.

  3. BlackBerry 7510 Keypad Replacement: 手順 3、 1の画像 1
    • Lift off the back cover.

  4. BlackBerry 7510 Keypad Replacement: 手順 4、 1の画像 1
    • Remove the two T6 screws.

  5. BlackBerry 7510 Keypad Replacement: 手順 5、 2の画像 1 BlackBerry 7510 Keypad Replacement: 手順 5、 2の画像 2
    • Remove the daughterboard.

    • Remove the exposed vibration motor.

  6. BlackBerry 7510 Keypad Replacement, Keypad: 手順 6、 3の画像 1 BlackBerry 7510 Keypad Replacement, Keypad: 手順 6、 3の画像 2 BlackBerry 7510 Keypad Replacement, Keypad: 手順 6、 3の画像 3
    • Unscrew metal plate.

    • Pry off front cover.

    • Lift off front cover to expose LCD screen.

  7. BlackBerry 7510 Keypad Replacement: 手順 7、 1の画像 1
    • Remove keypad from front cover and replace or fix existing pad.

終わりに

To reassemble your device, follow these instructions in reverse order.

作成者

8人の作成者と共同で作成されました。

Neil Johnson

メンバー登録日: 01/24/10

12 ポイント

6のガイドは作成済み

チーム

Cal Poly, Team 14-44, Regan Winter 2010 Cal Poly, Team 14-44, Regan Winter 2010人のメンバー

CPSU-REGAN-W10S14G44

4 メンバー

8のガイドは作成済み

0 件のコメント

コメントを追加

統計データ:

過去 24時間: 0

過去 7 日: 0

過去 30 日: 4

今までの合計 2,525