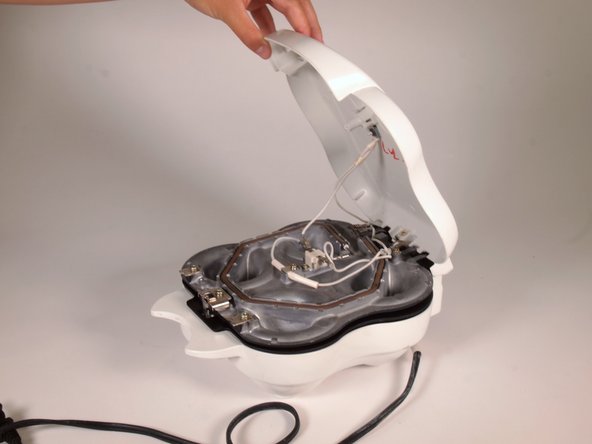
メインコンテンツにスキップ

Black and Decker The ShellBaker Meal and Dessert Maker G400 Disassembly

必要な工具と部品

  1. Black and Decker The ShellBaker Meal and Dessert Maker G400 Disassembly, Black and Decker The ShellBaker Meal and Dessert Maker G400 Disassembly: 手順 1、 1の画像 1
    • Make sure to unplug the ShellBaker and wait for it to cool before disassembly.

    • If there is a non-stick pan, make sure to take it out and set it aside.

  2. Black and Decker The ShellBaker Meal and Dessert Maker G400 Disassembly: 手順 2、 3の画像 1 Black and Decker The ShellBaker Meal and Dessert Maker G400 Disassembly: 手順 2、 3の画像 2 Black and Decker The ShellBaker Meal and Dessert Maker G400 Disassembly: 手順 2、 3の画像 3
    • Open the ShellBaker such that the outdented pan surface is facing up, and the handle is facing toward you.

    • Remove the two 12.7mm screws on either side of the handle using a Phillips #2 screwdriver.

    • Remove the handle from the ShellBaker.

  3. Black and Decker The ShellBaker Meal and Dessert Maker G400 Disassembly: 手順 3、 2の画像 1 Black and Decker The ShellBaker Meal and Dessert Maker G400 Disassembly: 手順 3、 2の画像 2
    • Orient the ShellBaker so that the back end is facing you.

    • Remove the 19.1 mm screw located above the bottom stand using a TR25 Torx Security screwdriver.

    • The top of the lid should now be detached from the top part of the pan and the circuitry on the top should be revealed.

  4. Black and Decker The ShellBaker Meal and Dessert Maker G400 Disassembly: 手順 4、 2の画像 1 Black and Decker The ShellBaker Meal and Dessert Maker G400 Disassembly: 手順 4、 2の画像 2
    • Flip the ShellBaker over so that you are looking at the bottom of it.

    • Remove the two 12.7mm screws on the end opposite the handle that attach the bottom stand to the base of the machine with a Phillips #2 screwdriver.

  5. Black and Decker The ShellBaker Meal and Dessert Maker G400 Disassembly: 手順 5、 2の画像 1 Black and Decker The ShellBaker Meal and Dessert Maker G400 Disassembly: 手順 5、 2の画像 2
    • Remove the bottom stand from the base of the machine.

    • Remove the two 12.7mm screws on the clip that keeps the power strip in place using a Phillips #2 screwdriver.

    • Remove the clip to release the power strip.

  6. Black and Decker The ShellBaker Meal and Dessert Maker G400 Disassembly: 手順 6、 2の画像 1 Black and Decker The ShellBaker Meal and Dessert Maker G400 Disassembly: 手順 6、 2の画像 2
    • Remove the two 12.7mm screws revealed in the bottom stand of the machine using a Phillips #2 screwdriver.

  7. Black and Decker The ShellBaker Meal and Dessert Maker G400 Disassembly: 手順 7、 2の画像 1 Black and Decker The ShellBaker Meal and Dessert Maker G400 Disassembly: 手順 7、 2の画像 2
    • Keeping the machine face down, remove the 19.1 mm screw in the center of the base using a TR25 Torx Security screwdriver (also known as Torx Tamper Proof screwdriver).

    • This screw may require a lot of force to unscrew.

  8. Black and Decker The ShellBaker Meal and Dessert Maker G400 Disassembly: 手順 8、 1の画像 1
    • The lid and base of the ShellBaker should now detach and you should be able to view the circuits of the machine on the top and bottom.

  9. Black and Decker The ShellBaker Meal and Dessert Maker G400 Disassembly: 手順 9、 1の画像 1
    • Circuit Diagram for the ShellBaker

終わりに

To reassemble your device, follow these instructions in reverse order.

作成者

2人の作成者と共同で作成されました。

Megan Yi

メンバー登録日: 09/14/22

169 ポイント

1ガイドが承認済み

チーム

0 件のコメント

コメントを追加

統計データ:

過去 24時間: 0

過去 7 日: 1

過去 30 日: 5

今までの合計 92