メインコンテンツにスキップ

Black and Decker IR02V-T Power Cord Replacement

必要な工具と部品

  1. Black and Decker IR02V-T Power Cord Replacement, Power Cord: 手順 1、 3の画像 1 Black and Decker IR02V-T Power Cord Replacement, Power Cord: 手順 1、 3の画像 2 Black and Decker IR02V-T Power Cord Replacement, Power Cord: 手順 1、 3の画像 3
    • Remove the two silicone covers which encase the screws.

    • Remove both 1 mm screws using a T5 Torx screwdriver.

    • Pry open the plastic cover starting from the top of the iron.

  2. Black and Decker IR02V-T Power Cord Replacement: 手順 2、 3の画像 1 Black and Decker IR02V-T Power Cord Replacement: 手順 2、 3の画像 2 Black and Decker IR02V-T Power Cord Replacement: 手順 2、 3の画像 3
    • Remove both caps from the end of the wire by using pliers.

    • Unfold the metal in the caps using the pliers to release the exposed wire.

    • Remove the two 1 mm screws holding down the wire using a Phillips #00 screwdriver.

    • Once the wires are exposed separate and fold to opposite sides.

  3. Black and Decker IR02V-T Power Cord Replacement: 手順 3、 3の画像 1 Black and Decker IR02V-T Power Cord Replacement: 手順 3、 3の画像 2 Black and Decker IR02V-T Power Cord Replacement: 手順 3、 3の画像 3
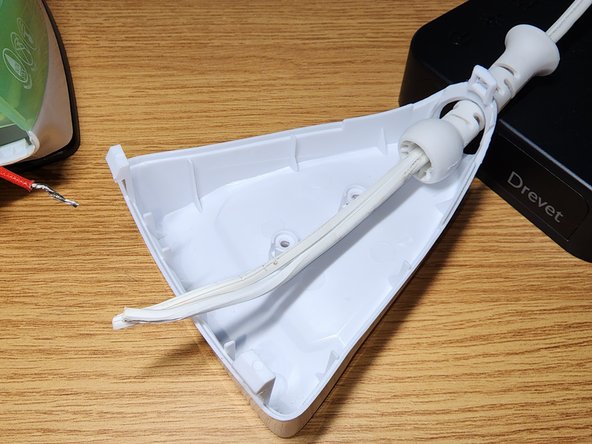
    • Remove the old power cord from the iron completely.

    • Insert the new cord through the plastic cover and hole of the iron as demonstrated in the image.

  4. Black and Decker IR02V-T Power Cord Replacement: 手順 4、 3の画像 1 Black and Decker IR02V-T Power Cord Replacement: 手順 4、 3の画像 2 Black and Decker IR02V-T Power Cord Replacement: 手順 4、 3の画像 3
    • Expose about half an inch of wire by removing the silicone that encases it.

    • Tie the new wire into a knot and connect the wires accordingly.

    • Place the caps over the exposed wire and use pliers to tighten the metal to secure the wire.

  5. Black and Decker IR02V-T Power Cord Replacement: 手順 5、 3の画像 1 Black and Decker IR02V-T Power Cord Replacement: 手順 5、 3の画像 2 Black and Decker IR02V-T Power Cord Replacement: 手順 5、 3の画像 3
    • Once the caps are over the wires add the two 1 mm Phillips screws along with the small base plate which secures the wire.

    • When all wires are secure place the plastic cover and screw back in the 1mm Torx screws.

ゴール

作成者

2人の作成者と共同で作成されました。

Kevin B

メンバー登録日: 11/10/22

146 ポイント

1ガイドが承認済み

チーム

CSU Los Angeles, Team 2-28, Briggs Fall 2022 CSU Los Angeles, Team 2-28, Briggs Fall 2022人のメンバー

CSULA-BRIGGS-F22S2G28

1 メンバー

1のガイドは作成済み

0 件のコメント

コメントを追加

統計データ:

過去 24時間: 0

過去 7 日: 5

過去 30 日: 65

今までの合計 895