メインコンテンツにスキップ

Bissell Air180 Motherboard Replacement

必要な工具と部品

  1. Bissell Air180 Motherboard Replacement, Air Filter: 手順 1、 2の画像 1 Bissell Air180 Motherboard Replacement, Air Filter: 手順 1、 2の画像 2
    • Squeeze the clip on the back panel of the bottom housing and pull the panel away from the housing, exposing the air filter.

  2. Bissell Air180 Motherboard Replacement: 手順 2、 1の画像 1
    • Grab the sides of the filter and pull it up.

  3. Bissell Air180 Motherboard Replacement: 手順 3、 1の画像 1
    • Pull the filter away from the bottom housing, removing it from the rest of the device.

  4. Bissell Air180 Motherboard Replacement, Power Supply: 手順 4、 1の画像 1
    • Remove the four 18mm Phillips #1 screws connecting the bottom housing to the rest of the device.

  5. Bissell Air180 Motherboard Replacement: 手順 5、 3の画像 1 Bissell Air180 Motherboard Replacement: 手順 5、 3の画像 2 Bissell Air180 Motherboard Replacement: 手順 5、 3の画像 3
    • Pull the bottom housing away from the rest of the device separating the power supply.

    • Unplug the red cord to fully disconnect the power supply from the fan and motherboard housing.

  6. Bissell Air180 Motherboard Replacement, Control Buttons: 手順 6、 3の画像 1 Bissell Air180 Motherboard Replacement, Control Buttons: 手順 6、 3の画像 2 Bissell Air180 Motherboard Replacement, Control Buttons: 手順 6、 3の画像 3
    • Pry off the top vent, separating it from the fan and motherboard housing.

  7. Bissell Air180 Motherboard Replacement: 手順 7、 2の画像 1 Bissell Air180 Motherboard Replacement: 手順 7、 2の画像 2
    • Pry the button control panel up and away from the rest of the device using a spudger.

  8. Bissell Air180 Motherboard Replacement: 手順 8、 2の画像 1 Bissell Air180 Motherboard Replacement: 手順 8、 2の画像 2
    • Pull the wire connecting the button controls to the fan housing to fully disconnect the button controls from the device.

  9. Bissell Air180 Motherboard Replacement, Fan: 手順 9、 3の画像 1 Bissell Air180 Motherboard Replacement, Fan: 手順 9、 3の画像 2 Bissell Air180 Motherboard Replacement, Fan: 手順 9、 3の画像 3
    • Flip the motherboard and fan housing upside down to find where to disconnect the fan from the rest of the device.

    • Remove the two 11 mm screws using a Phillips #1 screwdriver.

    • Detach the two wires connecting the fan to the motherboard so the fan is now loose inside the housing.

  10. Bissell Air180 Motherboard Replacement: 手順 10、 2の画像 1 Bissell Air180 Motherboard Replacement: 手順 10、 2の画像 2
    • Flip the motherboard and fan housing back over and pull the fan up separating it from the rest of the device.

  11. Bissell Air180 Motherboard Replacement, Motherboard: 手順 11、 2の画像 1 Bissell Air180 Motherboard Replacement, Motherboard: 手順 11、 2の画像 2
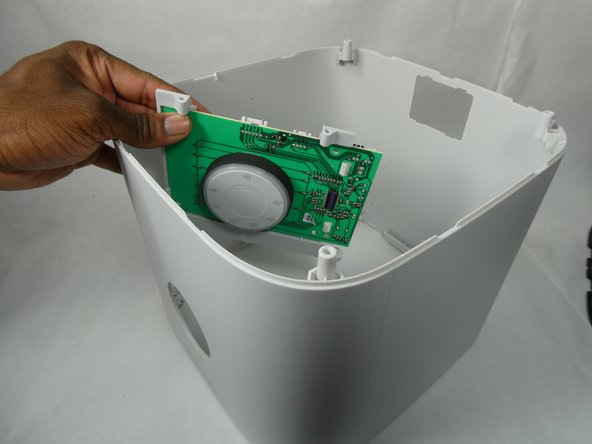
    • Apply pressure and push out the control knob to remove the motherboard from the rest of the device.

    • Removing the two 11mm Phillips #1 screws when disconnecting the fan also disconnected the motherboard from the rest of the device.

終わりに

To reassemble your device, follow these instructions in reverse order.

作成者

2人の作成者と共同で作成されました。

Aleah Ramos

メンバー登録日: 10/26/22

533 ポイント

5のガイドは作成済み

チーム

UMass Dartmouth, Team 3-4, Botvin Fall 2022 UMass Dartmouth, Team 3-4, Botvin Fall 2022人のメンバー

UMASSD-BOTVIN-F22S3G4

4 メンバー

5のガイドは作成済み

0 件のコメント

コメントを追加

統計データ:

過去 24時間: 0

過去 7 日: 1

過去 30 日: 1

今までの合計 82