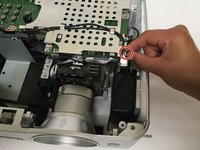
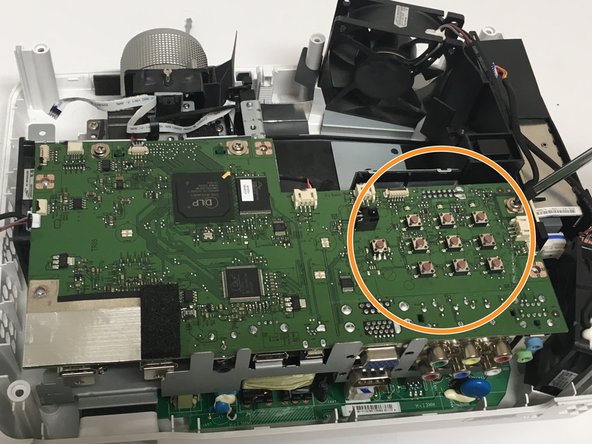
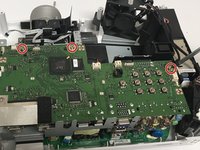
メインコンテンツにスキップ

BenQ HT1075 Projector Circuit Board Replacement

必要な工具と部品

  1. BenQ HT1075 Projector Circuit Board Replacement, Lamp: 手順 1、 1の画像 1
    • Loosen the 2.5 mm Phillips #1 screw that holds the top assembly in place using a Philips #1 (PH1) screwdriver. This will enable you to lift and slide off the top cover.

    • Fully remove the top cover in order to get to the lamp housing.

  2. BenQ HT1075 Projector Circuit Board Replacement: 手順 2、 1の画像 1
    • Carefully peel off the adhesive film covering the lamp housing.

  3. BenQ HT1075 Projector Circuit Board Replacement: 手順 3、 1の画像 1
    • Using a Phillips #1 (PH1) screwdriver, loosen and remove the single 2.5 mm Phillips #1 screw that secures the lamp housing to the projector.

  4. BenQ HT1075 Projector Circuit Board Replacement: 手順 4、 1の画像 1
    • Remove the lamp from the projector by pulling on the lamp handle.

    • Apply more force on the side opposite of the newly removed screw as you pull the lamp out.

  5. BenQ HT1075 Projector Circuit Board Replacement, Circuit Board: 手順 5、 1の画像 1
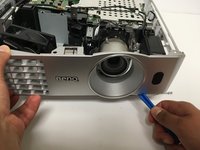
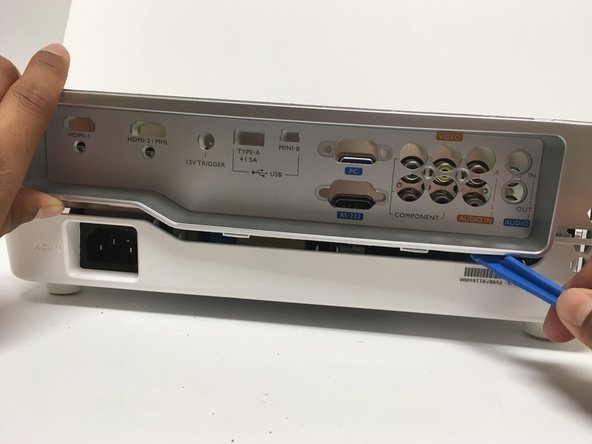
    • Turn the projector over and remove the five 9.5 mm Phillips #1 screws that hold the back cover with a Phillips #1 (PH1) screwdriver.

  6. BenQ HT1075 Projector Circuit Board Replacement, Remove the 6th screw holding the top cover: 手順 6、 1の画像 1
    • Flip the projector and remove the 6th and last crew.

  7. BenQ HT1075 Projector Circuit Board Replacement: 手順 7、 1の画像 1
    • Using an opening tool, remove the top cover by first loosening its top cover.

  8. BenQ HT1075 Projector Circuit Board Replacement: 手順 8、 2の画像 1 BenQ HT1075 Projector Circuit Board Replacement: 手順 8、 2の画像 2
    • Unplug the wire that connects the front cover to the circuit board.

    • Now use the opening tool to pry the front cover from the platform.

    • Gently pull the top cover from the rest of the frame.

  9. BenQ HT1075 Projector Circuit Board Replacement: 手順 9、 2の画像 1 BenQ HT1075 Projector Circuit Board Replacement: 手順 9、 2の画像 2
    • To prevent potential for electrical damage, disconnect any wires connected to the circuit board.

    • Using the opening tool, loosen the sides of the platform. Then gently pull them off from the projector components.

  10. BenQ HT1075 Projector Circuit Board Replacement: 手順 10、 3の画像 1 BenQ HT1075 Projector Circuit Board Replacement: 手順 10、 3の画像 2 BenQ HT1075 Projector Circuit Board Replacement: 手順 10、 3の画像 3
    • Remove these four 8.5 mm Phillips #1 screws using a Phillips #1 (PH1) screwdriver.

    • Afterwards, use a 5mm nut driver to remove the four remaining screws.

    • Use the opening tool to loosen the back cover then pull it off.

  11. BenQ HT1075 Projector Circuit Board Replacement: 手順 11、 1の画像 1
    • With a Phillips #1 (PH1) screwdriver, remove the four 6.3 mm Phillips screws that hold the metal casing on top of the circuit board.

    • Remove the metal casing.

  12. BenQ HT1075 Projector Circuit Board Replacement: 手順 12、 2の画像 1 BenQ HT1075 Projector Circuit Board Replacement: 手順 12、 2の画像 2
    • Using the Phillips #1 (PH1) screwdriver, remove the three 6.3 mm Phillips #1 screws holding down the circuit board.

    • Carefully pull the circuit board from the frame, adding force to the area where the pushbuttons are located.

終わりに

To reassemble your device, follow these instructions in reverse order.

2 の人々がこのガイドを完成させました。

作成者

4人の作成者と共同で作成されました。

Gabriela Remulla

メンバー登録日: 09/26/17

912 ポイント

5のガイドは作成済み

チーム

Cal Poly, Team S6-G1, Banghart Fall 2017 Cal Poly, Team S6-G1, Banghart Fall 2017人のメンバー

CPSU-BANGHART-F17S6G1

5 メンバー

5のガイドは作成済み

2 件のコメント

miss i need to get some information regarding this projector repair. if you can email me, sandarukbio@gmail.com

sandarukbio92 - 返信

very good instructions and pictures thank you for your detailed work

Quinn Griffith - 返信

コメントを追加

統計データ:

過去 24時間: 0

過去 7 日: 4

過去 30 日: 14

今までの合計 2,218