はじめに
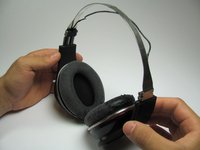
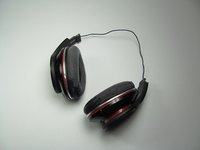
The headband is the plastic housing for the headphones' retracting mechanism and the audio wire between the two speakers. You will be removing the headband from each of the two speakers.
必要な工具と部品
-
-
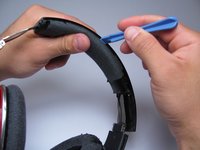
Using the T5 Torx screwdriver, remove the black screws on both sides of the outside of the headband.
-
4 (2 per side) Torx type T5, 3.5mm long screws.
 FixBotに聞いてみる
-
-
-
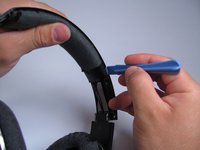
Use the plastic opening tool to gently pry the black plastic hinge piece directly away from the headband as shown.
-
-
-
-
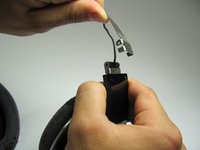
Remove the small metal hinges from their housings. There are a total of 4 hinges, two per side of the headphones.
-
-
-
Using a T5 Torx screwdriver, remove the silver screws from the silver segment of the headband.
-
4 (2 per side) Torx type T5, 4.0mm long screws.
-
-
-
Using the plastic opening tool, gently pry the headband cushion directly away from the plastic portion of the headband as shown. Pry the plastic portion a small amount and then move the opening tool sideways along on the headband. Repeat on both sides until the cushion separates from the top plastic part of the headband.
-
-
-
Carefully remove the metal band from each of the hinge housings on each side. These should come off quite easily, provided that you have removed the hinges as instructed in step 3.
-
Congratulations, you have completely removed the headband! This will allow for ease of accessibility to the speakers should you choose to delve further into the depths of your headphones.
-


To reassemble your device, follow these instructions in reverse order.
20 の人々がこのガイドを完成させました。
チーム

Cal Poly, Team 9-18, Regan Spring 2014 Cal Poly, Team 9-18, Regan Spring 2014人のメンバー
CPSU-REGAN-S14S9G18
4 メンバー
19のガイドは作成済み
2件のガイドコメント
When replacing the headband there is no need to remove any screws or hinges for the beats studio 1.0 as described here.
Simply carefully remove the headband cushion by snapping it out from the frame as it is merely a push fir and not reattained at the two ends it is just push fit into the top plastic section. Just tease it out gently with small screwdriver and then the the replacement in place and listen to the click as it snaps in. Simple and easy takes less than a minute.