メインコンテンツにスキップ

この修理ガイドは変更されています。最新の未承認バージョンに切り替えます。

Battery and Trackpad. Disassembling MacBook Pro 15" Retina 2012-2015

必要な工具と部品

  1. Battery and Trackpad. Disassembling MacBook Pro 15" Retina 2012-2015, Battery and Trackpad. Disassembling MacBook Pro 15" Retina 2012-2015: 手順 1、 2の画像 1 Battery and Trackpad. Disassembling MacBook Pro 15" Retina 2012-2015, Battery and Trackpad. Disassembling MacBook Pro 15" Retina 2012-2015: 手順 1、 2の画像 2
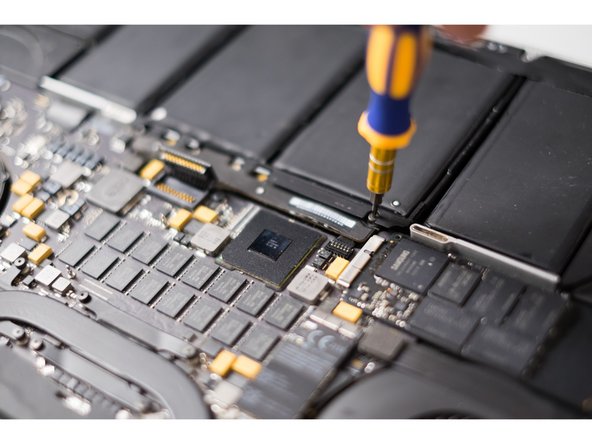
    • Remove the following pentalobe screws securing the lower case to the MacBook Pro:

    • Eight 3.0 mm

    • Two 2.3 mm

  2. Battery and Trackpad. Disassembling MacBook Pro 15" Retina 2012-2015: 手順 2、 1の画像 1
    • Lifting from the edge nearest the clutch cover, lift the lower case off the MacBook Pro.

    • Set the lower case aside.

  3. Battery and Trackpad. Disassembling MacBook Pro 15" Retina 2012-2015: 手順 3、 1の画像 1
    • Peel back the warning label covering the battery connector.

  4. Battery and Trackpad. Disassembling MacBook Pro 15" Retina 2012-2015: 手順 4、 3の画像 1 Battery and Trackpad. Disassembling MacBook Pro 15" Retina 2012-2015: 手順 4、 3の画像 2 Battery and Trackpad. Disassembling MacBook Pro 15" Retina 2012-2015: 手順 4、 3の画像 3
    • No metal tools!

    • Using the flat end of a spudger, gently pry the battery connector straight up out of its socket on the logic board.

    • Bend the battery cables back and out of the way, ensuring that the battery connector doesn't accidentally make contact with the logic board.

  5. Battery and Trackpad. Disassembling MacBook Pro 15" Retina 2012-2015: 手順 5、 2の画像 1 Battery and Trackpad. Disassembling MacBook Pro 15" Retina 2012-2015: 手順 5、 2の画像 2
    • Remove the following T5 Torx battery screws.

  6. Battery and Trackpad. Disassembling MacBook Pro 15" Retina 2012-2015: 手順 6、 3の画像 1 Battery and Trackpad. Disassembling MacBook Pro 15" Retina 2012-2015: 手順 6、 3の画像 2 Battery and Trackpad. Disassembling MacBook Pro 15" Retina 2012-2015: 手順 6、 3の画像 3
    • There is risk to damage the battery! (Do not use ANY metal tools - puncturing the battery can cause fire and possibly leak battery gel!)

    • Please note: carefully cut the duct tape layer under the battery with thin wire string. Pull back and forth slowly. Do not pry up with any metal tools.

  7. Battery and Trackpad. Disassembling MacBook Pro 15" Retina 2012-2015: 手順 7、 2の画像 1 Battery and Trackpad. Disassembling MacBook Pro 15" Retina 2012-2015: 手順 7、 2の画像 2
    • Be sure you did not damage the loopback of the track-pad!

    • Please lift up the plaque under the battery with metal spudger.

  8. Battery and Trackpad. Disassembling MacBook Pro 15" Retina 2012-2015: 手順 8、 2の画像 1 Battery and Trackpad. Disassembling MacBook Pro 15" Retina 2012-2015: 手順 8、 2の画像 2
    • Remove battery

  9. Battery and Trackpad. Disassembling MacBook Pro 15" Retina 2012-2015: 手順 9、 2の画像 1 Battery and Trackpad. Disassembling MacBook Pro 15" Retina 2012-2015: 手順 9、 2の画像 2
    • Using the flat end of a spudger, pry the trackpad connector.

  10. Battery and Trackpad. Disassembling MacBook Pro 15" Retina 2012-2015: 手順 10、 3の画像 1 Battery and Trackpad. Disassembling MacBook Pro 15" Retina 2012-2015: 手順 10、 3の画像 2 Battery and Trackpad. Disassembling MacBook Pro 15" Retina 2012-2015: 手順 10、 3の画像 3
    • Unscrew the light-colored screws

    • Remove trackpad.

  11. Battery and Trackpad. Disassembling MacBook Pro 15" Retina 2012-2015: 手順 11、 1の画像 1
    • Adjustment of trackpad touching level

  12. Battery and Trackpad. Disassembling MacBook Pro 15" Retina 2012-2015: 手順 12、 1の画像 1
    • Good luck!

終わりに

To reassemble your device, follow these instructions in reverse order.

53 の人々がこのガイドを完成させました。

作成者

3人の作成者と共同で作成されました。

Aleksandr ApplePartsPRO

メンバー登録日: 10/31/15

1,727 ポイント

1ガイドが承認済み

チーム

AppleParts.PRO AppleParts.PRO人のメンバー

Business

1 メンバー

4のガイドは作成済み

54 件のコメント

Thank you! I was able to swap out new trackpad w/ these instructions.

Bobby - 返信

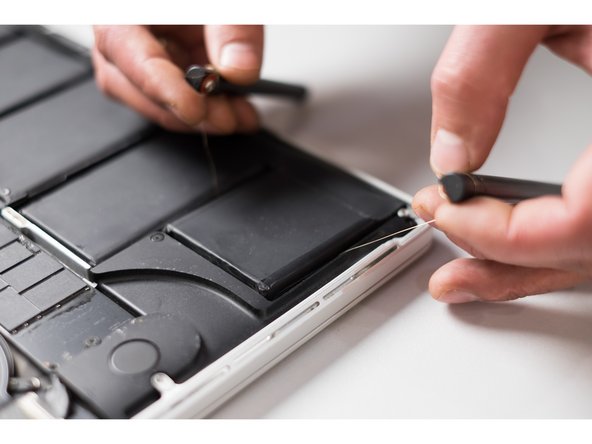
Hi, Could I just ask where did you get your 'Handles' for the wire string? I bought some titanium wire a while ago but literally cant grip it. I have searched ebay etc but nothing is comeing up - Maybe my search terms aren't correct.

Thanks

Aaron - 返信

Hello! You can use any strong jaws. We ordered holders in China.

Aleksandr ApplePartsPRO -

Hi, Thanks for that, sorry for the late reply. I have ordered a set from china so I'll see what they're like, in the meantime if anyone is interested I had some random parts laying around, I made a set out of a couple of plastic spudgers, some polymorph to enlarge the top which I sank a motherboard peg into which I can then screw some screws with the large heads into. Seems to do a pretty good job, i'll upload a pic if any1 is interested.

Aaron - 返信

コメントを追加

統計データ:

過去 24時間: 9

過去 7 日: 40

過去 30 日: 241

今までの合計 82,662