メインコンテンツにスキップ

この修理ガイドは変更されています。最新の未承認バージョンに切り替えます。

Audiovox CR8030iE5 Speakers Replacement

必要な工具と部品

  1. Audiovox CR8030iE5 Speakers Replacement, Top-Casing: 手順 1、 1の画像 1
    • Turn the device upside down.

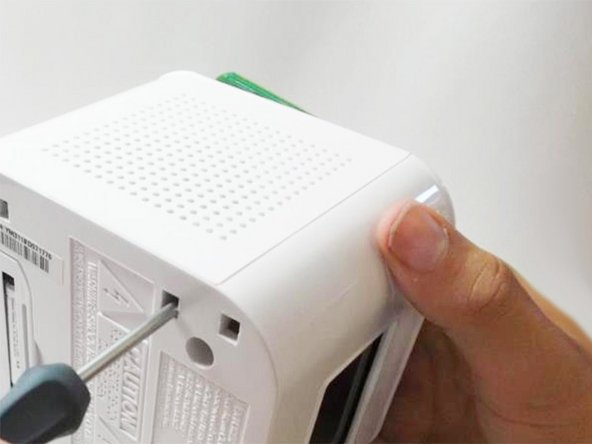
    • Apply constant pressure to the base of your Audiovox, while holding the plastic casing until the casing is completely removed.

  2. Audiovox CR8030iE5 Speakers Replacement: 手順 2、 1の画像 1
    • Remove the four screws from the base using a Phillips #1 screwdriver.

  3. Audiovox CR8030iE5 Speakers Replacement: 手順 3、 1の画像 1
    • Turn the device right-side up.

    • Gently pull the top panel off of the device.

  4. Audiovox CR8030iE5 Speakers Replacement: 手順 4、 1の画像 1
    • Using a Phillips #1 screwdriver, remove the screw found in the middle of the board.

  5. Audiovox CR8030iE5 Speakers Replacement: 手順 5、 1の画像 1
    • Pull back the board gently to avoid disconnecting the attached wires.

    • This allows you to view the soldered connections on the other side, and the internal components.

  6. Audiovox CR8030iE5 Speakers Replacement, Speakers: 手順 6、 1の画像 1
    • Notice that there are two speakers located on opposite sides of the inside of your Audiovox.

    • Slide a plastic opening tool along the rim of the faulty speaker where it meets the plastic casing.

    • This action removes any glue or adhesive that holds the speaker to the wall of your Audiovox.

  7. Audiovox CR8030iE5 Speakers Replacement: 手順 7、 2の画像 1 Audiovox CR8030iE5 Speakers Replacement: 手順 7、 2の画像 2
    • Using your thumb, applying constant pressure, pull back the plastic tab towards the speaker and away from the metal bracket.

    • Simultaneously insert a Phillips #00 screwdriver into the square hole on the underside of clock and push through to lift the metal bracket off of the plastic tab.

  8. Audiovox CR8030iE5 Speakers Replacement: 手順 8、 1の画像 1
    • Repeat the second part of "Step 7" for the other hole.

  9. Audiovox CR8030iE5 Speakers Replacement: 手順 9、 1の画像 1
    • Pull up on the metal brackets, found on either side, until the speaker is completely removed. Removing the speaker is rather challenging. Don't get discouraged if it takes multiple attempts!

    • Each speaker contains a powerful magnet. Try to keep them away from nearby metal objects.

終わりに

To reassemble your device, follow these instructions in reverse order.

3 の人々がこのガイドを完成させました。

作成者

9人の作成者と共同で作成されました。

Nab Sengupta

メンバー登録日: 04/18/13

55 ポイント

4のガイドは作成済み

チーム

Cal Poly, Team 10-39, Amido Spring 2013 Cal Poly, Team 10-39, Amido Spring 2013人のメンバー

CPSU-AMIDO-S13S10G39

4 メンバー

6のガイドは作成済み

0 件のコメント

コメントを追加

統計データ:

過去 24時間: 0

過去 7 日: 5

過去 30 日: 5

今までの合計 1,010