このバージョンは誤った内容を含んでいる可能性があります。最新の承認済みスナップショットに切り替えてください。
必要な工具と部品
-
この手順は未翻訳です。 翻訳を手伝う。
-
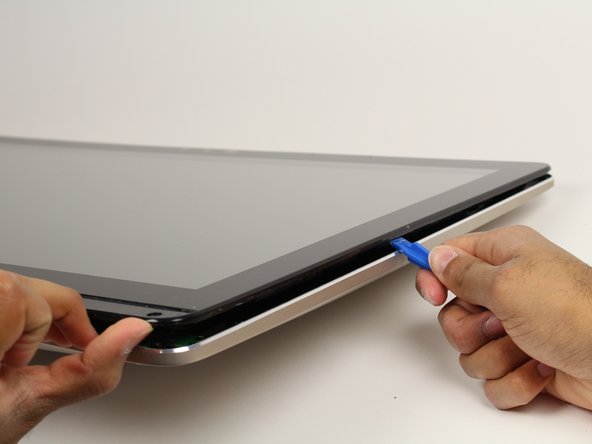
Use the plastic opening tool to pry off the black plastic strip at the bottom of the screen by wiggling the tool between the strip and the screen.
-
Run the opening tool slowly along the base of the screen, peeling the black strip back, until the opposite end of the screen is reached.
-
-
-
この手順は未翻訳です。 翻訳を手伝う。
-
Place the computer on its back, facing up.
-
Wedge the plastic opening tool in between the screen and the bezel of the aluminum computer casing.
-
Move the tool along the entire edge of the screen with an up-and-down prying motion to loosen the screen from the casing. Do not lift the entire screen away from the computer yet.
-
-
この手順は未翻訳です。 翻訳を手伝う。
-
Lift the screen from the bottom edge by about 6 inches. Prop it open with one hand.
-
Look inside the computer and locate five (5) cables that connect the embedded components of the screen (camera, microphone, etc.) to the rest of the computer.
Same here my model just had 4 cables.
-
-
この手順は未翻訳です。 翻訳を手伝う。
-
Use a finger to lift the plastic locking flaps that hold the remaining three (3) ribbon cables in place.
-
Remove the cables from their terminals by slipping them away from their connectors.
When re-connecting take great care to ensure the ribbon cables are square and flat - I had to take mine apart again to re-seat one as the screen was blank - worked fine once re-seated properly.
-


ある他の人がこのガイドを完成しました。
チーム

Cal Poly, Team S4-G1, Livingston Fall 2017 Cal Poly, Team S4-G1, Livingston Fall 2017人のメンバー
CPSU-LIVINGSTON-F17S4G1
5 メンバー
25のガイドは作成済み
2 件のコメント
In step 6 you are removing a ribbon cable with your fingernail. The same cable is damaged for me. Can you share the part number of this cable? I can see this a label is on this cable. I believe this is enabling the digitiser to work. I contacted Asus UK and they have no clue. Thanks
On my machine, it was positively impossible to use a plastic opening tool, or even a razor to get under the plastic strip - even after heating up with a heat gun. However, I found another method that will also help prevent damage to the plastic strip: in pictures for Steps 2 and 3, you can see that under the plastic strip, next to some of the screws there are square holes in the plastic body. I was able to shape a sturdy paper clip into an “L” shape, and feed it through the right-most exhaust vent at the bottom to insert into this square hole from below. From there, you can use the paper clip to try to push the plastic strip up from below. It still required some heat from the heat gun, but eventually I was able to push the plastic strip up enough to be able to slip a razor blade under it.
Alexander V Trofimuk - 返信
I too was unable to do this with the plastic tools, but used a small flat screwdriver to ply up the corned on the bottom curved corner and plastic tools form there - just left a small blemish on the plastic besel, but I can live with that.
Andy Monaghan - 返信