メインコンテンツにスキップ

Asus X751L Keyboard Replacement

必要な工具と部品

  1. Asus X751L Keyboard Replacement, Keyboard: 手順 1、 1の画像 1
    • With the screen closed, place your laptop upside-down with the front facing you.

    • Remove the six 14.6mm Phillips #00 screws.

    • Remove the four 6.6mm Phillips #00 screws.

  2. Asus X751L Keyboard Replacement: 手順 2、 1の画像 1
    • Flip the laptop over and open the lid.

    • Pry around the edges of the laptop base using the plastic opening tool.

    • Prying too hard can break the plastic clips.

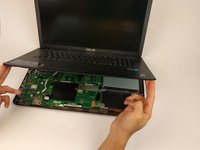
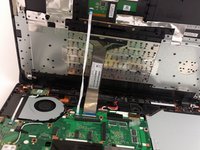
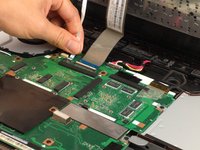
  3. Asus X751L Keyboard Replacement: 手順 3、 3の画像 1 Asus X751L Keyboard Replacement: 手順 3、 3の画像 2 Asus X751L Keyboard Replacement: 手順 3、 3の画像 3
    • Carefully lift the keyboard up.

    • Be very careful when lifting the keyboard up. Two zero insertion force (ZIF) cables are between the keyboard assembly and the motherboard. Do not lift the assembly too high.

    • Disconnect the two ZIF connectors from the motherboard using your fingernail to lift the cream-colored tab.

終わりに

To reassemble your device, follow these instructions in reverse order.

3 の人々がこのガイドを完成させました。

作成者

2人の作成者と共同で作成されました。

John Enderton

メンバー登録日: 02/02/17

576 ポイント

2のガイドは作成済み

チーム

USF Tampa, Team 17-2, Blackwell Spring 2017 USF Tampa, Team 17-2, Blackwell Spring 2017人のメンバー

USFT-BLACKWELL-S17S17G2

4 メンバー

5のガイドは作成済み

コメント 1 件

Looks easy enough, I have a Polish version qwertz keyboard , a 752L model-17" anyone know a compatible UK qwerty keyboard as a replacement? - or or a k. board shared with another model that will fit ? Asus service centre are less than helpful .!

phil.kath4 - 返信

コメントを追加

統計データ:

過去 24時間: 1

過去 7 日: 7

過去 30 日: 26

今までの合計 3,155