メインコンテンツにスキップ
リペアコミュニティに参加 - アカウントの作成

Asus X551CA LCD Replacement

必要な工具と部品

  1. Asus X551CA LCD Replacement, Keyboard Plate Cover: 手順 1、 1の画像 1
    • Power off and unplug your laptop before you begin.

    • Turn the laptop upside-down and remove the following screws using a Phillips #0 driver:

    • Two 9.5 mm screws in the middle of the back edge, and one 9.5 mm screw in the right edge

    • Two 4.3 mm screws in the back corners

    • One 17.5 mm screw at the left edge near the optical drive

    • Three 4.3 mm screws in the front edge

    FixBotに聞いてみる
  2. Asus X551CA LCD Replacement: 手順 2、 1の画像 1
    • Use the plastic opening tool to separate the keyboard plate cover from the bottom cover. In order to do this, insert the plastic opening tool in between the keyboard plate cover and the bottom cover, then slide along edges to pry open.

    FixBotに聞いてみる
  3. Asus X551CA LCD Replacement: 手順 3、 1の画像 1
    • Locate the three ribbons connecting the keyboard plate cover to the bottom cover.

    FixBotに聞いてみる
  4. Asus X551CA LCD Replacement: 手順 4、 3の画像 1 Asus X551CA LCD Replacement: 手順 4、 3の画像 2 Asus X551CA LCD Replacement: 手順 4、 3の画像 3
    • Invert the laptop in order to gain access to the ribbons.

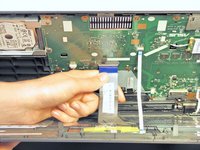
    • Remove each ribbon by flipping the small white plastic flap up and gently pulling on the ribbon.

    FixBotに聞いてみる
  5. Asus X551CA LCD Replacement: 手順 5、 1の画像 1
    • Now that the ribbons have been detached from the bottom cover, carefully remove the keyboard plate cover. Once it has been removed, place it in a safe and moisture free area so it does not get damaged.

    FixBotに聞いてみる
  6. Asus X551CA LCD Replacement, Hard Drive: 手順 6、 1の画像 1
    • Unscrew the three 5.5 mm Phillips #0 screws with the Phillips #0 Screwdriver.

    FixBotに聞いてみる
  7. Asus X551CA LCD Replacement: 手順 7、 1の画像 1
    • Once the screws have been removed, place your fingers on the left corners and push the hard drive towards the right edge of the laptop (relative to the picture).

    FixBotに聞いてみる
  8. Asus X551CA LCD Replacement: 手順 8、 1の画像 1
    • Once it is free, remove the hard drive from its internal cavity.

    FixBotに聞いてみる
  9. Asus X551CA LCD Replacement, Spacer: 手順 9、 1の画像 1
    • Using the Phillips #0 Screwdriver, unscrew the 5.5 mm Phillips #0 screw that holds the spacer in place.

    FixBotに聞いてみる
  10. Asus X551CA LCD Replacement: 手順 10、 1の画像 1
    • Remove the spacer from the laptop by gently sliding it towards the right edge of the laptop.

    FixBotに聞いてみる
  11. Asus X551CA LCD Replacement, WiFi Card: 手順 11、 1の画像 1
    • Use the Phillips #0 Screwdriver to unscrew the 3.2 mm Phillips #0 screw which attaches the WiFi card to the motherboard.

    FixBotに聞いてみる
  12. Asus X551CA LCD Replacement: 手順 12、 1の画像 1
    • Disconnect the Wifi card from the motherboard by gently sliding it towards the right edge of the laptop.

    FixBotに聞いてみる
  13. Asus X551CA LCD Replacement: 手順 13、 1の画像 1
    • Remove each of the two small antenna connections by disconnecting one wire at a time. Each wire should easily unsnap from the Wifi card.

    FixBotに聞いてみる
  14. Asus X551CA LCD Replacement, Battery: 手順 14、 1の画像 1
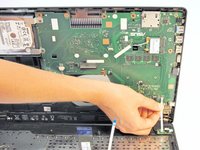
    • Remove the battery from the laptop by applying pressure on both ends and lifting it out of the case.

    FixBotに聞いてみる
  15. Asus X551CA LCD Replacement, Motherboard: 手順 15、 1の画像 1
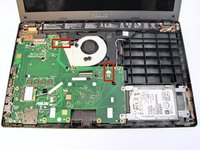
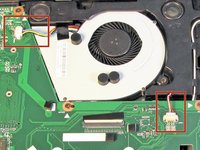
    • With the Phillips #0 Screwdriver, remove the nine 5.5 mm Phillips #0 screws which hold the motherboard in place.

    FixBotに聞いてみる
  16. Asus X551CA LCD Replacement: 手順 16、 2の画像 1 Asus X551CA LCD Replacement: 手順 16、 2の画像 2
    • Now, locate the two wires connected to the motherboard.

    FixBotに聞いてみる
  17. Asus X551CA LCD Replacement: 手順 17、 2の画像 1 Asus X551CA LCD Replacement: 手順 17、 2の画像 2
    • Remove the wires by easily pulling them parallel to the motherboard's surface.

    • The wires are very fragile. Be sure to pull carefully so that they do not break!

    FixBotに聞いてみる
  18. Asus X551CA LCD Replacement: 手順 18、 2の画像 1 Asus X551CA LCD Replacement: 手順 18、 2の画像 2
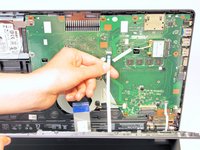
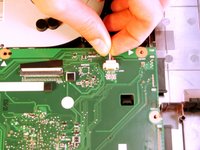
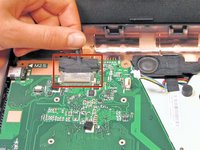
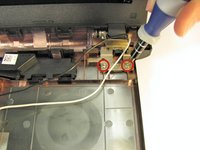
    • Remove the LCD display connection by gently pulling on the attached wire.

    • Gently lift any tape that may be holding the connection.

    FixBotに聞いてみる
  19. Asus X551CA LCD Replacement: 手順 19、 1の画像 1
    • Remove the motherboard from the case by gently lifting it upward.

    FixBotに聞いてみる
  20. Asus X551CA LCD Replacement, Front Display Bezel: 手順 20、 1の画像 1
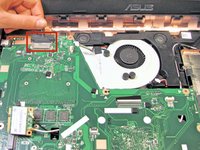
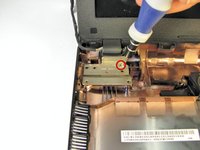
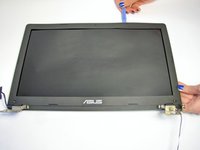
    • Locate both of the hinges that connect the monitor to the bottom plate cover.

    FixBotに聞いてみる
  21. Asus X551CA LCD Replacement: 手順 21、 2の画像 1 Asus X551CA LCD Replacement: 手順 21、 2の画像 2
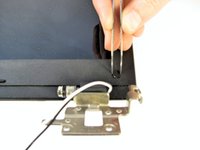
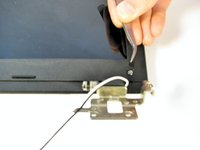
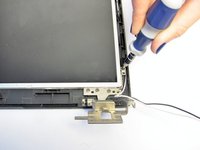
    • Use the Phillips #0 screwdriver to unscrew the two 4.8 mm Phillips #0 screws on the right hinge, and the one 4.8 mm Phillips #0 screw on the left hinge.

    FixBotに聞いてみる
  22. Asus X551CA LCD Replacement: 手順 22、 1の画像 1
    • Once the screws are removed, the monitor should easily lift away from the bottom plate cover

    FixBotに聞いてみる
  23. Asus X551CA LCD Replacement: 手順 23、 1の画像 1
    • Locate the two stickers that cover up the screws that hold the front bezel in place

    FixBotに聞いてみる
  24. Asus X551CA LCD Replacement: 手順 24、 2の画像 1 Asus X551CA LCD Replacement: 手順 24、 2の画像 2
    この手順で使用する道具:
    Tweezers
    $4.99
    • Use a pair of tweezers to remove these stickers.

    • The stickers can be difficult to grasp with the tweezers so do not be discouraged when trying to remove them!

    FixBotに聞いてみる
  25. Asus X551CA LCD Replacement: 手順 25、 1の画像 1
    • Once the stickers are removed, the two screws that hold the front bezel in place will be exposed.

    FixBotに聞いてみる
  26. Asus X551CA LCD Replacement: 手順 26、 1の画像 1
    • Use the Phillips #0 screwdriver to remove the two 4.8 mm Phillips #0 screws.

    FixBotに聞いてみる
  27. Asus X551CA LCD Replacement: 手順 27、 2の画像 1 Asus X551CA LCD Replacement: 手順 27、 2の画像 2
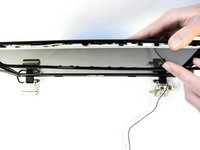
    • Once the screws are taken out, the front bezel is ready to be removed.

    • Insert the Plastic Opening Tool inbetween the front and back bezels and slide along the edges to pry open.

    • Gently use hands if necessary to separate the front bezel from the back.

    FixBotに聞いてみる
  28. Asus X551CA LCD Replacement: 手順 28、 1の画像 1
    • Once pried away from the back bezel, the front bezel will easily lift away from the LCD.

    FixBotに聞いてみる
  29. Asus X551CA LCD Replacement, LCD: 手順 29、 1の画像 1
    • Locate the twelve 3.2 mm Phillips #0 screws that hold the LCD in place.

    FixBotに聞いてみる
  30. Asus X551CA LCD Replacement: 手順 30、 2の画像 1 Asus X551CA LCD Replacement: 手順 30、 2の画像 2
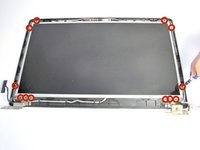
    • Use the Philips #0 screwdriver to remove the twelve 3.2 mm Phillips #0 screws that hold the LCD in place.

    FixBotに聞いてみる
  31. Asus X551CA LCD Replacement: 手順 31、 1の画像 1
    • Once the screws are removed, lift up the LCD to expose the wire connecting the back bezel to the LCD.

    FixBotに聞いてみる
  32. Asus X551CA LCD Replacement: 手順 32、 1の画像 1
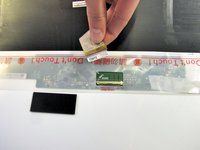
    • Gently unhook the wire from the back bezel to allow the LCD to be flipped over.

    FixBotに聞いてみる
  33. Asus X551CA LCD Replacement: 手順 33、 1の画像 1
    • Once flipped over, locate the ribbon that is connected to the back of the LCD.

    FixBotに聞いてみる
  34. Asus X551CA LCD Replacement: 手順 34、 2の画像 1 Asus X551CA LCD Replacement: 手順 34、 2の画像 2
    • Gently tug on the ribbon to remove it from the LCD.

    FixBotに聞いてみる
  35. Asus X551CA LCD Replacement: 手順 35、 1の画像 1
    • Now that the ribbon has been detached from the back, carefully remove the LCD.

    FixBotに聞いてみる
終わりに

To reassemble your device, follow these instructions in reverse order.

10 の人々がこのガイドを完成させました。

作成者

5人の作成者と共同で作成されました。

Josh

メンバー登録日: 04/10/14

2,970 ポイント

12のガイドは作成済み

チーム

Cal Poly, Team 7-22, Regan Spring 2014 Cal Poly, Team 7-22, Regan Spring 2014人のメンバー

CPSU-REGAN-S14S7G22

5 メンバー

15のガイドは作成済み

1件のガイドコメント

You don't need to disassemble the entire unit to get the panel out. Seems an overkill

Res Q Service - 返信 共有

コメントを追加

統計データ:

過去 24時間: 1

過去 7 日: 13

過去 30 日: 70

今までの合計 11,295