メインコンテンツにスキップ

Asus VivoBook X202E-DB21T Motherboard Replacement

必要な工具と部品

  1. Asus VivoBook X202E-DB21T Motherboard Replacement, Battery: 手順 1、 2の画像 1 Asus VivoBook X202E-DB21T Motherboard Replacement, Battery: 手順 1、 2の画像 2
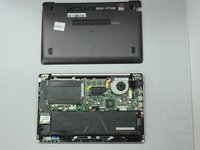
    • Flip the device such that the labels are on top.

    • Use a Phillips #1 screwdriver to remove the four 8mm screws near the back.

    • Use the same screwdriver to remove the four 5mm screws in the front.

    • Use the same screwdriver to remove the single 9mm screw in the center.

    • Make sure that the device is powered down and unplugged.

  2. Asus VivoBook X202E-DB21T Motherboard Replacement: 手順 2、 2の画像 1 Asus VivoBook X202E-DB21T Motherboard Replacement: 手順 2、 2の画像 2
    • Remove the back cover by gently prying with a spudger.

  3. Asus VivoBook X202E-DB21T Motherboard Replacement: 手順 3、 2の画像 1 Asus VivoBook X202E-DB21T Motherboard Replacement: 手順 3、 2の画像 2
    • Remove the eight 5mm screws using a Phillips #1 screwdriver.

    • Do not puncture the battery.

  4. Asus VivoBook X202E-DB21T Motherboard Replacement: 手順 4、 1の画像 1
    • Disconnect the battery ribbon cable from the motherboard.

  5. Asus VivoBook X202E-DB21T Motherboard Replacement: 手順 5、 1の画像 1
    • Remove the battery from the laptop.

  6. Asus VivoBook X202E-DB21T Motherboard Replacement, Hard Drive: 手順 6、 2の画像 1 Asus VivoBook X202E-DB21T Motherboard Replacement, Hard Drive: 手順 6、 2の画像 2
    • Unscrew the three 4mm screws holding the hard drive to the board.

  7. Asus VivoBook X202E-DB21T Motherboard Replacement: 手順 7、 2の画像 1 Asus VivoBook X202E-DB21T Motherboard Replacement: 手順 7、 2の画像 2
    • Pull on the tab on the left side of the hard drive and slowly disconnect it from the board.

  8. Asus VivoBook X202E-DB21T Motherboard Replacement, CMOS Battery: 手順 8、 2の画像 1 Asus VivoBook X202E-DB21T Motherboard Replacement, CMOS Battery: 手順 8、 2の画像 2
    • Unplug and remove the CMOS battery.

  9. Asus VivoBook X202E-DB21T Motherboard Replacement, Motherboard: 手順 9、 2の画像 1 Asus VivoBook X202E-DB21T Motherboard Replacement, Motherboard: 手順 9、 2の画像 2
    • Unscrew the five 5mm screws holding the left board together.

  10. Asus VivoBook X202E-DB21T Motherboard Replacement: 手順 10、 2の画像 1 Asus VivoBook X202E-DB21T Motherboard Replacement: 手順 10、 2の画像 2
    • Unplug the two connectors on the left board.

  11. Asus VivoBook X202E-DB21T Motherboard Replacement: 手順 11、 3の画像 1 Asus VivoBook X202E-DB21T Motherboard Replacement: 手順 11、 3の画像 2 Asus VivoBook X202E-DB21T Motherboard Replacement: 手順 11、 3の画像 3
    • Remove the single 3mm screw from the sound chip.

    • Unplug the sound chip.

    • Remove the sound chip.

  12. Asus VivoBook X202E-DB21T Motherboard Replacement: 手順 12、 1の画像 1
    • Remove the six 4mm screws holding the fan and CPU cover.

  13. Asus VivoBook X202E-DB21T Motherboard Replacement: 手順 13、 2の画像 1 Asus VivoBook X202E-DB21T Motherboard Replacement: 手順 13、 2の画像 2
    • Unplug the fan.

    • Remove the fan and CPU cover.

  14. Asus VivoBook X202E-DB21T Motherboard Replacement: 手順 14、 1の画像 1
    • Unscrew the nine 4mm screws holding the right board together.

  15. Asus VivoBook X202E-DB21T Motherboard Replacement: 手順 15、 1の画像 1
    • Remove the two remaining connectors on the board.

  16. Asus VivoBook X202E-DB21T Motherboard Replacement: 手順 16、 1の画像 1
    • Remove the right board.

終わりに

To reassemble your device, follow these instructions in reverse order.

ある他の人がこのガイドを完成しました。

作成者

2人の作成者と共同で作成されました。

John Thomas

メンバー登録日: 01/13/19

756 ポイント

6のガイドは作成済み

チーム

0 件のコメント

コメントを追加

統計データ:

過去 24時間: 1

過去 7 日: 4

過去 30 日: 22

今までの合計 1,446