メインコンテンツにスキップ

Asus ROG G74SX-DH73-3D Disc/Optical Drive Replacement

必要な工具と部品

  1. Asus ROG G74SX-DH73-3D Disc/Optical Drive Replacement, Disc/Optical Drive: 手順 1、 2の画像 1 Asus ROG G74SX-DH73-3D Disc/Optical Drive Replacement, Disc/Optical Drive: 手順 1、 2の画像 2
    • Place the device upside-down. Unscrew the screw at the top of the cover and remove the cover by using a plastic opening tool.

  2. Asus ROG G74SX-DH73-3D Disc/Optical Drive Replacement: 手順 2、 1の画像 1
    • Remove the screw that is located on the right edge of the removed cover. The screw is in a small opening.

  3. Asus ROG G74SX-DH73-3D Disc/Optical Drive Replacement: 手順 3、 2の画像 1 Asus ROG G74SX-DH73-3D Disc/Optical Drive Replacement: 手順 3、 2の画像 2
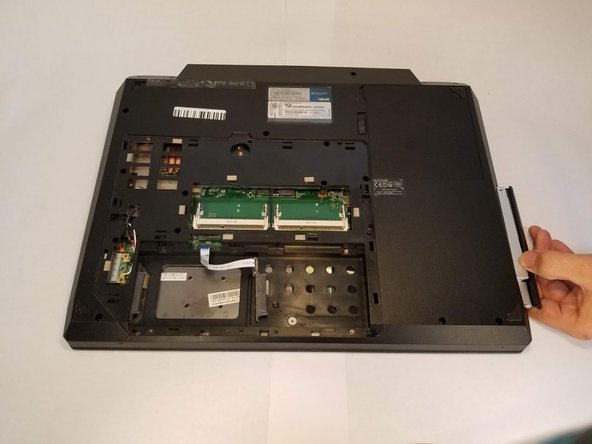
    • Inside the opening that the screw was in, use a nylon spudger or any thin tool to push against the inside edge of the disc/optical drive.

    • With the disc/optical drive slightly popped out of the socket, pull the rest of it out by hand.

終わりに

To reassemble your device, follow these instructions in reverse order.

作成者

1人の作成者と共同作成されました。

Jackson Reynolds

メンバー登録日: 09/18/18

346 ポイント

3のガイドは作成済み

チーム

University of North Texas, Team S3-G7, Raign Fall 2018 University of North Texas, Team S3-G7, Raign Fall 2018人のメンバー

UNT-RAIGN-F18S3G7

3 メンバー

4のガイドは作成済み

0 件のコメント

コメントを追加

統計データ:

過去 24時間: 0

過去 7 日: 0

過去 30 日: 1

今までの合計 230