メインコンテンツにスキップ

Asus MeMO Pad HD 7 Front Facing Camera Replacement

必要な工具と部品

  1. 注意: 手順 1-4 は、作業進行中としてマークされている ガイド から引用されています。

    Asus MeMO Pad HD 7 Front Facing Camera Replacement, Remove Rear Panel: 手順 1、 3の画像 1 Asus MeMO Pad HD 7 Front Facing Camera Replacement, Remove Rear Panel: 手順 1、 3の画像 2 Asus MeMO Pad HD 7 Front Facing Camera Replacement, Remove Rear Panel: 手順 1、 3の画像 3
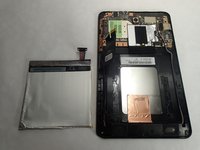
    • Carefully remove the back panel by using a plastic opening tool to remove the panel off the device.

    • Pull the back panel away from the device.

    • The volume buttons can fall out of the case. Pay attention so as not to lose them.

  2. Asus MeMO Pad HD 7 Front Facing Camera Replacement: 手順 2、 1の画像 1
    • Unlock the ZIF connectors on the data cables.

    • Raise the white locking tabs by lifting their upper edge - furthest from the battery - they hinge across the width of the connector.

    • Remove the cable from its slot by gently pulling downward on the tabs.

    • Check that the touchscreen cables are fully seated when reassembling or touchscreen may have unresponsive areas.

  3. Asus MeMO Pad HD 7 Front Facing Camera Replacement: 手順 3、 1の画像 1
    • Locate the battery connector by following the wires that come from the top right of the battery. To disconnect the battery just lift up gently on the wires. Use a spudger or blue plastic opening tool to gently lift the wires if it is hard to get a grip.

  4. Asus MeMO Pad HD 7 Front Facing Camera Replacement, Remove Battery: 手順 4、 3の画像 1 Asus MeMO Pad HD 7 Front Facing Camera Replacement, Remove Battery: 手順 4、 3の画像 2 Asus MeMO Pad HD 7 Front Facing Camera Replacement, Remove Battery: 手順 4、 3の画像 3
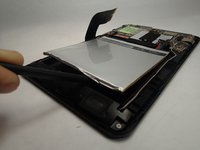
    • Using a spudger carefully pry the battery up. It is glued down so slight pressure may be needed.

    • The battery has a soft casing, be careful not to tear the battery casing as chemicals could leak out.

  5. 注意: 手順 5-8 は、作業進行中としてマークされている ガイド から引用されています。

    Asus MeMO Pad HD 7 Front Facing Camera Replacement, Motherboard: 手順 5、 1の画像 1
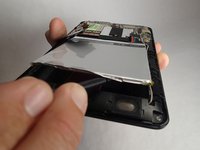
    • Locate the speaker wires to the left side of the battery. Remove the connector by pulling up gently or prying with a tool if you can not get a good grip.

  6. Asus MeMO Pad HD 7 Front Facing Camera Replacement: 手順 6、 1の画像 1
    • Pry the GPS Antenna cable straight up using a spudger or similar prying tool. It will be the grey wire that runs up the right side of the device coming from the speaker housing up to the motherboard.

  7. Asus MeMO Pad HD 7 Front Facing Camera Replacement: 手順 7、 1の画像 1
    • Remove the data ribbon for the motherboard which is located on the right side of the board. It has a flat top on the connector. Remove it by using a spudger to pry it straight up.

    • Locate the volume and power button connector on the left side of the mother board. Disconnect the ZIF connector by flipping the latch on the connector up and sliding the data cable directly out.

  8. Asus MeMO Pad HD 7 Front Facing Camera Replacement: 手順 8、 1の画像 1
    • Unscrew two #000 Philips 1.5 mm screws on the right side of the motherboard.

    • Unscrew 3 #000 Philips 2 mm screws from the left and center of the board.

    • The board will now lift straight up.

  9. Asus MeMO Pad HD 7 Front Facing Camera Replacement, Front Facing Camera: 手順 9、 1の画像 1
    • With the motherboard removed flip it to the side with the front facing camera.

    • Using a pair of tweezers grab the camera and pull straight up to remove it.

終わりに

To reassemble your device, follow these instructions in reverse order.

ある他の人がこのガイドを完成しました。

作成者

5人の作成者と共同で作成されました。

Julien Daigle

メンバー登録日: 01/20/15

1,235 ポイント

5のガイドは作成済み

チーム

USF Tampa, Team 11-3, Blackwell Winter 2015 USF Tampa, Team 11-3, Blackwell Winter 2015人のメンバー

USFT-BLACKWELL-W15S11G3

4 メンバー

5のガイドは作成済み

コメント 1 件

You forgot a couple very important steps. Before removing the motherboard, undo the clip that releases the power and volume button board. Also, there is a connector underneath the motherboard for the rear facing camera. Be careful not to break the connector or the ribbon cable. I can tell it's going to be tricky to reconnect it on reassembly.

Teletwanger - 返信

コメントを追加

統計データ:

過去 24時間: 0

過去 7 日: 0

過去 30 日: 0

今までの合計 1,561