メインコンテンツにスキップ

Asus MeMO Pad 8 ME181C Speaker Assembly Replacement

必要な工具と部品

  1. Asus MeMO Pad 8 ME181C Speaker Assembly Replacement, Rear Case: 手順 1、 2の画像 1 Asus MeMO Pad 8 ME181C Speaker Assembly Replacement, Rear Case: 手順 1、 2の画像 2
    • Insert a plastic opening tool into the seam between the rear case and the screen.

    • Work the plastic opening tool around the perimeter of the device to completely remove the rear case.

  2. Asus MeMO Pad 8 ME181C Speaker Assembly Replacement, Battery: 手順 2、 3の画像 1 Asus MeMO Pad 8 ME181C Speaker Assembly Replacement, Battery: 手順 2、 3の画像 2 Asus MeMO Pad 8 ME181C Speaker Assembly Replacement, Battery: 手順 2、 3の画像 3
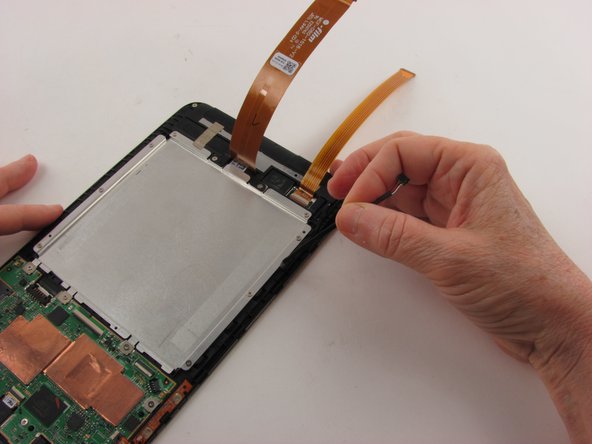
    • Use the flat end of the nylon spudger to flip up the retaining flap of the Zero Insertion Force (ZIF) connector holding the orange motherboard ribbon cable in place.

  3. Asus MeMO Pad 8 ME181C Speaker Assembly Replacement: 手順 3、 2の画像 1 Asus MeMO Pad 8 ME181C Speaker Assembly Replacement: 手順 3、 2の画像 2
    • Use the flat end of the nylon spudger to flip up the retaining flap of the ZIF connector holding the black motherboard ribbon cable in place.

  4. Asus MeMO Pad 8 ME181C Speaker Assembly Replacement: 手順 4、 2の画像 1 Asus MeMO Pad 8 ME181C Speaker Assembly Replacement: 手順 4、 2の画像 2
    • Use the pointed end of the nylon spudger to pop up the battery connector.

    • When reconnecting the battery cable after replacing the battery, press the battery connector with your finger until it clicks into place.

  5. Asus MeMO Pad 8 ME181C Speaker Assembly Replacement: 手順 5、 2の画像 1 Asus MeMO Pad 8 ME181C Speaker Assembly Replacement: 手順 5、 2の画像 2
    • Use the flat end of the nylon spudger to pry up the battery.

    • The battery is secured with adhesive. Some force is required to detach battery from the device.

    • If removing motherboard is necessary, it may be easier complete this step with the motherboard simultaneously later.

  6. Asus MeMO Pad 8 ME181C Speaker Assembly Replacement, Speaker Assembly: 手順 6、 3の画像 1 Asus MeMO Pad 8 ME181C Speaker Assembly Replacement, Speaker Assembly: 手順 6、 3の画像 2 Asus MeMO Pad 8 ME181C Speaker Assembly Replacement, Speaker Assembly: 手順 6、 3の画像 3
    • Use the pointed end of a spudger to disconnect the speaker cable.

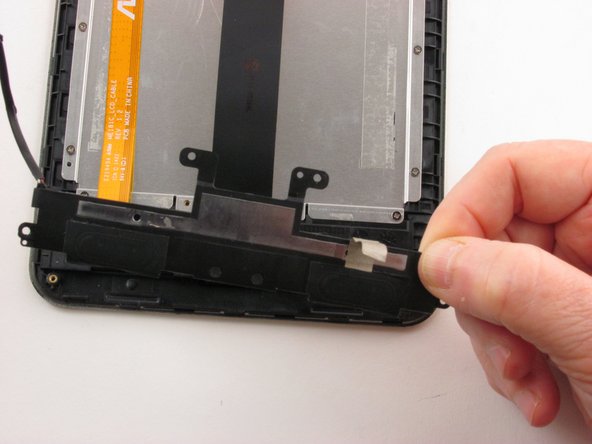
    • Gently pull the speaker cable out of its channel along the left side of the device.

  7. Asus MeMO Pad 8 ME181C Speaker Assembly Replacement: 手順 7、 1の画像 1
    • Remove the four 3 mm Phillips #000 screws securing the speaker assembly.

  8. Asus MeMO Pad 8 ME181C Speaker Assembly Replacement: 手順 8、 2の画像 1 Asus MeMO Pad 8 ME181C Speaker Assembly Replacement: 手順 8、 2の画像 2
    • Remove the speaker assembly from the device.

終わりに

To reassemble your device, follow these instructions in reverse order.

作成者

1人の作成者と共同作成されました。

Geoff Wacker

メンバー登録日: 09/30/13

89,964 ポイント

89のガイドは作成済み

0 件のコメント

コメントを追加

統計データ:

過去 24時間: 0

過去 7 日: 3

過去 30 日: 3

今までの合計 404