メインコンテンツにスキップ
リペアコミュニティに参加 - アカウントの作成

Asus Chromebook C523N Keyboard Replacement

必要な工具と部品

  1. Asus Chromebook C523N Keyboard Replacement, Back Cover: 手順 1、 2の画像 1 Asus Chromebook C523N Keyboard Replacement, Back Cover: 手順 1、 2の画像 2
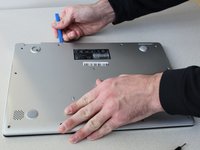
    • Remove the four 0.5mm JIS #00 screws from the bottom edge of the Chromebook and one in the center.

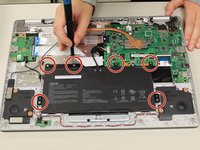
    • Remove the six 1.7mm JIS #00 screws from the sides and top edge of the Chromebook.

    FixBotに聞いてみる
  2. Asus Chromebook C523N Keyboard Replacement: 手順 2、 2の画像 1 Asus Chromebook C523N Keyboard Replacement: 手順 2、 2の画像 2
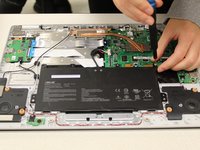
    • Using a spudger, lift the top left base pad and remove it to reveal a final screw underneath.

    • Remove the one 0.5mm JIS #00 screw underneath the base pad.

    FixBotに聞いてみる
  3. Asus Chromebook C523N Keyboard Replacement: 手順 3、 2の画像 1 Asus Chromebook C523N Keyboard Replacement: 手順 3、 2の画像 2
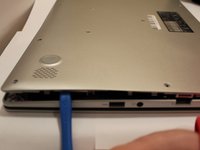
    • Use an opening tool to gently pry the base enclosure up and remove from the laptop.

    FixBotに聞いてみる
  4. Asus Chromebook C523N Keyboard Replacement, Speaker: 手順 4、 3の画像 1 Asus Chromebook C523N Keyboard Replacement, Speaker: 手順 4、 3の画像 2 Asus Chromebook C523N Keyboard Replacement, Speaker: 手順 4、 3の画像 3
    この手順で使用する道具:
    Tweezers
    $4.99
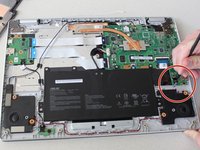
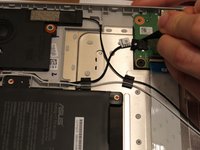
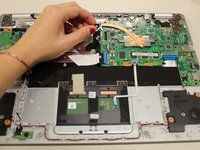
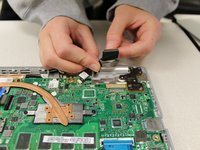
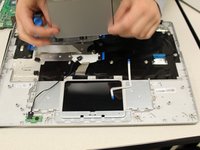
    • Using the nylon tipped tweezers, gently pry the black and white wires from the wireless card and lift.

    FixBotに聞いてみる
  5. Asus Chromebook C523N Keyboard Replacement: 手順 5、 3の画像 1 Asus Chromebook C523N Keyboard Replacement: 手順 5、 3の画像 2 Asus Chromebook C523N Keyboard Replacement: 手順 5、 3の画像 3
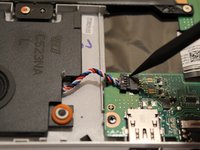
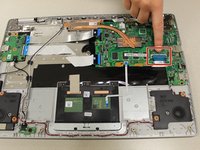
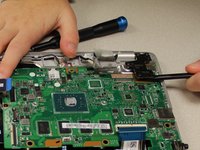
    • Use a spudger to pry the small tangle of black, red, white, and blue wires from the audio connector, pushing the wires back toward the speaker.

    FixBotに聞いてみる
  6. Asus Chromebook C523N Keyboard Replacement: 手順 6、 2の画像 1 Asus Chromebook C523N Keyboard Replacement: 手順 6、 2の画像 2
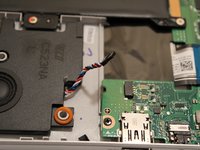
    • Use a spudger to pry the black wire from the audio connector, pushing the wires back toward the left speaker.

    FixBotに聞いてみる
  7. Asus Chromebook C523N Keyboard Replacement: 手順 7、 1の画像 1
    • Gently grab both speakers and lift them from the Chromebook to remove.

    FixBotに聞いてみる
  8. Asus Chromebook C523N Keyboard Replacement, Battery: 手順 8、 3の画像 1 Asus Chromebook C523N Keyboard Replacement, Battery: 手順 8、 3の画像 2 Asus Chromebook C523N Keyboard Replacement, Battery: 手順 8、 3の画像 3
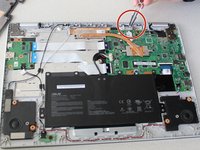
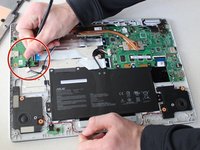
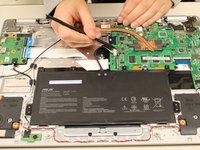
    • To disconnect the cable, use the tip of a spudger or your fingernail to flip up the small locking flap.

    • Gently disconnect the battery cable from the motherboard.

    FixBotに聞いてみる
  9. Asus Chromebook C523N Keyboard Replacement: 手順 9、 2の画像 1 Asus Chromebook C523N Keyboard Replacement: 手順 9、 2の画像 2
    • Remove six 1.4 mm JIS #00 screws from the battery.

    FixBotに聞いてみる
  10. Asus Chromebook C523N Keyboard Replacement: 手順 10、 1の画像 1
    • Remove the battery from the laptop.

    FixBotに聞いてみる
  11. Asus Chromebook C523N Keyboard Replacement, Motherboard: 手順 11、 3の画像 1 Asus Chromebook C523N Keyboard Replacement, Motherboard: 手順 11、 3の画像 2 Asus Chromebook C523N Keyboard Replacement, Motherboard: 手順 11、 3の画像 3
    この手順で使用する道具:
    Tweezers
    $4.99
    • Using tweezers, gently pry the black and white wires from the wireless card and lift.

    FixBotに聞いてみる
  12. Asus Chromebook C523N Keyboard Replacement: 手順 12、 3の画像 1 Asus Chromebook C523N Keyboard Replacement: 手順 12、 3の画像 2 Asus Chromebook C523N Keyboard Replacement: 手順 12、 3の画像 3
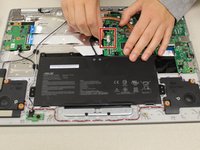
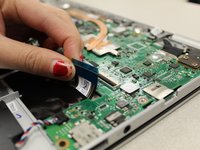
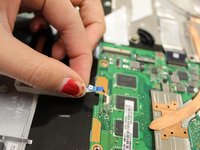
    • Gently pull the trackpad cable from the connector, located next to the wireless card.

    FixBotに聞いてみる
  13. Asus Chromebook C523N Keyboard Replacement: 手順 13、 3の画像 1 Asus Chromebook C523N Keyboard Replacement: 手順 13、 3の画像 2 Asus Chromebook C523N Keyboard Replacement: 手順 13、 3の画像 3
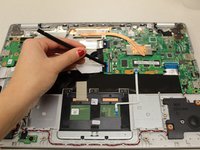
    • Using a spudger, disconnect the two side-by-side ribbon cables from their connectors, pushing in the direction of the ribbons (toward the left side of the Chromebook).

    FixBotに聞いてみる
  14. Asus Chromebook C523N Keyboard Replacement: 手順 14、 2の画像 1 Asus Chromebook C523N Keyboard Replacement: 手順 14、 2の画像 2
    • Disconnect the thick blue ribbon cable from the connector by pulling it away from the motherboard.

    FixBotに聞いてみる
  15. Asus Chromebook C523N Keyboard Replacement: 手順 15、 3の画像 1 Asus Chromebook C523N Keyboard Replacement: 手順 15、 3の画像 2 Asus Chromebook C523N Keyboard Replacement: 手順 15、 3の画像 3
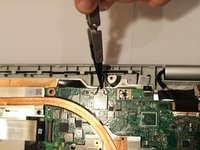
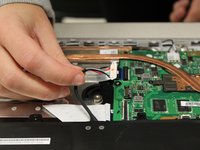
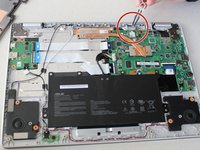
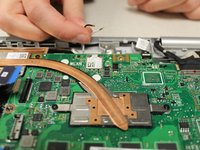
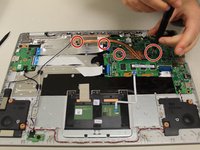
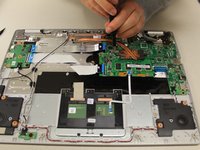
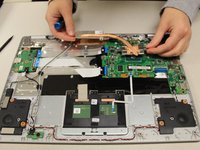
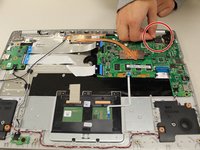
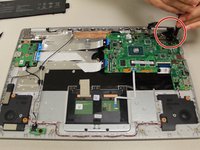
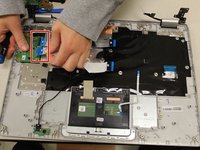
    • Remove the 0.4mm JIS #0 screws from the heat sink in the center of the motherboard.

    • Lift and remove the heat sink.

    FixBotに聞いてみる
  16. Asus Chromebook C523N Keyboard Replacement: 手順 16、 3の画像 1 Asus Chromebook C523N Keyboard Replacement: 手順 16、 3の画像 2 Asus Chromebook C523N Keyboard Replacement: 手順 16、 3の画像 3
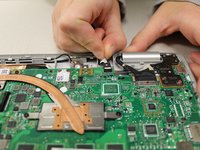
    • Gripping the thin white ribbon cable, gently pull it away from the motherboard to disconnect.

    FixBotに聞いてみる
  17. Asus Chromebook C523N Keyboard Replacement: 手順 17、 2の画像 1 Asus Chromebook C523N Keyboard Replacement: 手順 17、 2の画像 2
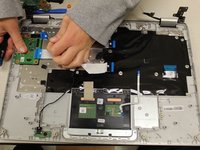
    • Disconnect the thick black connector by gently pulling it up, away from the motherboard.

    FixBotに聞いてみる
  18. Asus Chromebook C523N Keyboard Replacement: 手順 18、 2の画像 1 Asus Chromebook C523N Keyboard Replacement: 手順 18、 2の画像 2
    • Remove the two 0.4mm JIS #00 screws at the bottom of the hinge (closest to the motherboard).

    • Using an opening tool, pry the hinge upward.

    FixBotに聞いてみる
  19. Asus Chromebook C523N Keyboard Replacement: 手順 19、 2の画像 1 Asus Chromebook C523N Keyboard Replacement: 手順 19、 2の画像 2
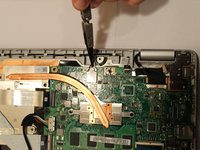
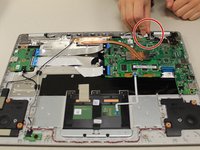
    • Remove the two 0.4 mm JIS #00 screws from the motherboard.

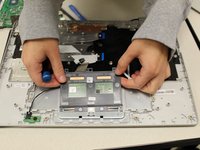
    • Gently lift and remove the motherboard.

    FixBotに聞いてみる
  20. Asus Chromebook C523N Keyboard Replacement, Touchpad: 手順 20、 1の画像 1
    • Pull gently on the touchpad cable connector to disconnect.

    FixBotに聞いてみる
  21. Asus Chromebook C523N Keyboard Replacement: 手順 21、 1の画像 1
    • Carefully, remove the tape from the touch pad only.

    FixBotに聞いてみる
  22. Asus Chromebook C523N Keyboard Replacement: 手順 22、 1の画像 1
    • Remove the three 1.4 mm JIS #00 screws.

    FixBotに聞いてみる
  23. Asus Chromebook C523N Keyboard Replacement: 手順 23、 2の画像 1 Asus Chromebook C523N Keyboard Replacement: 手順 23、 2の画像 2
    • Lift at the far edge of the touchpad to remove it.

    FixBotに聞いてみる
  24. Asus Chromebook C523N Keyboard Replacement, Keyboard: 手順 24、 2の画像 1 Asus Chromebook C523N Keyboard Replacement, Keyboard: 手順 24、 2の画像 2
    • Disconnect the two ribbon cables from the daughterboard.

    FixBotに聞いてみる
  25. Asus Chromebook C523N Keyboard Replacement: 手順 25、 1の画像 1
    • Remove the four 0.4mm JIS #00 screws from the daughterboard.

    • Remove the daughterboard.

    FixBotに聞いてみる
  26. Asus Chromebook C523N Keyboard Replacement: 手順 26、 1の画像 1
    • Remove the two 0.4mm JIS #00 screws on the left hinge.

    FixBotに聞いてみる
  27. Asus Chromebook C523N Keyboard Replacement: 手順 27、 1の画像 1
    • Lift the keyboard of the Chromebook off of the screen.

    FixBotに聞いてみる
終わりに

To reassemble your device, follow these instructions in reverse order.

2 の人々がこのガイドを完成させました。

作成者

4人の作成者と共同で作成されました。

Aaron Hogan

メンバー登録日: 10/15/19

682 ポイント

4のガイドは作成済み

チーム

Grand Valley State University, Team S4-G2, DeVasto Fall 2019 Grand Valley State University, Team S4-G2, DeVasto Fall 2019人のメンバー

GVSU-DEVASTO-F19S4G2

4 メンバー

6のガイドは作成済み

3件のガイドコメント

Great walk through. I used this to replace a keyboard on a C423N ASUS. Everything but the track pad connector on the mother board and three screws instead of 2 on the screen hinges is the same.

Charles Stanley - 返信 共有

Hi there

How would I replace the screen for this model??

Saif - 返信 共有

how to replace ssd in motherbord

Suresh dhakar - 返信 共有

コメントを追加

統計データ:

過去 24時間: 1

過去 7 日: 10

過去 30 日: 63

今までの合計 2,818