メインコンテンツにスキップ

Asus Chromebook C300SA-DS02 Trackpad Replacement

必要な工具と部品

  1. Asus Chromebook C300SA-DS02 Trackpad Replacement, Keyboard: 手順 1、 2の画像 1 Asus Chromebook C300SA-DS02 Trackpad Replacement, Keyboard: 手順 1、 2の画像 2
    • Power the laptop off and make sure the charger is unplugged before starting.

    • Remove the eight 8.0mm Phillips #0 screws on the bottom of the laptop.

    • Remove the three 6.0mm Phillips #0 screws.

  2. Asus Chromebook C300SA-DS02 Trackpad Replacement: 手順 2、 3の画像 1 Asus Chromebook C300SA-DS02 Trackpad Replacement: 手順 2、 3の画像 2 Asus Chromebook C300SA-DS02 Trackpad Replacement: 手順 2、 3の画像 3
    • Open the laptop.

    • Using an iFixit opening tool, pry along the edges of the keyboard.

    • Lift the keyboard and slide it gently towards you.

    • Do not completely remove the keyboard. It is still connected to the back panel by a pair of ribbon cables.

  3. Asus Chromebook C300SA-DS02 Trackpad Replacement: 手順 3、 3の画像 1 Asus Chromebook C300SA-DS02 Trackpad Replacement: 手順 3、 3の画像 2 Asus Chromebook C300SA-DS02 Trackpad Replacement: 手順 3、 3の画像 3
    • Disconnect the two ZIF connectors by prying up the locking bar with a spudger and removing the ribbon cable.

  4. Asus Chromebook C300SA-DS02 Trackpad Replacement: 手順 4、 1の画像 1
    • Remove the keyboard from the laptop.

  5. Asus Chromebook C300SA-DS02 Trackpad Replacement, Trackpad: 手順 5、 2の画像 1 Asus Chromebook C300SA-DS02 Trackpad Replacement, Trackpad: 手順 5、 2の画像 2
    • Flip over the keyboard assembly to reveal the trackpad beneath.

  6. Asus Chromebook C300SA-DS02 Trackpad Replacement: 手順 6、 2の画像 1 Asus Chromebook C300SA-DS02 Trackpad Replacement: 手順 6、 2の画像 2
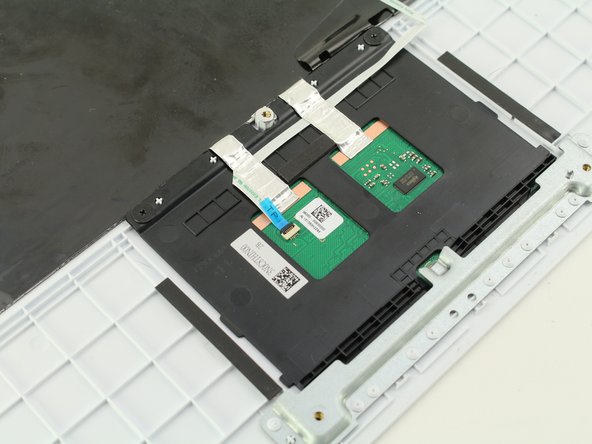
    • Peel up the two pieces of foil tape holding down the trackpad.

  7. Asus Chromebook C300SA-DS02 Trackpad Replacement: 手順 7、 3の画像 1 Asus Chromebook C300SA-DS02 Trackpad Replacement: 手順 7、 3の画像 2 Asus Chromebook C300SA-DS02 Trackpad Replacement: 手順 7、 3の画像 3
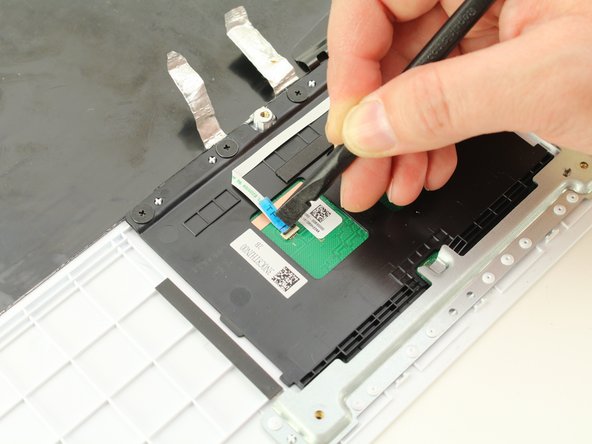
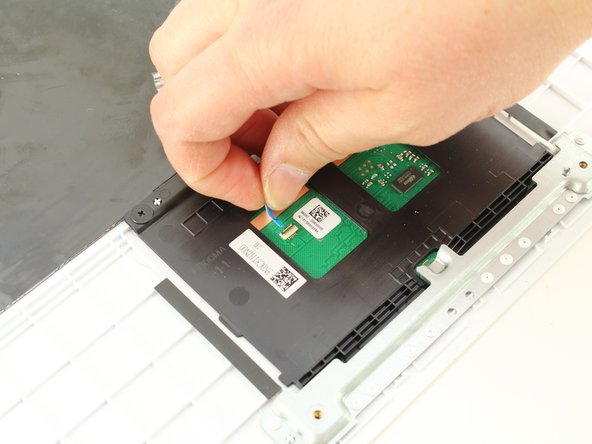
    • Use a spudger to release the locking bar of the ZIF connector near the center of the trackpad.

    • Slide the cable ribbon from the connector.

  8. Asus Chromebook C300SA-DS02 Trackpad Replacement: 手順 8、 1の画像 1
    • Peel back the ribbon cable, which is adhered to the trackpad.

  9. Asus Chromebook C300SA-DS02 Trackpad Replacement: 手順 9、 3の画像 1 Asus Chromebook C300SA-DS02 Trackpad Replacement: 手順 9、 3の画像 2 Asus Chromebook C300SA-DS02 Trackpad Replacement: 手順 9、 3の画像 3
    • Remove the four 2.5mm Phillips #0 screws along the top edge of the trackpad.

  10. Asus Chromebook C300SA-DS02 Trackpad Replacement: 手順 10、 2の画像 1 Asus Chromebook C300SA-DS02 Trackpad Replacement: 手順 10、 2の画像 2
    • Pry the trackpad from the top edge with a finger or spudger.

    • Lift the trackpad up and away from the keyboard assembly.

終わりに

To reassemble your device, follow these instructions in reverse order.

作成者

2人の作成者と共同で作成されました。

Austin Blakely

メンバー登録日: 03/11/19

19,506 ポイント

53のガイドは作成済み

チーム

iFixit iFixit人のメンバー

Staff

135 メンバー

16,817のガイドは作成済み

0 件のコメント

コメントを追加

統計データ:

過去 24時間: 0

過去 7 日: 1

過去 30 日: 1

今までの合計 179