メインコンテンツにスキップ

Asus Chromebook C202 Input/Output board Replacement

必要な工具と部品

  1. Asus Chromebook C202 Input/Output board Replacement, Back Panel: 手順 1、 2の画像 1 Asus Chromebook C202 Input/Output board Replacement, Back Panel: 手順 1、 2の画像 2
    この手順で使用する道具:
    Phillips #1 Screwdriver
    $5.49
    購入する
    • Remove ten 8 mm Phillips #1 screws from the bottom of the Chromebook using a Phillips #1 screwdriver.

    • Two of the screws are hidden by rubber caps along the rubber rest of the device. Use tweezers to get them out.

  2. Asus Chromebook C202 Input/Output board Replacement: 手順 2、 1の画像 1
    この手順で使用する道具:
    iFixit Opening Tool
    $1.99
    購入する
    • Place the plastic opening tool into the edges between the front of the Chromebook and the back of it with the upper scoop of the opening tool facing upward.

    • Push down on the plastic opening tool to unhinge the top portion of the Chromebook from its lower portion. Opening the Chromebook all the way where the display touches the ground helps in opening up the top edge.

    • Use your hand to gently lift the top portion of the Chromebook from the bottom portion of it to avoid damaging the ribbon cables.

  3. Asus Chromebook C202 Input/Output board Replacement: 手順 3、 1の画像 1
    • Gently disconnect the ribbon cable connecting the trackpad to the motherboard.

    • Gently disconnect the ribbon cable connecting the keyboard to the motherboard.

  4. Asus Chromebook C202 Input/Output board Replacement, Battery: 手順 4、 3の画像 1 Asus Chromebook C202 Input/Output board Replacement, Battery: 手順 4、 3の画像 2 Asus Chromebook C202 Input/Output board Replacement, Battery: 手順 4、 3の画像 3
    • Pull the latch out on both the Input/Output board as well as the motherboard.

    • Gently remove the ribbon cable connecting the I/O board to the motherboard.

  5. Asus Chromebook C202 Input/Output board Replacement: 手順 5、 3の画像 1 Asus Chromebook C202 Input/Output board Replacement: 手順 5、 3の画像 2 Asus Chromebook C202 Input/Output board Replacement: 手順 5、 3の画像 3
    • Remove two 4 mm Phillips #1 screws from the metal grate connected to the battery.

    • Remove metal grate from battery.

    • Remove six 4 mm Phillips #1 screws from the battery

  6. Asus Chromebook C202 Input/Output board Replacement: 手順 6、 2の画像 1 Asus Chromebook C202 Input/Output board Replacement: 手順 6、 2の画像 2
    • Disconnect the battery from the motherboard.

    • Lift battery from the bottom portion of the Chromebook.

  7. Asus Chromebook C202 Input/Output board Replacement: 手順 7、 1の画像 1
    • Remove the battery from the Chromebook.

  8. Asus Chromebook C202 Input/Output board Replacement, Input/Output board: 手順 8、 2の画像 1 Asus Chromebook C202 Input/Output board Replacement, Input/Output board: 手順 8、 2の画像 2
    • Remove 2 4 mm Phillips #1 screws connecting the I/O board to the Chromebook.

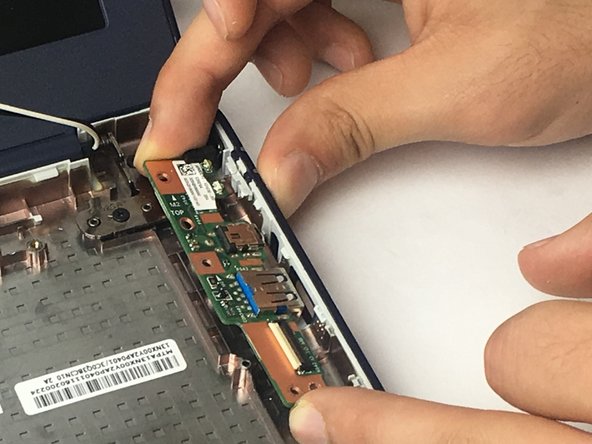
    • Lift the I/O board from the Chromebook.

終わりに

To reassemble your device, follow these instructions in reverse order.

2 の人々がこのガイドを完成させました。

作成者

2人の作成者と共同で作成されました。

Christopher Segale

メンバー登録日: 09/28/16

883 ポイント

6のガイドは作成済み

チーム

USF Tampa, Team 3-1, Passmore Fall 2016 USF Tampa, Team 3-1, Passmore Fall 2016人のメンバー

USFT-PASSMORE-F16S3G1

4 メンバー

16のガイドは作成済み

コメント 1 件

Thanks for all your ASUS guides — saved me a packet when my son breaks his!

Nick Huggett - 返信

コメントを追加

統計データ:

過去 24時間: 0

過去 7 日: 4

過去 30 日: 6

今までの合計 1,026