メインコンテンツにスキップ

Asus Chromebook C201 LCD Screen Replacement

必要な工具と部品

  1. Asus Chromebook C201 LCD Screen Replacement, Palm Rest Assembly: 手順 1、 1の画像 1
    • Flip the laptop upside down with the rear end of the computer away from you.

  2. Asus Chromebook C201 LCD Screen Replacement: 手順 2、 1の画像 1
    • Remove the two rear rubber feet by using one of the small, blue plastic spudgers.

  3. Asus Chromebook C201 LCD Screen Replacement: 手順 3、 1の画像 1
    • Use the J0 screwdriver to remove the eight 5mm black screws on the bottom of the laptop, which includes the two that were hidden under the rear rubber feet.

  4. Asus Chromebook C201 LCD Screen Replacement: 手順 4、 1の画像 1
    • Turn the laptop on its side. Use a small, blue opening tool to pry the keyboard cover and laptop apart. Begin from the top right, next to the power button, and slowly work your way around to the opposite side until the keyboard cover is detached.

  5. Asus Chromebook C201 LCD Screen Replacement: 手順 5、 2の画像 1 Asus Chromebook C201 LCD Screen Replacement: 手順 5、 2の画像 2
    • Gently flip the keyboard cover away from the laptop. Rest it safely upside down so the cables are not strained and are easily accessible.

  6. Asus Chromebook C201 LCD Screen Replacement: 手順 6、 3の画像 1 Asus Chromebook C201 LCD Screen Replacement: 手順 6、 3の画像 2 Asus Chromebook C201 LCD Screen Replacement: 手順 6、 3の画像 3
    • Use the metal spudger to gently pry up the small tabs that are clamping down on the keyboard cables.

  7. Asus Chromebook C201 LCD Screen Replacement: 手順 7、 2の画像 1 Asus Chromebook C201 LCD Screen Replacement: 手順 7、 2の画像 2
    • Carefully pull the keyboard cables out of the connecting ports that are attached to the motherboard.

  8. Asus Chromebook C201 LCD Screen Replacement: 手順 8、 1の画像 1
    • Remove the keyboard cover and safely place it somewhere face down.

  9. Asus Chromebook C201 LCD Screen Replacement, LCD Screen: 手順 9、 2の画像 1 Asus Chromebook C201 LCD Screen Replacement, LCD Screen: 手順 9、 2の画像 2
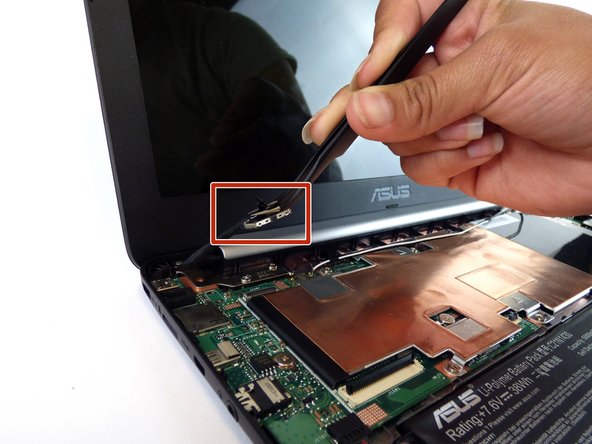
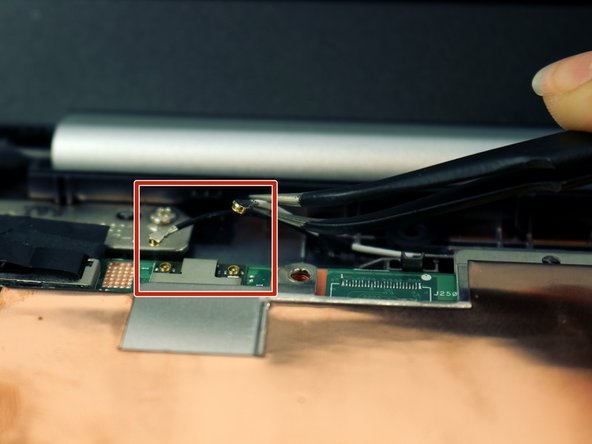
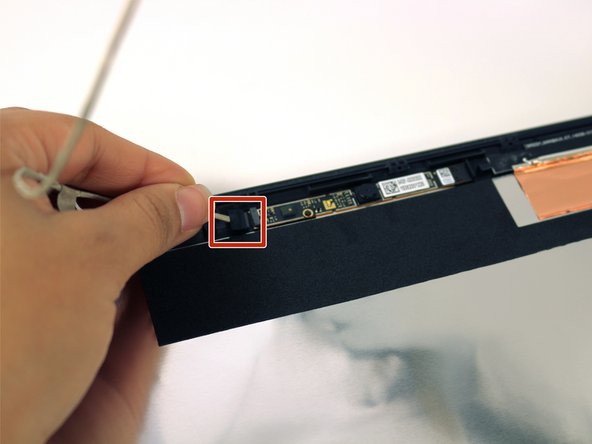
    • Locate the LCD cable and its connector which is located in the upper left hand corner of the computer. Carefully flip up the tiny tab and safely remove the cable using precision tweezers.

  10. Asus Chromebook C201 LCD Screen Replacement: 手順 10、 2の画像 1 Asus Chromebook C201 LCD Screen Replacement: 手順 10、 2の画像 2
    • Disconnect the black and white cables located near the screen hinge.

  11. Asus Chromebook C201 LCD Screen Replacement: 手順 11、 2の画像 1 Asus Chromebook C201 LCD Screen Replacement: 手順 11、 2の画像 2
    • Remove the 6, 4mm silver screws from the hinges attaching the LCD to the laptop using the J0 Phillips screwdriver.

  12. Asus Chromebook C201 LCD Screen Replacement: 手順 12、 1の画像 1
    • Turn the hinges to an upright position.

  13. Asus Chromebook C201 LCD Screen Replacement: 手順 13、 2の画像 1 Asus Chromebook C201 LCD Screen Replacement: 手順 13、 2の画像 2
    • Carefully pop the LCD screen assembly out of the laptop case.

  14. Asus Chromebook C201 LCD Screen Replacement: 手順 14、 2の画像 1 Asus Chromebook C201 LCD Screen Replacement: 手順 14、 2の画像 2
    • Remove the silver cover.

    • Make sure to put the cover back in right side (longer side) up when re-installing

  15. Asus Chromebook C201 LCD Screen Replacement: 手順 15、 2の画像 1 Asus Chromebook C201 LCD Screen Replacement: 手順 15、 2の画像 2
    • Use a blue plastic spudger to snap the LCD cover off, working the spudger around the perimeter and completely remove the cover.

  16. Asus Chromebook C201 LCD Screen Replacement: 手順 16、 1の画像 1
    • Remove the 4, 3mm silver corner screws holding in the LCD.

  17. Asus Chromebook C201 LCD Screen Replacement: 手順 17、 2の画像 1 Asus Chromebook C201 LCD Screen Replacement: 手順 17、 2の画像 2
    • Remove the left hinge by unscrewing the two 3mm large Phillips head screws.

    • Unscrew the one 3mm small Phillips head screw.

  18. Asus Chromebook C201 LCD Screen Replacement: 手順 18、 2の画像 1 Asus Chromebook C201 LCD Screen Replacement: 手順 18、 2の画像 2
    • Carefully lift the screen. Gently unravel and unplug the LCD cord.

終わりに

To reassemble your device, follow these instructions in reverse order.

10 の人々がこのガイドを完成させました。

作成者

5人の作成者と共同で作成されました。

Taylor Allen

メンバー登録日: 02/09/16

327 ポイント

1ガイドが承認済み

チーム

USF Tampa, Team 2-51, Cagle Spring 2016 USF Tampa, Team 2-51, Cagle Spring 2016人のメンバー

USFT-CAGLE-S16S2G51

4 メンバー

10のガイドは作成済み

0 件のコメント

コメントを追加

統計データ:

過去 24時間: 0

過去 7 日: 8

過去 30 日: 13

今までの合計 3,637