メインコンテンツにスキップ

Asus Chromebook C101P Screen Replacement

必要な工具と部品

  1. Asus Chromebook C101P Screen Replacement, Keyboard: 手順 1、 1の画像 1
    • Flip the Chromebook so that the bottom is facing up.

    • Remove the nine T5 Torx screws.

  2. Asus Chromebook C101P Screen Replacement: 手順 2、 1の画像 1
    • Remove the four rubber grips on the bottom side of the Chromebook using an opening tool.

  3. Asus Chromebook C101P Screen Replacement: 手順 3、 1の画像 1
    • Remove the four black screws where the rubber grips were.

  4. Asus Chromebook C101P Screen Replacement: 手順 4、 2の画像 1 Asus Chromebook C101P Screen Replacement: 手順 4、 2の画像 2
    • Reorient the Chromebook so the right side is facing upwards.

    • Wedge an opening tool or spudger between the keyboard (upper case) and the lower case of the bottom portion of the Chromebook.

  5. Asus Chromebook C101P Screen Replacement: 手順 5、 3の画像 1 Asus Chromebook C101P Screen Replacement: 手順 5、 3の画像 2 Asus Chromebook C101P Screen Replacement: 手順 5、 3の画像 3
    この手順で使用する道具:
    Tweezers
    $4.99
    購入する
    • Pull back the black lever on the base of the cable. While pulling back, take your tweezers and pull back on the large ribbon cable.

    • Pull back the black lever on the base of the cable. While pulling back, take your tweezers and pull back on the small ribbon cable.

    • Separate the keyboard from the rest of the laptop.

  6. Asus Chromebook C101P Screen Replacement, Screen: 手順 6、 2の画像 1 Asus Chromebook C101P Screen Replacement, Screen: 手順 6、 2の画像 2
    この手順で使用する道具:
    Tweezers
    $4.99
    購入する
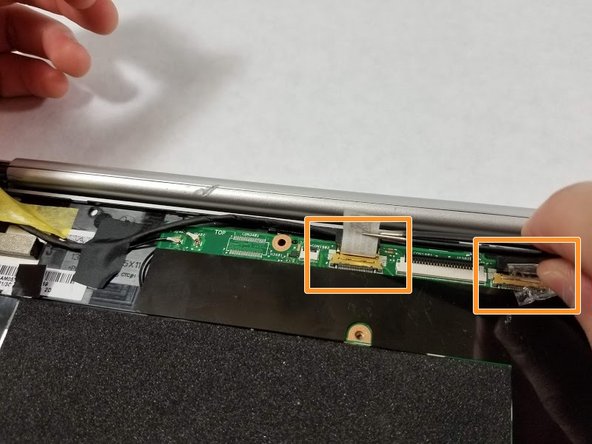
    • Detach the the screen cables from the motherboard using a pair of tweezers.

    • Peel off the tape or seal to easily remove the screen cables.

  7. Asus Chromebook C101P Screen Replacement: 手順 7、 2の画像 1 Asus Chromebook C101P Screen Replacement: 手順 7、 2の画像 2
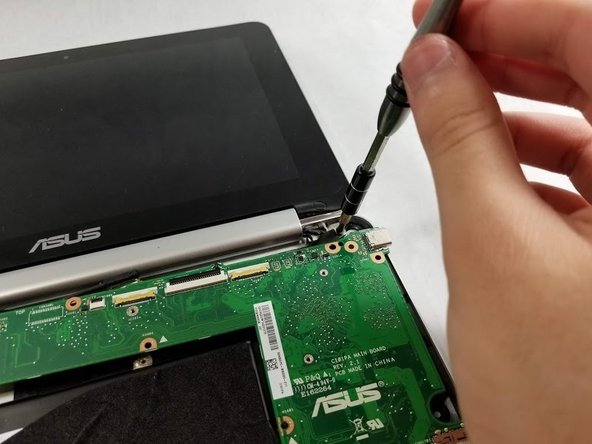
    • Remove the Phillips 00 screws from the hinges.

  8. Asus Chromebook C101P Screen Replacement: 手順 8、 1の画像 1
    • Angle the hinge as shown and use a T5 Torx screwdriver to remove the hinge screws.

  9. Asus Chromebook C101P Screen Replacement: 手順 9、 2の画像 1 Asus Chromebook C101P Screen Replacement: 手順 9、 2の画像 2
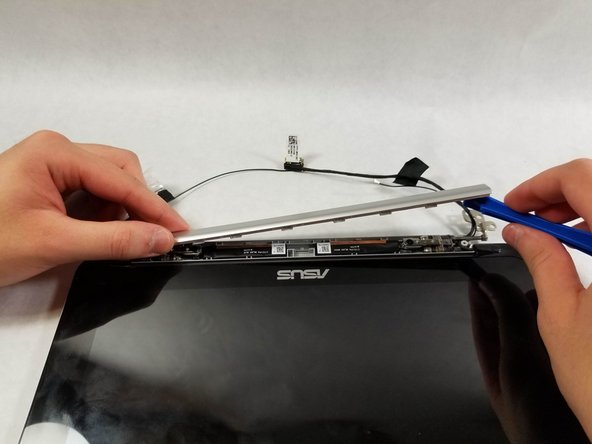
    • Pry open the hinge by using the iFixit opening tool.

  10. Asus Chromebook C101P Screen Replacement: 手順 10、 1の画像 1
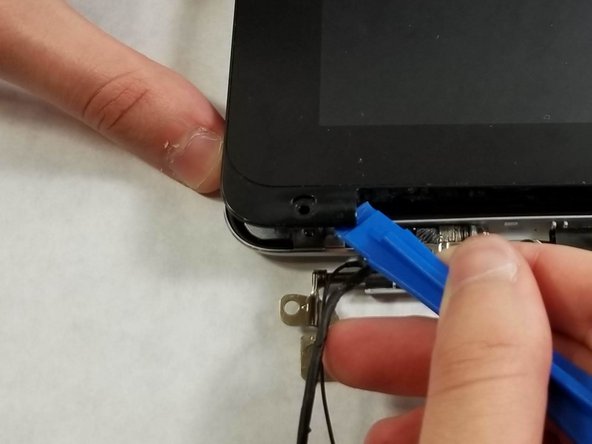
    • Use the iFixit opening tool to pop out the black rubber grips near the bottom of the screen.

    • Use a Phillips 00 screwdriver to remove the screws beneath the rubber grips.

  11. Asus Chromebook C101P Screen Replacement: 手順 11、 3の画像 1 Asus Chromebook C101P Screen Replacement: 手順 11、 3の画像 2 Asus Chromebook C101P Screen Replacement: 手順 11、 3の画像 3
    • Use the iFixit opening tool to pry around the screen.

    • Use the space between the screen and the hinge to prop it up.

    • Once open, slide the wires that are in the hinge out. The screen should now be fully detached from the case.

終わりに

To reassemble your device, follow these instructions in reverse order.

作成者

3人の作成者と共同で作成されました。

Dan Sysopha

メンバー登録日: 10/25/19

345 ポイント

2のガイドは作成済み

チーム

UMass Dartmouth, Team S1-G2, O'Connell Fall 2019 UMass Dartmouth, Team S1-G2, O'Connell Fall 2019人のメンバー

UMASSD-O'CONNELL-F19S1G2

2 メンバー

5のガイドは作成済み

0 件のコメント

コメントを追加

統計データ:

過去 24時間: 1

過去 7 日: 3

過去 30 日: 25

今までの合計 2,119