メインコンテンツにスキップ

Astro A40 TR Plus Mixamp M80 Wires in speaker Replacement

必要な工具と部品

  1. Astro A40 TR Plus Mixamp M80 Wires in speaker Replacement, Ear Cushions: 手順 1、 2の画像 1 Astro A40 TR Plus Mixamp M80 Wires in speaker Replacement, Ear Cushions: 手順 1、 2の画像 2
    • Use your hand to firmly grasp the cushion and remove it from the speaker.

    • Repeat the process for the other side if needed.

    • The best place to grip it is where there is a tab sticking out. The tab will make it easier to remove.

    • When reassembling, note the curvature of the cushion to determine whether it's the left or the right cushion.

  2. Astro A40 TR Plus Mixamp M80 Wires in speaker Replacement, Motherboard: 手順 2、 3の画像 1 Astro A40 TR Plus Mixamp M80 Wires in speaker Replacement, Motherboard: 手順 2、 3の画像 2 Astro A40 TR Plus Mixamp M80 Wires in speaker Replacement, Motherboard: 手順 2、 3の画像 3
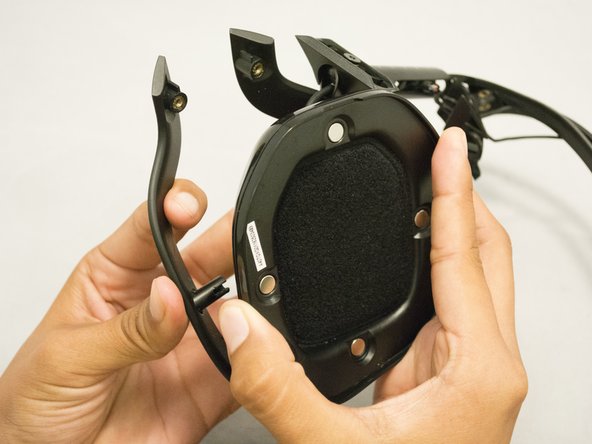
    • Slide the plastic spudger beneath the dust cover of the speaker.

    • Lift the dust cover up with the plastic spudger.

    • Using your fingers, completely remove the dust cover from the speaker.

  3. Astro A40 TR Plus Mixamp M80 Wires in speaker Replacement: 手順 3、 3の画像 1 Astro A40 TR Plus Mixamp M80 Wires in speaker Replacement: 手順 3、 3の画像 2 Astro A40 TR Plus Mixamp M80 Wires in speaker Replacement: 手順 3、 3の画像 3
    • Remove four 5 mm screws from the speaker protector using a JIS #1 screwdriver.

    • Use your hands to remove the speaker protector.

  4. Astro A40 TR Plus Mixamp M80 Wires in speaker Replacement: 手順 4、 2の画像 1 Astro A40 TR Plus Mixamp M80 Wires in speaker Replacement: 手順 4、 2の画像 2
    • Remove the two 2 mm long screws securing the motherboard using a Phillips #000 screwdriver.

  5. Astro A40 TR Plus Mixamp M80 Wires in speaker Replacement: 手順 5、 2の画像 1 Astro A40 TR Plus Mixamp M80 Wires in speaker Replacement: 手順 5、 2の画像 2
    • Use your fingers to hold the wire located by the covered part and gently lift it out of its cradle.

    • Carefully use your fingers to disconnect the colored wires connected to the motherboard.

    • If replacing the wires, ensure you carefully disconnect the remaining colored wires to replace them with new standard wires.

  6. Astro A40 TR Plus Mixamp M80 Wires in speaker Replacement, Wires in speaker: 手順 6、 3の画像 1 Astro A40 TR Plus Mixamp M80 Wires in speaker Replacement, Wires in speaker: 手順 6、 3の画像 2 Astro A40 TR Plus Mixamp M80 Wires in speaker Replacement, Wires in speaker: 手順 6、 3の画像 3
    • Use your fingers to remove the black wire from your headphones.

終わりに

To reassemble your device, follow these instructions in reverse order.

作成者

3人の作成者と共同で作成されました。

Yang Li

メンバー登録日: 06/28/17

541 ポイント

5のガイドは作成済み

チーム

コメント 1 件

But where do I buy the replacement speaker

David Landeros - 返信

コメントを追加

統計データ:

過去 24時間: 1

過去 7 日: 11

過去 30 日: 34

今までの合計 1,645