メインコンテンツにスキップ

Archos 101 G9 MicroUSB Port Replacement

必要な工具と部品

  1. Archos 101 G9 MicroUSB Port Replacement, Display Assembly: 手順 1、 1の画像 1
    • Place an iFixit opening tool in the crease where the display assembly and back of the device meet.

    • Slide the tool firmly through the crease on one side of the device, twisting as you go to create separation.

    • When you reach the corner, carefully pry the two halves of the device apart.

    • There are small clips along the edges that need to stay intact in order to properly reassemble the device. Be very gentle when prying so as not to break the clips.

    • Repeat for the remaining three sides and corners.

  2. Archos 101 G9 MicroUSB Port Replacement: 手順 2、 2の画像 1 Archos 101 G9 MicroUSB Port Replacement: 手順 2、 2の画像 2
    • Separate the halves of the device.

    • Ensure that you separate from the top and you keep the bottoms of both pieces near each other so as not to damage the ribbon cables that connect the halves.

  3. Archos 101 G9 MicroUSB Port Replacement: 手順 3、 2の画像 1 Archos 101 G9 MicroUSB Port Replacement: 手順 3、 2の画像 2
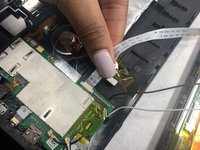
    • Gently remove both ribbon cables from their sockets on the motherboard.

  4. Archos 101 G9 MicroUSB Port Replacement: 手順 4、 1の画像 1
    • Remove the white and black coaxial cables with gold tips from the motherboard.

  5. Archos 101 G9 MicroUSB Port Replacement: 手順 5、 1の画像 1
    • Remove the display assembly from the back panel.

  6. Archos 101 G9 MicroUSB Port Replacement, Motherboard: 手順 6、 1の画像 1
    • Remove the 2 mm screw that holds the motherboard in place using a Phillips #0 screwdriver.

  7. Archos 101 G9 MicroUSB Port Replacement: 手順 7、 1の画像 1
    • Carefully remove the ribbon cable from its socket on the motherboard.

  8. Archos 101 G9 MicroUSB Port Replacement: 手順 8、 1の画像 1
    • Remove the tape covering all of the solder connections on the motherboard.

  9. Archos 101 G9 MicroUSB Port Replacement: 手順 9、 1の画像 1
    • Desolder all six of the connections that were underneath the tape.

  10. Archos 101 G9 MicroUSB Port Replacement: 手順 10、 1の画像 1
    • Remove the motherboard from the tablet.

  11. Archos 101 G9 MicroUSB Port Replacement, MicroUSB Port: 手順 11、 3の画像 1 Archos 101 G9 MicroUSB Port Replacement, MicroUSB Port: 手順 11、 3の画像 2 Archos 101 G9 MicroUSB Port Replacement, MicroUSB Port: 手順 11、 3の画像 3
    • Locate the microUSB port at the bottom of the motherboard.

    • Remove the rubber piece next to the microUSB port.

  12. Archos 101 G9 MicroUSB Port Replacement: 手順 12、 1の画像 1
    • Remove the plastic piece behind the microUSB port by hand.

    • Try not to remove the ribbon cable attached to it, but it's okay if you do. Just remember to reconnect it.

  13. Archos 101 G9 MicroUSB Port Replacement: 手順 13、 1の画像 1
    • Desolder the four solder points around the microUSB port.

終わりに

To reassemble your device, follow these instructions in reverse order.

作成者

3人の作成者と共同で作成されました。

Deneille Davids

メンバー登録日: 10/28/21

181 ポイント

2のガイドは作成済み

チーム

UMass Dartmouth, Team 4-1, Gulbrandsen Fall 2021 UMass Dartmouth, Team 4-1, Gulbrandsen Fall 2021人のメンバー

UMASSD-GULBRANDSEN-F21S4G1

3 メンバー

6のガイドは作成済み

0 件のコメント

コメントを追加

統計データ:

過去 24時間: 0

過去 7 日: 1

過去 30 日: 6

今までの合計 162