はじめに
このガイドを使用して、Apple Watch Series 3のForce Touch ガスケットを交換します。このガイドでは、ディスプレイを接続したまま手順を示します。ディスプレイも交換する場合は、 このガイド を参照して、ディスプレイを取り外した後、新しいディスプレイをインストールする前に Force Touch ガスケットを交換します。こうすれば、ガスケットの位置合わせが少し簡単になります。
Force Touch機能が正常に動作し、ディスプレイを再密閉するために新しい接着剤が必要な場合は、代わりに接着剤の交換ガイド に従ってください。
このガイドの画像に写っているデバイスは、Apple Watch Series 3のGPSモデルです。Apple WatchのGPSモデルとセルラーモデルには、いくつかの細かい違いがあります。セルラーモデルをお持ちの場合は、書かれているすべての指示にしっかりと従い、2つのデバイス間の不一致に関する警告に特に注意してください。
必要な工具と部品
-
-
iOpenerを使って、(もしくはヘアドライヤーかヒートガン)ディスプレイを温めます。触ると熱い程度まで温めてください。
-
iOpenerを少なくとも1分は載せて、スクリーンを十分に温めて、ケースに沿って留められた接着剤を柔らかくします。
-
iOpenerを再度温めるか、接着剤が冷却されないように、スクリーン周辺に動かしながら温め続けてください。
I have heated up the iOpener to 165 degrees and left it on for more than a minute. No way I can lift the screen off with the exact knife. Tried different angles in various places, but no go. I also used a hair dryer un til the watch screen was too hot to touch and even tried a very hard cutting tool blade and also no go. Could n ever get the blade under the face I applied enough force where I could see that the blade left small marks, not very big, but could never get anything to move or lift. What am I doing wrong? I spent 47 years at a global computer company and I am used to taking apart small things and applying force when required. I don’t know what I am doing wrong. Please help me.
Getting the initial gap is not easy. Maybe a playing card could work its way in the tiny gap and cut some adhesive. After that there might be some success with an exacto knife. Or you want to try a piece of aluminum foil (folded for more rigidity) for cutting the adhesive. Be aware of the force touch gasket and that it might get damaged during that procedure.
I finally used a hot air gun set to 150 deg. C heating up the edges by slowly spinning the watch around before the technique worked. Difficult is the level noted and it’s correct. Finally worked and watch perfectly functioning.
I used a heat gun, too. I was worried after reading comments that it would burn up the LCD, so I heated it a little bit at a time, rotating it like you did, and checking to see if I could get my knife under it. I must have hit one of the buttons because it did turn on, but that did reassure me that the display was okay.
It's open. Now that the watch and I have had a few minutes to cool down, I'm ready for the next step. Not as difficult as I thought it could be. Tomorrow, I'll be replacing the battery in an iPod Touch 6th Gen.
bester -
I had to heat the iOpener 2 times and leave it on top of the watch for 10 minutes.
-
-
The Watch 3 stainless Steel has an additional Frame. Where do i have To Open it?
I wore thick gardening gloves just to be safe 😅 and it took a while but the screen did come off.
-
-
カーブしたブレードをディスプレイとアウターケースの間の隙間の中に当てます。デジタルクラウンに一番近いディスプレイの短いサイドから初めます。
-
隙間に向けてまっすぐ、しっかりと押し込みます。
-
差し込んだら、ブレードの角度を傾けてディスプレイをわずかに開く様にこじ開けます。
It’s difficult to grip case in a way that keeps fingers safe from the blade but doesn’t hit the side buttons and turn the device on!
If it’s a struggle to get the display to release, warm case for a few more minutes.
I have tried so may times to get the display to release but nothing works. Should have bought a new watch LOL. Kept the iOpener on 2 times for 10 minutes and it still won't open. There must be a better way.
Hi Susan,
if you're struggling to get the adhesive loose enough a hair dryer, heat gun, or hot plate may also be used, but be careful not to overheat the device. The edge should feel slightly too hot to the touch.
-
-
-
-
Y000ドライバーを使用して、メタルカバープレートを固定しているトライポイントネジを外します。
-
ピンセットを使って、カバープレートを取り出します。
-
まず、2つのフラップの蝶番を外すために、プレートを完全に開けます。
-
プレートを持ち上げて取り出せるには、半分に閉じます。
What if I’m unable to unscrew the screw? I’m using the right tool, but it just won’t do it. It feels like it can’t “lock in” if you know what I mean in order to be able to get enough grip to turn the screw. Any suggestions?
-
-
-
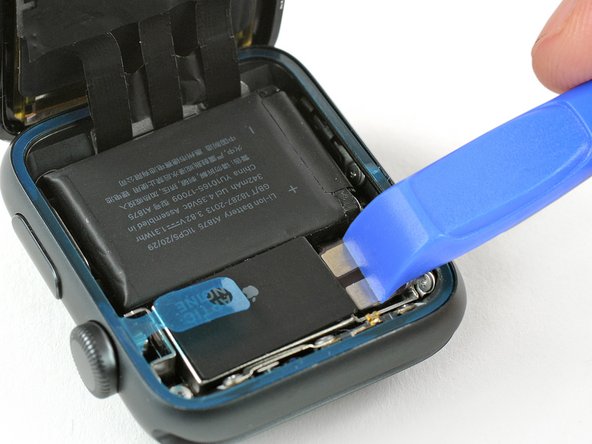
スパッジャーの鋭利な先端を使って、コネクタをまっすぐ持ち上げて、バッテリーを取り外します。
-
コネクタをわずかに曲げて、アクシデントで接触しないよう注意してください。
-
-
-
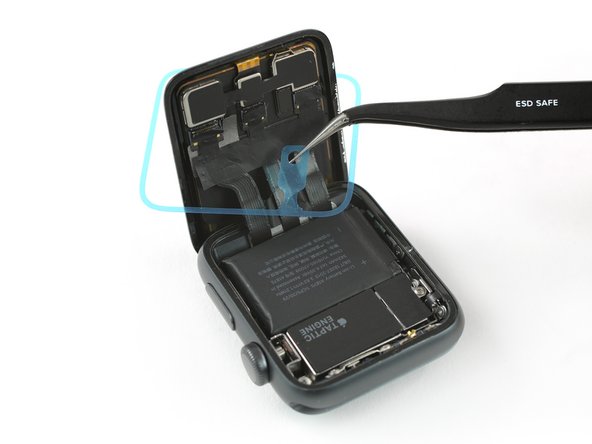
ピンセットを使って、Force Touchガスケットを剥がします。
-
わずかにディスプレイを前方側に傾けて、Force Touchガスケットを垂直に固定しながら、ディスプレイ上を通しながら剥がします。
Does the metal connector for the gasket “clip” in place? Any tips on how to do that?
Wrong place.
-
-
-
接着剤の残りや飛散したガラスを完全に除去してから、Watchを再密封してください。
-
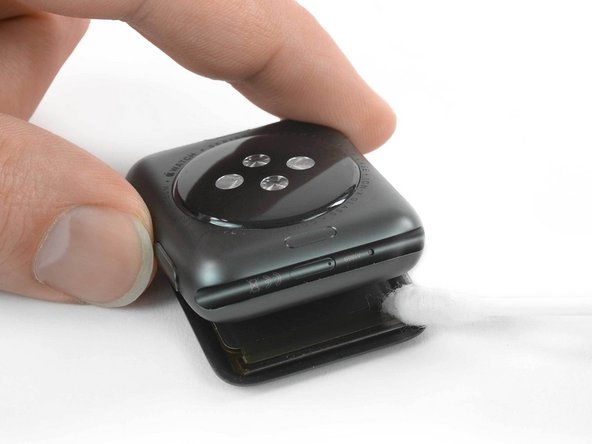
クリーニングパッドでケースを磨くか、糸くずの出ない布やコーヒーフィルターに包んだ開口ツールやスパッジャーの先端にイソプロピルアルコール(90%以上の濃度)を少量付けてケースを拭き取ります。また綿棒を使用することもできます。
Which job has the sticker which connects the display flex with the housing? These stickers can‘t found on the series 2 but on the series 3? I damaged one of the two connections when I cleaned the old glue. I‘ve tested 3 force touch cable stickers and none worked…is there any connection? Help
chrkraemer - 返信
-
-
-
ピンセットを使って、交換用Force Touchガスケットの底から青い保護ライナーを慎重に取り除き、下の粘着面を露出させます。
My force touch sensor looks different than this one. It says it’s a 38/2/3Cell on the package but it has a different connection than the one in the pictures.
-
-
-
Force Touchガスケットとバッテリーフレックスケーブルを、カチッと音がするまでコネクタをまっすぐ下に押して、再接続します。
Any tips to seating these connectors? How positive (tight) are the connections.
You might want to start pushing down the side of the connector that is closest to the cable instead of flat down.
-


e-wasteを処理する場合は、認可済みリサイクルセンターR2を通じて廃棄してください。
修理がうまくいきませんか?ベーシックなトラブルシューティングを試して見るか、このモデルのアンサーフォーラムを参照してください。
e-wasteを処理する場合は、認可済みリサイクルセンターR2を通じて廃棄してください。
修理がうまくいきませんか?ベーシックなトラブルシューティングを試して見るか、このモデルのアンサーフォーラムを参照してください。
65 の人々がこのガイドを完成させました。
以下の翻訳者の皆さんにお礼を申し上げます:
100%

Midori Doiさんは世界中で修理する私たちを助けてくれています! あなたも貢献してみませんか?
翻訳を始める ›


15 件のコメント
After replacing the screen and the force touch sensor everything except the force touch works.
I have tested 4 force touch sensor flex…what can it be?
chrkraemer - 返信
Hello I’ve got the same problem. Have you resolved it ?
Perhaps it’s necessary to reinstall watchOS ?
In my case applewatch is locked, to many error code access. And I don’t have iphone brother with me….so I can’t reset applewatch.
Reinstalling watchOS is impossible. Only Apple can do it…
my only problem is still the non-working force touch.
Same problem, replaced battery while broke the force touch gasket. After replaced a new gasket, the force touch still not working.
Patrick -
Warning! Inserting the screw to the plate that holds down the battery connector and the GPS antenna was very difficult. I actually lost the screw and thought it was down inside the watch. I removed the battery to see if it shake out. I realized that it was not inside the watch. My last hope was looking on the area rug with a big magnifying glass. Low and behold I found it. Tip! Do not try this repair on a bare wooden tabletop. That tiny little screw will bounce a long way if you drop it. You need to work on a soft rubber mat or on the top of the magnetic parts mat that Fixit sells. After several attempts trying to get that screw started, I still failed. Eventually, I had to use the tweezers from Fixit to hold the screw then dab a tiny bit of Gorilla glue on the Y0000 bit and hold the screw with the pliers and push onto the bit until it dries. Once the screw was glued to the bit I had no problem.
Did everything but now my touch sensor isn’t working at all …. Heellllppp me?
Do not buy the repair kit for the apple watch. I bought the repair kit for a broken screen, an new battery and an extra force touch sensor just to play it safe. The adhesive on the force touch sensor does not work. Even after following the instructions of placing a weight (book) on it for several hours the adhesive doesn’t hold. Save your money and buy a new watch.
Same issue here. My screen separated from the case on its own, guessing I wore it too much! Anyways, I ordered the force touch gasket and when it didn’t work the first time ifixit did send me a new one as it didn’t seem to have adhesive on one side…new one seems to also have this issue. Just save yourself time and a small headache and get a new one.
For all those with the force touch problem- This may have been caused by damaging the internal force touch ring, located in-between the digitizer/glass layer and the OLED display. Impossible to fix. However, in watchOS 7, Apple removed the force touch feature and replaced it with Haptic Touch, which is basically de-glorified force touch. Just tap and hold gently on the display and it will be triggered, with no need for the force touch ring.
En el series 3 LTE + GPS, si no se pone eso que le pasa al Apple Watch?
After replacing the Force Touch gasket will the watch be waterproof enough to swim with/ have the same water resistance as when it was new?
After a new force touch ribbon and gasket and screen replacement, the screen works, but not force touch or the ability to use the touch screen. It is a display only.
After the first result, I took the new screen off again, disconnected, disconnected the force touch, checked connections, reconnected, put on a new adhesive, and it's still the same result a second time.
Is the problem the force touch ribbon or the new screen? It's possible I suppose it is a bad screen.
I’m having trouble with resealing my watch after successful battery and force touch gasket replacement. Force touch works, but my screen keeps popping off. I’ve cleaned off adhesive residue from previous gasket and employed every method for heat and pressure that is suggested in the guide. The screen does not stay sealed. The screen pops up and a away from the body constantly. Nothing I’ve tried has established a secure seal. What should I do?
Verify your model. The back of the Cellular model just says GPS, so be sure to check the groves where the watch band goes to determine you model. I made the mistake of just reading the back of the device and since I’d been gifted the device didn’t know it was cellular. Cellular has a different type of touch force gasket, different screen, and different battery connections.
Ryan Holt - 返信
From what I just read on Apple, the only differences in watch series 3 is 38mm and 42mm.
mcr4u2 -
As a consumer all you need to know are 38mm and 42mm
Michael Adoga - 返信
The back will say GPS LTE if it’s the cellular version. If it doesn’t say LTE it is only the GPS version. The displays are different whether or not it is LTE(cellular).
themepark - 返信
This alternative method only reboots the watch.
Gregg Stanley - 返信