はじめに
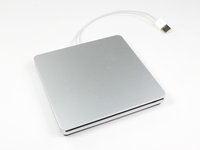
Apple が MacBook Air 用に販売していた外付け光学ドライブのドライブ本体を交換する簡易ガイドです。
光学ドライブが故障した場合は本ガイドを参照して交換してください。
注意:
これは古い iMac、MacBook、MacBook Pro システムで通常は動作しない SuperDrive を使用するために、OS X の設定ファイルを書き換える方法です。
使用に関する注意事項
テキストエディタかターミナルアプリでnano を使用して com.apple.Boot.plist ファイルを開きます。そのファイルの中に <key>Kernel Flags</key>というキーが見つかるはずです。
その下に次の行を追加します:
<string>mbasd=1</string>
そのあと Mac を再起動してください。
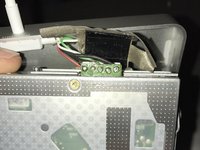
後期モデル A1379 のお使いの場合
残念ながら、基板上の接点がUSBケーブルに直接はんだ付けされているため、別の同一 Apple 製外付け SuperDrive から内部ドライブを流用して交換する必要があります。2011 年以前に製造されたモデルは標準的な PATA スリムラインドライブですが、2012 年以降に Apple から購入した SuperDrive は修理にはんだごてが必要です。
必要な工具と部品
-
-
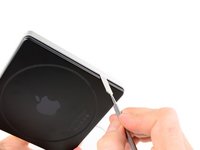
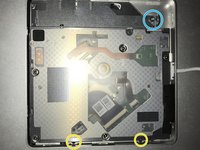
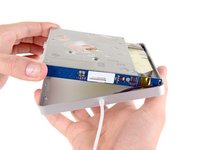
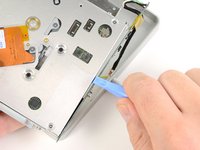
SuperDrive を開くには、初めに下部ケースを外す必要があります。
-
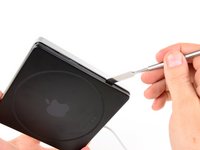
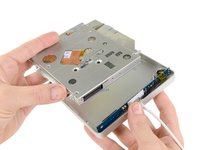
下部ケースは 8 個のクリップで固定されています。
-
6 か所はドライブの両側
-
2 か所はドライブの背面側
-
-


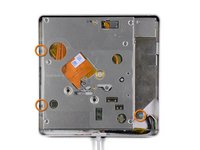


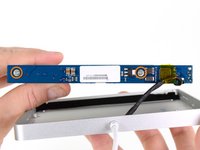


デバイスを再組み立てする際は、これらのインストラクションを逆の順番に従って作業を進めてください。
53 の人々がこのガイドを完成させました。
以下の翻訳者の皆さんにお礼を申し上げます:
100%


これらの翻訳者の方々は世界を修理する私たちのサポートをしてくれています。 あなたも貢献してみませんか?
翻訳を始める ›

23件のガイドコメント
After you pry open, inside there is an internal Super Drive.
Please tell me what's the markings/printed words model, name, brand, part number, etc....
Thank you.
My drive has nothing on that orange part in the middle of the drive (like you can see in the pictures here) except for two QR codes; it has absolutely no markings/printed words model, name, brand, part number, etc. on the inside, except the manufacturing date 2012 stamped inside the black aluminum bottom case cover.
Hope this helps.
Thank you. My drive from 2012 ist fastened with a six-sided star-shaped Torx screw on the right side. The ones on the left side are black Philips screws and they are so tiny that they are hard to see in normal light. All I want to do is clean the drive from dust since it won't read DVDs anymore, while it has no problems with CDs at all. So now this Torx screw is another obstacle. I will have to waste more time & money buying an extra tool, thanks to Apple.
Is it possible to replace the internal DVD drive by a Bluray? Does macOS Sierra work with external Bluray drives?
Thanks for helping.
Sincerely
Yes, but the only drive that is known to be an ATAPI (EIDE) connecting drive that supports Blu-ray is the Panasonic UJ-215-B. They were astronomically priced new in 2007-2008 when they were released. Good luck finding one today, and if you do it will still be very expensive and almost never a new one. But it seems to be a direct drop in replacement. I myself have already begun this project, and have one on the way right now. Bought it for $250 so it was pricey but considering it was new I got very lucky.