メインコンテンツにスキップ
リペアコミュニティに参加 - アカウントの作成

Apple TV 1st Generation Logic Board Replacement

必要な工具と部品

  1. Apple TV 1st Generation Logic Board Replacement, Lower Case: 手順 1、 1の画像 1
    • Flip the Apple TV over so that the bottom of the unit is facing up.

    • You need to remove the rubber base to get access to the screws.

    • Starting at one side of the device, use a hairdryer or a heat gun to soften the adhesive holding the rubber base in place.

    • The rubber base will be hot after heating, take extreme caution while proceeding to avoid personal injury.

    • While the adhesive is still warm, peel the bottom of the rubber base upwards to detach it from the metal plate.

    • The rubber base can tear if the adhesive hasn't been softened enough.

    • Repeat the procedure described above until the rubber base has been completely removed.

    FixBotに聞いてみる
  2. Apple TV 1st Generation Logic Board Replacement: 手順 2、 1の画像 1
    • Remove the four T10 Torx screws that secure the lower case to the upper case.

    FixBotに聞いてみる
  3. Apple TV 1st Generation Logic Board Replacement: 手順 3、 1の画像 1
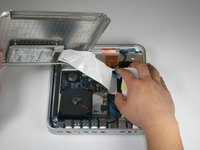
    • Carefully lift the lower case from the upper case enough to allow access to the internals of the Apple TV.

    • Be aware that the hard drive is physically attached to the lower case and that a ribbon cable runs from the drive to the logic board in the upper case.

    FixBotに聞いてみる
  4. Apple TV 1st Generation Logic Board Replacement: 手順 4、 2の画像 1 Apple TV 1st Generation Logic Board Replacement: 手順 4、 2の画像 2
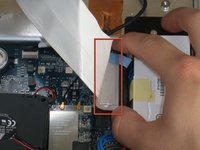
    • Carefully pull the hard drive data cable straight up from its socket on the logic board.

    • During reassembly, make sure the hard drive data cable is firmly seated in its socket on the logic board; otherwise, during boot-up you will see a flashing question mark "?".

    FixBotに聞いてみる
  5. Apple TV 1st Generation Logic Board Replacement, Fan: 手順 5、 1の画像 1
    この手順で使用する道具:
    Tweezers
    $4.99
    • The fan is held in place by three rubber posts.

    • Using a pair of tweezers, squeeze the top of each post and push the post down into the hole. Repeat for all three posts.

    • During reinstallation, it helps to lubricate the rubber posts. Try weaving a string through the holes in the posts to pull them up through the mounting points.

    • Do not excessively pull on the posts, as they may rip.

    FixBotに聞いてみる
  6. Apple TV 1st Generation Logic Board Replacement: 手順 6、 1の画像 1
    • Using a pair of tweezers, pull the fan connector straight up from its socket on the logic board.

    • Lift and remove the fan out of the upper case.

    FixBotに聞いてみる
  7. Apple TV 1st Generation Logic Board Replacement, AirPort Card: 手順 7、 1の画像 1
    • Pry the AirPort antenna cables straight up from their sockets on the logic board.

    FixBotに聞いてみる
  8. Apple TV 1st Generation Logic Board Replacement: 手順 8、 1の画像 1
    • Remove the single T8 Torx screw securing the AirPort card to the logic board.

    FixBotに聞いてみる
  9. Apple TV 1st Generation Logic Board Replacement: 手順 9、 1の画像 1
    • Cautiously lift the AirPort card and pull it straight away. Slide it from its socket on the logic board.

    FixBotに聞いてみる
  10. Apple TV 1st Generation Logic Board Replacement, Power Supply: 手順 10、 1の画像 1
    • Disconnect the power cable straight up from its socket on the logic board.

    • There is a release tab that must be pushed inwards in conjunction with pulling to release the power cable

    • Make sure to pull the connector straight up from its socket and not toward the face of the logic board.

    FixBotに聞いてみる
  11. Apple TV 1st Generation Logic Board Replacement: 手順 11、 1の画像 1
    • Remove the following three screws securing the power supply to the upper case:

    • One 4.8 mm T8 Torx screw

    • Two 5.8 mm T8 Torx screws

    FixBotに聞いてみる
  12. Apple TV 1st Generation Logic Board Replacement: 手順 12、 2の画像 1 Apple TV 1st Generation Logic Board Replacement: 手順 12、 2の画像 2
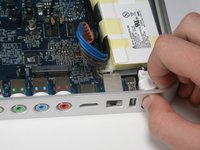
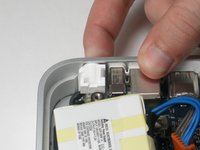
    • Use your finger to push and dislodge the AC power connector inwards, towards the power supply.

    • This should pop out easily.

    FixBotに聞いてみる
  13. Apple TV 1st Generation Logic Board Replacement: 手順 13、 1の画像 1
    • Power supply remains.

    FixBotに聞いてみる
  14. Apple TV 1st Generation Logic Board Replacement, Logic Board: 手順 14、 1の画像 1
    • Remove the T8 Torx screw securing the metal shield to the case.

    • To remove the T8 screw, you must insert the screwdriver through the access hole in the metal shield. The access hole is located near the PRAM battery.

    FixBotに聞いてみる
  15. Apple TV 1st Generation Logic Board Replacement: 手順 15、 2の画像 1 Apple TV 1st Generation Logic Board Replacement: 手順 15、 2の画像 2
    • Remove the T20 screw located near the digital audio port.

    • Lift and remove the metal shield from the upper case of the Apple TV.

    FixBotに聞いてみる
  16. Apple TV 1st Generation Logic Board Replacement: 手順 16、 1の画像 1
    この手順で使用する道具:
    Tweezers
    $4.99
    • Use a pair of tweezers to pull the IR cable straight away from its socket on the logic board.

    • Make sure to pull the connector parallel to the face of the logic board. Do not pull the connector straight up.

    FixBotに聞いてみる
  17. Apple TV 1st Generation Logic Board Replacement: 手順 17、 1の画像 1
    • Lift the left edge of the logic board (nearest the PRAM battery) upwards and slide it out of the case, away from the ports.

    • Be careful not to damage the ports when sliding the logic board out of case.

    • The logic board remains.

    FixBotに聞いてみる
終わりに

To reassemble your device, follow these instructions in reverse order.

7 の人々がこのガイドを完成させました。

作成者

11人の作成者と共同で作成されました。

kelsey8800

メンバー登録日: 11/11/09

490 ポイント

1ガイドが承認済み

チーム

Cal Poly, Team 18-5, Maness Fall 2009 Cal Poly, Team 18-5, Maness Fall 2009人のメンバー

CPSU-MANESS-F09S18G5

5 メンバー

7のガイドは作成済み

0件のガイドコメント

コメントを追加

統計データ:

過去 24時間: 3

過去 7 日: 13

過去 30 日: 85

今までの合計 14,657