メインコンテンツにスキップ

American Sanders EZSand Orbital Sander 07163A 2017 Motor Replacement

必要な工具と部品

  1. American Sanders EZSand Orbital Sander 07163A 2017 Motor Replacement, Remove the sandpaper disc: 手順 1、 1の画像 1
    • Before you begin, be sure that the sander is unplugged and powered off.

    • Carefully tilt the sander back and lay it down on its side, exposing the three sanding pads on the bottom.

  2. American Sanders EZSand Orbital Sander 07163A 2017 Motor Replacement: 手順 2、 1の画像 1
    • Peel the hook-and-loop sandpaper disc off of the driver assembly.

  3. American Sanders EZSand Orbital Sander 07163A 2017 Motor Replacement, Remove the driver pad: 手順 3、 2の画像 1 American Sanders EZSand Orbital Sander 07163A 2017 Motor Replacement, Remove the driver pad: 手順 3、 2の画像 2
    • Use a 3 mm hex key or driver bit to remove the six 11.9 mm-long screws securing the driver pad.

    • Remove the driver pad from the sanding disc.

  4. American Sanders EZSand Orbital Sander 07163A 2017 Motor Replacement, Remove the sanding disc: 手順 4、 3の画像 1 American Sanders EZSand Orbital Sander 07163A 2017 Motor Replacement, Remove the sanding disc: 手順 4、 3の画像 2 American Sanders EZSand Orbital Sander 07163A 2017 Motor Replacement, Remove the sanding disc: 手順 4、 3の画像 3
    • Use a flathead screwdriver to pry off and remove the rubber plug in the center of the sanding disc.

  5. American Sanders EZSand Orbital Sander 07163A 2017 Motor Replacement: 手順 5、 2の画像 1 American Sanders EZSand Orbital Sander 07163A 2017 Motor Replacement: 手順 5、 2の画像 2
    • Slide a thin 22 mm wrench underneath the sanding disc and clasp it onto the flat part of the motor driveshaft to keep the driveshaft from turning.

  6. American Sanders EZSand Orbital Sander 07163A 2017 Motor Replacement: 手順 6、 2の画像 1 American Sanders EZSand Orbital Sander 07163A 2017 Motor Replacement: 手順 6、 2の画像 2
    • Use an 11 mm socket and socket wrench to remove the 16.5 mm-long bolt securing the sanding disc to the motor driveshaft.

    • Apply counter torque to the driveshaft wrench as you loosen the bolt to keep the sanding disc from spinning.

  7. American Sanders EZSand Orbital Sander 07163A 2017 Motor Replacement: 手順 7、 3の画像 1 American Sanders EZSand Orbital Sander 07163A 2017 Motor Replacement: 手順 7、 3の画像 2 American Sanders EZSand Orbital Sander 07163A 2017 Motor Replacement: 手順 7、 3の画像 3
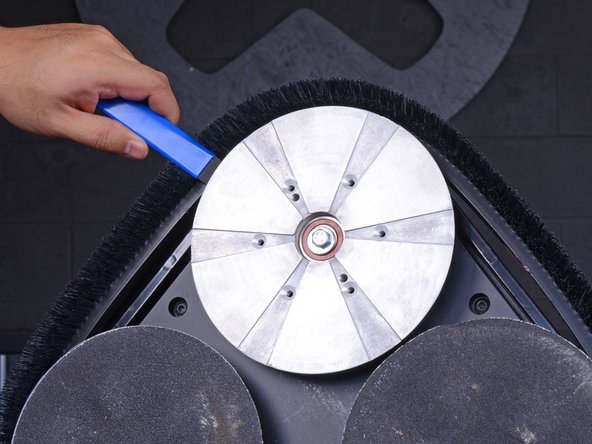
    • Take two pry bars and insert them underneath the sanding disc as close to the driveshaft as possible.

    • Apply pressure to the pry bars in opposite directions to carefully pry the sanding disc off of the driveshaft.

    • Remove the sanding disc from the floor sander.

  8. American Sanders EZSand Orbital Sander 07163A 2017 Motor Replacement, Remove the bottom weight and cover: 手順 8、 1の画像 1
    • Repeat the previous seven steps to remove the other two sanding discs before continuing.

    • With all three sanding discs removed, use a 4 mm hex key to remove four 25.4 mm-long screws securing the bottom cover and bottom weight.

  9. American Sanders EZSand Orbital Sander 07163A 2017 Motor Replacement: 手順 9、 1の画像 1
    • Lift the bottom weight away from the sander.

  10. American Sanders EZSand Orbital Sander 07163A 2017 Motor Replacement: 手順 10、 3の画像 1 American Sanders EZSand Orbital Sander 07163A 2017 Motor Replacement: 手順 10、 3の画像 2 American Sanders EZSand Orbital Sander 07163A 2017 Motor Replacement: 手順 10、 3の画像 3
    • Pull the top edge of the bottom cover away from the sander until you have enough space to slide the cover out.

    • Slide the cover across the bottom of the sander, away from the wheels, and remove it.

  11. American Sanders EZSand Orbital Sander 07163A 2017 Motor Replacement, Remove the dust fan: 手順 11、 1の画像 1
    • Remove the washer from the motor shaft.

  12. American Sanders EZSand Orbital Sander 07163A 2017 Motor Replacement: 手順 12、 3の画像 1 American Sanders EZSand Orbital Sander 07163A 2017 Motor Replacement: 手順 12、 3の画像 2 American Sanders EZSand Orbital Sander 07163A 2017 Motor Replacement: 手順 12、 3の画像 3
    • Pull the drive pad bearing straight off of the motor shaft.

    • You may not be able to remove the bearing with your hands. If this is the case, use a bearing puller to remove the bearing.

  13. American Sanders EZSand Orbital Sander 07163A 2017 Motor Replacement: 手順 13、 3の画像 1 American Sanders EZSand Orbital Sander 07163A 2017 Motor Replacement: 手順 13、 3の画像 2 American Sanders EZSand Orbital Sander 07163A 2017 Motor Replacement: 手順 13、 3の画像 3
    • Using snap ring pliers, pry the snap ring open and slide it off of the motor shaft.

    • Remove the snap ring.

  14. American Sanders EZSand Orbital Sander 07163A 2017 Motor Replacement: 手順 14、 2の画像 1 American Sanders EZSand Orbital Sander 07163A 2017 Motor Replacement: 手順 14、 2の画像 2
    • Slide the dust fan straight off of the motor shaft.

  15. American Sanders EZSand Orbital Sander 07163A 2017 Motor Replacement, Prepare the motor for removal: 手順 15、 3の画像 1 American Sanders EZSand Orbital Sander 07163A 2017 Motor Replacement, Prepare the motor for removal: 手順 15、 3の画像 2 American Sanders EZSand Orbital Sander 07163A 2017 Motor Replacement, Prepare the motor for removal: 手順 15、 3の画像 3
    • Using snap ring pliers, pry the snap ring open and slide it off of the motor shaft.

    • Remove the snap ring.

  16. American Sanders EZSand Orbital Sander 07163A 2017 Motor Replacement, Remove the motor screws: 手順 16、 1の画像 1
    • Use an 11 mm socket to remove the four 22.8 mm-long screws securing the motor.

  17. American Sanders EZSand Orbital Sander 07163A 2017 Motor Replacement, Unlatch the handle assembly: 手順 17、 3の画像 1 American Sanders EZSand Orbital Sander 07163A 2017 Motor Replacement, Unlatch the handle assembly: 手順 17、 3の画像 2 American Sanders EZSand Orbital Sander 07163A 2017 Motor Replacement, Unlatch the handle assembly: 手順 17、 3の画像 3
    • Lift the top of the latch securing the handle assembly to the sander and push it back against the sander.

    • Make sure the hook on the latch is clear of the small metal tab on the sander.

    • Repeat this step for all three latches securing the handle assembly.

  18. American Sanders EZSand Orbital Sander 07163A 2017 Motor Replacement, Remove the handle assembly: 手順 18、 1の画像 1
    • Remove the handle assembly from the sander.

  19. American Sanders EZSand Orbital Sander 07163A 2017 Motor Replacement, Remove the dust bag: 手順 19、 2の画像 1 American Sanders EZSand Orbital Sander 07163A 2017 Motor Replacement, Remove the dust bag: 手順 19、 2の画像 2
    • Lift the dust bag straight up to remove it from the sander.

  20. American Sanders EZSand Orbital Sander 07163A 2017 Motor Replacement, Remove the motor: 手順 20、 3の画像 1 American Sanders EZSand Orbital Sander 07163A 2017 Motor Replacement, Remove the motor: 手順 20、 3の画像 2 American Sanders EZSand Orbital Sander 07163A 2017 Motor Replacement, Remove the motor: 手順 20、 3の画像 3
    • Use a Phillips #2 driver to remove three 22.1 mm-long screws securing the motor cover to the sander. There is one screw on each side of the sander.

  21. American Sanders EZSand Orbital Sander 07163A 2017 Motor Replacement: 手順 21、 1の画像 1
    • Use a 7/32" hex key to remove three 23.7 mm-long hex screws securing the motors to the motor cover.

  22. American Sanders EZSand Orbital Sander 07163A 2017 Motor Replacement: 手順 22、 1の画像 1
    • Lift the motor cover straight up and remove it.

  23. American Sanders EZSand Orbital Sander 07163A 2017 Motor Replacement: 手順 23、 3の画像 1 American Sanders EZSand Orbital Sander 07163A 2017 Motor Replacement: 手順 23、 3の画像 2 American Sanders EZSand Orbital Sander 07163A 2017 Motor Replacement: 手順 23、 3の画像 3
    • Find the two wires that connect the motor you're replacing to the motor power hub that sits in between all the motors.

    • Pull the two wires straight out of their sockets to disconnect them.

  24. American Sanders EZSand Orbital Sander 07163A 2017 Motor Replacement: 手順 24、 2の画像 1 American Sanders EZSand Orbital Sander 07163A 2017 Motor Replacement: 手順 24、 2の画像 2
    • Lift the motor straight up and remove it from the sander.

    • Repeat the last 14 steps if you wish to remove one or both of the remaining motors.

終わりに

To reassemble your device, follow these instructions in reverse order.

4 の人々がこのガイドを完成させました。

作成者

3人の作成者と共同で作成されました。

Adam O'Camb

メンバー登録日: 04/11/15

196,326 ポイント

416のガイドは作成済み

0 件のコメント

コメントを追加

統計データ:

過去 24時間: 2

過去 7 日: 11

過去 30 日: 41

今までの合計 2,094