はじめに
通常、スクリーンはタブレットで最初に破損するもので、LCDパネルはユーザーのタッチを感知し、スクリーン上に画像を表示します。
この交換を行うには、iOpenerやヒートガンなどのヒート用ツールが必要です。これらのツールを安全に使用して、けがやデバイスの損傷を防ぐよう、注意してください。
必要な工具と部品
-
-
スピーカーワイヤをマザーボードから半田除去します。
This step is completely unnecessary. The cords don't get in the way of the rest of the procedure. Feel free to disregard this step.
-
-
-
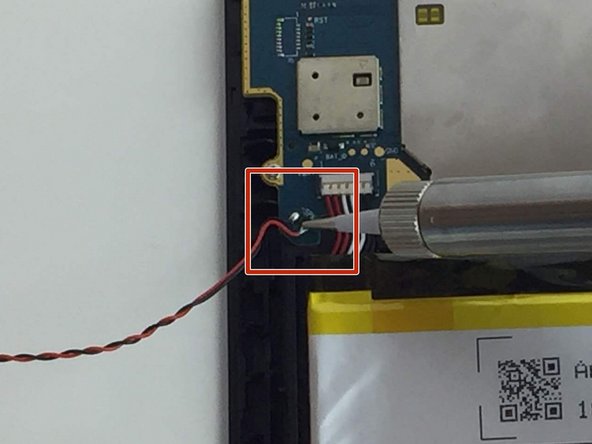
バッテリーコネクタはAmazon Fire バッテリーパックの左上コーナーに搭載されています。
-
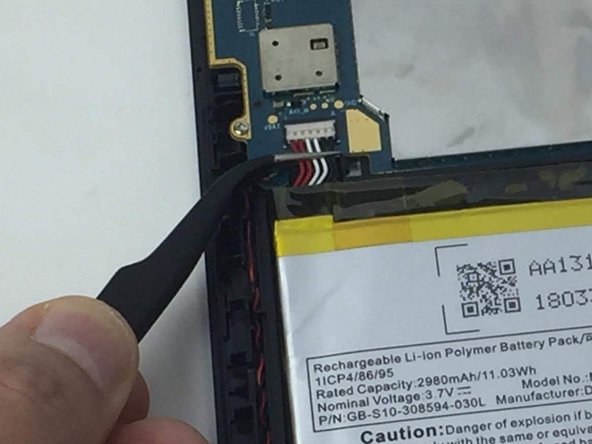
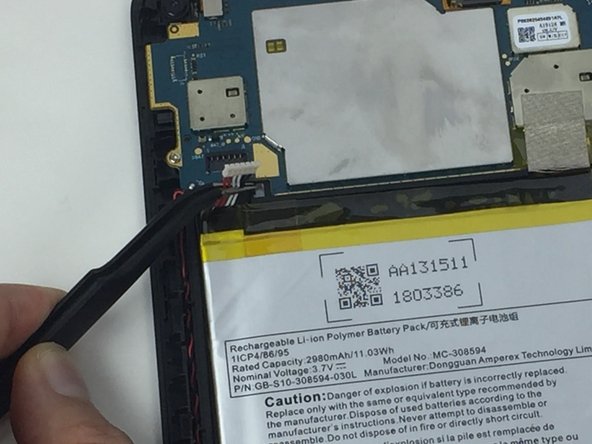
バッテリーコネクタの接続を外すには、アングル付きのESD精密ピンセットを使って、ケーブルを持ち上げて、ソケットから外してください。
-
-
-
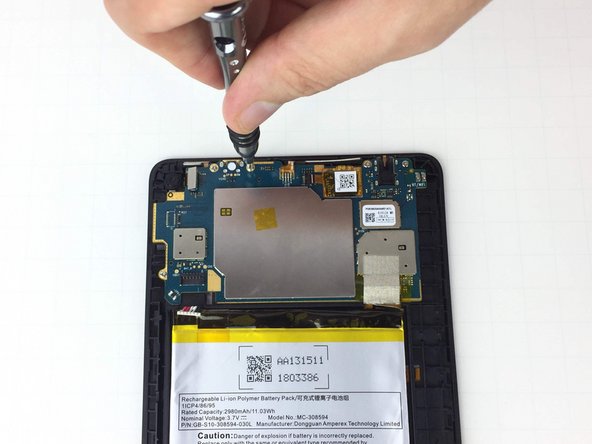
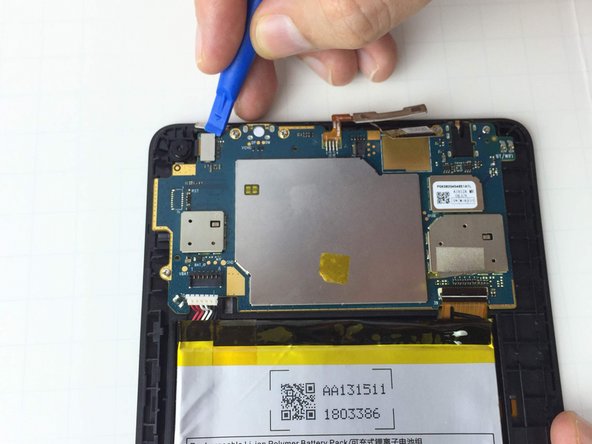
PH0 プラスドライバーを使って、マザーボード上の2mmネジを5本外します。これらのネジは1番目の画像で赤でマークしています。
-
-
-
-
LCD-マザーボードのコネクタケーブルには、保護用レイヤーが付いています。実際のコネクタを露出するために、精密ピンセットで剥がしてください。
-
精密ピンセットを使って、ケーブルの接続を外すために、コネクタケーブルを慎重に引き抜きます。
Pull black tab at connector upwards first, then flex cable can be pulled easily.
-
-
-
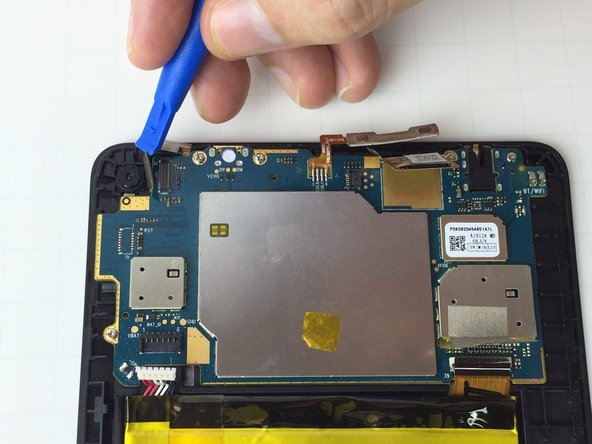
開口ツールをマザーボードの下に差し込み、上向きに持ち上げて、マザーボードをケースから取り出します。
Thanks for the information, very useful. Does anyone know how the power button works? wiring? I am thinking of replacing it with a small push button. Mine broke. Thanks in advance, Jorge
-
-
-
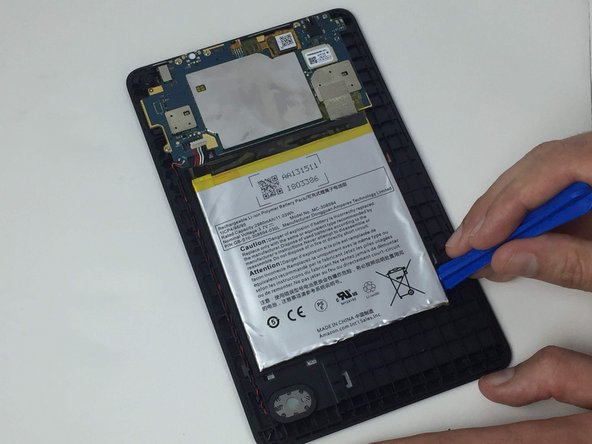
開口ツールをバッテリーパックの端の下にゆっくりと差し込みます。ツールを斜めに傾けて、下からこじ開けます。
-
バッテリーパック片側または角を上に持ち上げたら、開口ツールをパックの下に約1cm程度慎重に押し込み、残りの側面をこじ開けます。
I am not understanding why the battery needs to be removed if you are only replacing the glass. I’m sure there is a good reason. Could you explain?
The LCD and digitizer are adhered to the plastic frame of the tablet. Heat is what is needed to soften the adhesive, via an iOpener, heat gun, hair dryer, or hot plate LCD remover. However, heat can cause batteries to be damaged or catch fire. So it is advisable to remove the battery first.
When I did this repair, I was able to get the battery out, but the corners were quite bent. So I used a glue stick like a rolling pin and carefully rolled the bend out of the battery.
-
-
-
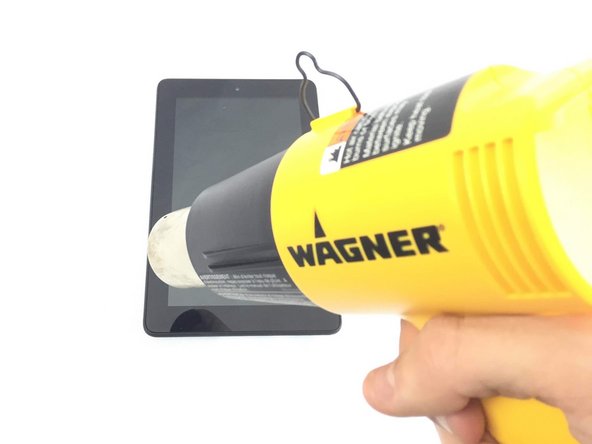
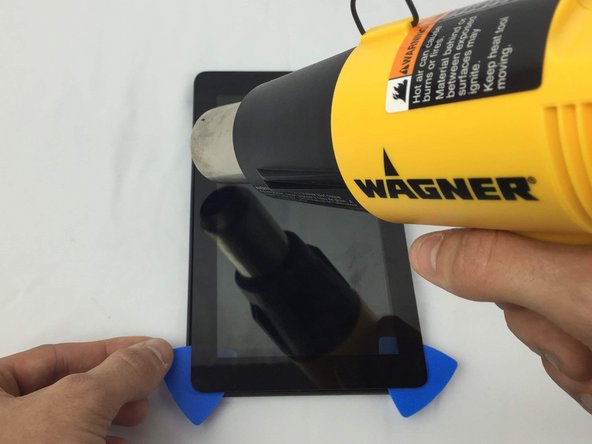
Amazon Fireのガラススクリーンの端にiOpenerやヒートガンなどの加熱ツールを使用します。 iOpenerの準備には時間がかかる場合があります。 ヒートガンを誤った方法で使用すると、プラスチックが変形する可能性があります。ご注意ください。
-
デバイスの端を加熱する時は、ギターピックなどの乖離するためのツールを使用してガラスパネルを持ち上げます。
!#^&@@ off, You motherlovers failed to mention the ribbon cable on the left side connected to the LCD. I worked the 3 sides exactly like the directions and avoiding the top edge. But my LCD ribbon cable to Digitizer was ruined as I folded the 3 removed edges to the top…..Straight Bull…Directions should have stated that…You should have mentioned to only remove bottom and right side(being careful to avoid ribbon cable to the leftside while removing the screen) instead of working in a U. That's false info…Somebody owes me an LCD.
-
-
-
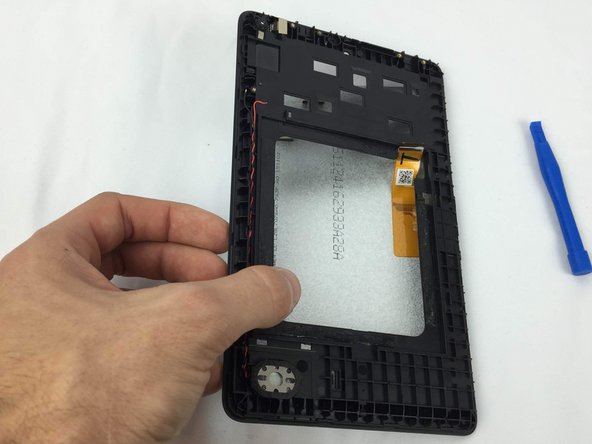
デジタイザケーブルがデバイス背部まで通っていることに注意してください。 このケーブルをスロットを通して解放し、ガラスパネルをデバイスフレームから外します。
What about the 2 magnets in the plastic frame they came out when pulling out digitizer not sure if they have a specific way of going back in. Help plz
-


デバイスを再組立する際は、これらのインストラクションを逆の順番に従って作業を進めてください。
デバイスを再組立する際は、これらのインストラクションを逆の順番に従って作業を進めてください。
37 の人々がこのガイドを完成させました。
以下の翻訳者の皆さんにお礼を申し上げます:
100%

Midori Doiさんは世界中で修理する私たちを助けてくれています! あなたも貢献してみませんか?
翻訳を始める ›
チーム

USF Tampa, Team 1-2, Nance Spring 2016 USF Tampa, Team 1-2, Nance Spring 2016人のメンバー
USFT-NANCE-S16S1G2
3 メンバー
13のガイドは作成済み
46 件のコメント
So....... what's that Glass panel part number?
Where can I get the Digitizer? It appears to me (from your guide) the screens (Digitizer and LCD) DO in fact, separate. It does seem odd to me, from being in the industry for so long, that the digitizer has a polarizer attached to it. That polarizer is usually adhered to the LCD screen and that usually suggests that the repair part would call for a screen assembly.. Not just a digitizer. Can you attach some more pictures of the digitizer and the connector itself to clarify? Also, If you know where to order the part domestically and can you post a link? Thank you! Great guide BTW.
If the speaker and wire (twisted red&white) are removed from the case (step 2 above), then you won't need to desolder the connection to the motherboard (step 3 above). Just leave it soldered and remove with motherboard (step 10 above).
....or desolder connection and leave the speaker & wire in the case, if you like to "play with powertools?" ;-)
Why remove the battery? It was by far the most tricky operation and exposed the battery to damage prying it out with a flat tool. Any puncture of the plastic jacket qoulds mean instant death to the battery and if any metal tool in contact, a fire hazard. BTW where do you get a replacement digitized for the 7inch 5th generation Kindle?
Ordered mine from here: http://www.ebay.com/usr/guan_lcd took about 2.5 weeks, maybe more. Replaced my digitizer following this guide and the other one on this website. Everything went fine until I turned the tablet back on and I ended up with a rainbow haze over the screen. Screen is responsive like new, but I really can't see anything, Hope I didn't get a defective component
The rainbow haze is likely due to leaving the plastic protection from the inside of the replacement screen. It can be difficult to see. I had the same problem but levered up the screen and it was sorted. The screen light is refracted by the plastic coating I assume.
PS: There's foam padding under the original digitizer, the replacement (same serial number) doesn't have the same foam padding, and it does't come with adhesive strips
hallo,
für Amazon Fire 7 5. Generation ist die Seriennummer SV98LN auf dem Gehäuse angegeben. Doch danach gekaufte Digitizer funktionieren nicht in jdem Fall in einem solchen Gerät. Kann ich alo nicht nach dieser Model-Nr. kaufen?
where can i order the lcd screen
Do you really have to desolder the speaker wires?
hi, just changed my cracked screen, I removed all the sticky adhesive glue from the plastic frame and put the new screen down, but sadly what do I need to help keep it in place? the new screen didnt come with any adhesive :( many thanks
Lacking anything better on hand, I used rubber cement. Wish me luck.
I used double-sided tape, cut to 5mm width. Worked for me
mrkfiore -
I used double-sided tape to hold down the digitizer. No more shattered screen and works perfectly.
mrkfiore -
I would use thin double sided tape, or even something like B7000 or E8000
all done to spec, picture looks good but no touch response??
Does any one know where the Digitizer can be ordered from (apart from ebay) are Ifixit not going to stock this part? I know Amazon allways change parts and are a nightmare but someone somewhere must have bought the surplus stock from the factory making them? Thanks
James Caza - 返信
So yeah, I never desoldered that baby speaker :) just sticked him on the motherboard while away :D
For the removal of the digitizer, I had no means to heat whatsoever.... but didn't need it;
I got to grab a corner the hacking-way: I melted a 3mm hole on the plastic to get a tool under the screen :) and that was it (if a little smooth jack-like hole doesnt scare you, it's a real shortcut)
Then to get around more easily I added a bit of heat, but... just rubbing the screen with my fingers for 30secs was enough ! (really hot ! ouch !)
Very nice guide anyway, full of good advice !
Where can I buy the screen and lcd? I live in the Phil
Do you have to desolder the speaker when replacing a broken screen reply with email blackmask184@gmail.com
No, I didn’t. Just be careful with the speaker and wires.
mrkfiore -
I’m with mark, changed a cracked screen, but there is no mention of what to do about glueing down the new screen. Otherwise great tutorial.
Brian Byrd - 返信
do you use adhesive to hold down the screen email me at blackmask184@gmail.com
When replacing a screen can you use adhesive strips or uv glue and does it matter which one we do. blackmask184@gmail.com
I used double-sided tape
mrkfiore -
Really helpful guide. But really how do you keep the screen down without a adhesive. Also I damaged the LCD screen in the process of removing the damaged touch screen. Guess the heat affected the LCD screen. Be careful on that one.
do you sell LCD of these unit cause my screen has broken.thank u
These steps helped tremedelously. I only had a few problems. Number 1 it’s harder then it looks to seperate the old lcd screen from the frame. Use tape on shattered screen to prevent more shards from happening and being broken up. Be careful. Number 2 there’s nothing holding the new screen to the frame. Make sure you have something to make it stick or use glue. I used double sided tape. Number 3 make sure you order the right screen for your kindle.
I just finished replacing my screen & digitizer. It was easier to order the whole thing on Amazon. Did a tablet repair once before and did severe the cable. Now I just buy the screen and digitizer already together. These directions were very helpful. Especially since no other website showed how to get the digitizer out. No need to desolder the battery. Just pry it up, it’s only in the spot with 2 sided tape under it. Make sure to use plenty of 2sided tape on the frame so the screen will stay down once you set it back in.
I (a mom with absolutely no tech background) just finished replacing a cracked screen *toot*. Thank you so much for the instructions! However, I never was able to remove the motherboard or the battery. They were very firmly glued down. So, if you’re only replacing the screen, the only things you really need to disconnect seem to be the digitizer and the volume buttons (because they get in the way of the digitizer). Getting the glass off was a pain in the a$$, maybe because I was using a hairdryer lol. But I found that putting pieces of paper underneath the glass as I went along made it much easier.
Again, thank you so much for the instructions. I definitely could not have done it without them! My son is elated to have his tablet back.
So, just to be clear, you only removed the volume button and just pried everything up?
Hi,
My Tablet (Amazon fire 7) woeks well. touch works but LCD is just black. Under the sun light I can see booting logo, clock, battery and some details but there is no light on display?!! I am looking for a display if anyone has ! Please contact me by email: vaziritabar@hotmail.com
Where can I just order the shell? My digitizer is good… but my son cracked his plastic case to smitherines around the edges… leaving shards of plastic and big gaps! I need it in blue….
https://www.amazon.com/gp/product/B0792V...
I went with this digitizer. It worked. The P/N on the box is:X001OF8VT3 The screen comes with new adhesive strips
clean the old adhesive off the frame. There is enough to reattach the LCD also. It’s a little sheet of 3M300LSE double sided tape strips.
Stick them down to the plastic and then remove the brown release tape.
The tools pictured are essential! I bought this kit.
https://www.amazon.com/Zacro-Opening-Spu...
The ribbon cables for the digitizer and LCD both have little pop up retainers that hold the ribbons in. The LCD ribbon is a ##&&% to get in.
Everything the instructions say to do, you you need to do. The only exception is the speaker wire.
There were two protective covers on the back of the digitizer, be sure to get them both. Leave the front one on till way last!
The battery is only attached around it’s perimeter. It can be pried out around the edges.
This procedure is right on! Thanks
Hi, can anyone help or advise I’ve changed the cracked screen put it all back together, When I switched it on I had the rainbow flare ( took apaprt again to take of screen protector on the inside of new screen) Now when it switch it on i’ve got grey stipe lines across the screen , checked all the connections, they look ok . What have I missed anyone know
I have this too minus the rainbow flare. I have the wide gray stripe and the only cause I can find is a very minor scratch on the black covering down the left side of the LCD. It feels like there might be a micro scratch right next to the scratch in the black tape. I wonder could this be the cause.
Rongwey -
Edit is not an option so I re-post. After fiddling with the LCD connector, the gray bar is gone but the display remains white with no picture. I can hear the startup sound . This makes me think there’s no damage to the LCD as I’d thought but may be a bad connection. Something else I can’t see without a microscope. Either way, I’ve ordered a replacement LCD and will say if this fixed it making the white screen absolute damage.
hallo,
es gibt:
Kindle Fire 7" (2015 5th Gen) Model SV98LN glass/touch digitizer
und
AMAZON FIRE TABLET 7, 7TH GEN SCREEN REPLACEMENT SR043KL
beide gibt es mit Gummirahmen innnen und ohne diesen Gummirahmen - was muss ich beim Kaufen des Digitizer als Unterschied beachten?
p-faulstich@web.de
Solo ha faltado sangre de unicornio para poder arreglar esta tablet de amazon, es lamentable que los fabricantes hagan estas cosas tan complicadas de reparar que no te queda mas remedio que comprar una nueva.
so I have replaced the LCD screen and the digitizer and everything is working good however I have all these hazy looking colors when I move the thing so I opened it up again and took off the other paper the was inside on the digitizer and put it back together than I could not see anything The lcd is working great but cant figure out where that color is coming from and I read everyone else’s comments about the covering but when I remove mine than nothing shines through help please! kids tablet
Where can I get a blue replacement LCD and digitizer?
Can you replace just the digitizer?
A lot of pop up