はじめに
Prerequisites 1. Follow the procedure in Before working inside your computer.
必要な工具と部品
-
-
Remove the two screws (M2.5x5) that secure the base cover to the palm-rest and keyboard assembly.
-
New line. Loosen the two captive screws (M2.5x8.5+3.5) that secure the base cover to the palm-rest and keyboard assembly
-
Loosen the four captive screws (M2.5x1.7+3.3) that secure the base cover to the palm-rest and keyboard assembly.
-
-
-
Disconnect the battery cable from the system board (applicable only if not disconnected earlier).
-
Remove the four screws (M2x4) that secure the battery to the palm-rest and keyboard assembly.
-
Remove the four screws (M2x3) that secure the battery to the palm-rest and keyboard assembly.
-
Lift the battery off the palm-rest and keyboard assembly.
-
-
-
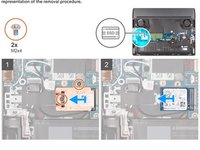
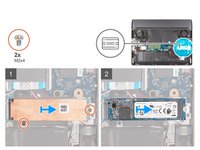
Remove the two screws (M2x4) that secure the thermal shield to the solid-state drive and the system board.
-
Lift the thermal shield off the solid-state drive.
-
Slide and lift the solid-state drive off the solid-state drive slot on the system board.
-
-
-
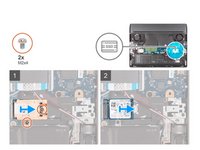
Slide to remove the screw mount from the palm-rest and keyboard assembly.
-
Slide the screw mount into the other screw mount slot on the palm-rest and keyboard assembly.
-
-
-
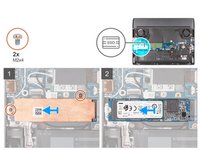
Remove the two screws (M2x4) that secure the thermal shield to the solid-state drive and system board.
-
Lift the thermal shield off the solid-state drive.
-
Slide and lift the solid-state drive off the solid-state drive slot on the system board.
-
-
-
-
Slide to remove the screw mount from the palm-rest and keyboard assembly.
-
Slide the screw mount into the other screw mount slot on the palm-rest and keyboard assembly.
-
-
-
Lift the system board Mylar to access the memory module.
-
Use your fingertips to carefully spread apart the securing-clips on each end of the memory-module slot until the memory modulepops up.
-
Remove the memory module from the memory-module slot.
-
-
-
Remove the two screws (M2x4) that secure the rear I/O-cover to the palm-rest and keyboard assembly.
-
Remove the two screws (M2.5x5) that secure the rear I/O-cover to the palm-rest and keyboard assembly.
-
Disconnect the Tron light cable from the system board.
-
Firmly grasp the sides of your computer with both hands and push the rubber feet on the rear I/O-cover outwards with yourthumbs to release the rear I/O-cover from the palm-rest and keyboard assembly.
-
Slide the rear I/O-cover away from the palm-rest and keyboard assembly.
-
-
-
Remove the two screws (M2x4) that secure the USB Type-C port bracket to the system board.
-
Remove the USB Type-C port bracket from the system board.
-
Open the latch, and disconnect the display cable from the system board.
-
Disconnect the Alienhead LED cable from the system board.
-
Peel the display cable from the system board.
-
Disconnect the power-adapter port cable from the system board.
-
Peel the power-adapter port cable from the system board.
-
Disconnect the I/O-board cable from the system board.
-
-
-
Disconnect the speaker cable from the system board.
-
Open the latch, and disconnect the touchpad cable from the system board.
-
Open the latch, and disconnect the keyboard-controller board-cable from the system board.
-
Open the latch, and disconnect the power-button board cable from the USB board.
-
Open the latch, and disconnect the RGB-IR camera cable from the USB board.
-
Peel the RGB-IR camera cable from the system board.
-
-
-
Remove the eight (M2x4) screws that secure the system board to the palm-rest and keyboard assembly. (The USB board and heat sink are attached to the system board.)
-
Lift the system-board assembly off the palm-rest and keyboard assembly. (Before removing the system board, give sufficient time for the heat sink to cool down to avoid injury.)
-
-
-
Remove the three screws (M2x2) that secure the power-button bracket to the palm-rest and keyboard assembly.
-
Lift the power-button bracket off the palm-rest and keyboard assembly.
-
Peel and lift the power button off the palm-rest and keyboard assembly.
-


To reassemble your device, follow these instructions in reverse order.
